 |
My apologies
for taking so long
to log my
ADVENTURES re: the making and re-makings of the bathroom
@
LAND'S END
I've no excuse to offer
other than that there were times I was just too lazy
and/or uninspired to work on it.
Inspiration for the bathroom
came in waves
but as of today,
(fingers crossed)
all that's left to do
is to add the ceiling to the cottage and then move on to the exterior.
So without further delay-
let's weigh anchor and
let the Orinoco flow!
|
 |
| so.... Back in March 2020, before I began work on the bedroom, https://studioeminiatures.blogspot.com/2020/04/a-long-days-journey-into-night-lands.html I took the opportunity of replacing the bathroom's original wallpaper to what you see above. Both the bedroom wallpaper and the bathroom wallpaper, were glued end to end onto a single template, then that template was glued onto the exterior wall. The bathroom wallpaper also needed to be installed onto the interiors of all the connecting walls before I could finish the bedroom, and the kitchen. It was only after I'd completed both of the other rooms, that I took a long, hard look at the effect of the vertical stripes on all 3 of the bathroom walls. |
 |
| The space felt like a shoebox very tall and narrow, and the skinny vertical stripe accentuated its "elevator-look" even more. After thinking over what to do and where to begin, I decided the best course of action was to break up the vertical stripes with some "cottagey"wainscotting, similar to what's in the living room. In hindsight, it would have been better to have installed it as shiplap but that's now water under the bridge. I made 3 wall templates using cereal boxes and proceeded to glue coffee stir sticks to the card. I made the wainscotting higher on the back wall than on the sides, just as I'd done in the living room; but because of the protrusions of the 2 channel supports which I needed to use to stabilize the interior walls, it caused the wainscotting to stop short of the corners which presented an additional design problem for me, of how to tie the panels in. |
 |
 |
| I didn't want to paint over the dark wood nor did I want to paint the wainscotting panels dark, so I postponed making any decisions until all the wainscotting was finished. |
 |
The Bathroom door(s): |
 |
It had taken me a while to finally go with a split door (minus a threshold) rather than with a single one. These doors proved to be more difficult to install than the bedroom door had been. Very Frustrating! Even so, it resulted in additional usable floor space inside this tall skinny space which was worth the extra effort. TUBS: I have at least 4 different styles of miniature tubs in my drawer of bathroom fittings. I've been finding them here and there, usually in the toy department of thrift stores. Some are in decent shape and some are not. I decided to use this ceramic one because I think it suits the style of this cottage. The interior of the tub is rather crude. And even with some sanding it's only just "OKAY" which is Ideal for Land's End! |
 |
The toy sink and toilet pictured below are also from the thrift store. |
 |
And although they're obviously a set, the toilet is puny next to the HUGE bathroom sink so I jetisoned the toilet and only used the sink which was not only the right size but the right vintage style too! |

 |
It was easy to unsnap the sink from its backing, and cut away the support brackets from the body of pink plastic. |
 |
 |
| As work on the bathroom continued, I eventually cut the brackets down to their bare minimum and painted them black which you'll see later on in this post. In the meantime... The toilet I decided to use came from the candy section of a dollar store with lollipops sticking out of the hole at the top of the tank and a bowl full of sour powder. The lollipops were Yummy but the powder was chucked overboard! - YUK! |
 |
| And because the light passed through the plastic, I ended up painting the insides of the plastic with a couple of coats of white chalk paint as well as black acrylic paint for more opacity and it worked! I've covered the hole on top of the tank with a little pan which Janine had given me and filled it with a colourful collection of tiny sea shells. I still have to decide on an flush handle but this is how it looks so far. By the way, the lid opens and closes but there's no seat over the bowl and I can't be bothered making one for a lid I'll never lift. |

 |
Because the style of this toilet is more modern than vintage, I went online and ordered a vintage looking one and will wait to see which one looks best: but in the interim; this one will do. I'll also mention the addition of a shelf on the back wall.  was instrumental in determining the final layout of the bath fittings, because in order to easily access the hooks and the shelf; I needed to move the tub to the side wall. In order to put a mirror over the sink I needed enough wall space above it which by default left the toilet under the bathroom window and directly in front of the bathroom doors: not an ideal location for a toilet in my estimation, but hey! "them's the breaks". I didn't realize at the time I was installing the doors, that the toilet would end up in front of it, but I'd intentionally installed the door opening in line with the window so that when you look through there's a view staight into the kitchen from the outside; here's the view from the outside the bathroom window-IN:  And from the inside the bathroom -OUT  LIGHTING: I was going to go with the lantern but I felt that the light was too dim and yellow. I ended up making one from brass tubing; a white plastic ball and assorted bead caps |
 |
| I threaded the wires through an overhead beam and hooked them up to a transformer to see if I liked it and I DO! Later on, in the build I shortened the brass tube by 1/2 inch to raise the fixture higher. |
 |
As the bathroom began acquiring a personality; I was taking more and more pictures. It was as I was looking at the following one, that I thought about adding more shelves  Obviously, I needed a place for storing towels, bath products, photos and other related items AND I had all this available vertical wall space! At first I tried an enclosed cupboard shelf unit which looked top heavy as well as impractical. I felt that the shelves should be open and simple, so I made some with tongue depressors, and stained them brown to tie in with the support beams in the corners. I didn't like it that much |
 |
| and although the green towels fit; they didn't look good either. So- I painted the shelves in a watery, off-white chalk paint; enough to cover the wood stain but not completely obliterate it. Then I glued the shelf unit onto the wall and began searching through my stash to find better towels and other cool stuff to place on the shelves. I spent the next few days trying out different combinations until I could get most of what I wanted, on display, after which I continued editing and tweaking and photographing it. |
 |
| It wasn't long before I decided I wanted to add a light to the corner of the bottom shelf, so I found one I'd saved in my stash, which had suffered severe damage during those infamous"garage" days. It used to be a shiny hanging lamp fixture, but 12 years of neglect in my damp garage had corroded the metal so badly that it literally fell apart in my hands. Nevertheless, it was precisely because of all of its green rust that I'd held onto it, and I was determined to find a way to reuse it. I carefully unthreaded the fragile wiring from the lamp housing, and then removed any left over crumbling bits of metal. Then I reglued the main housing back together and rethreaded the wires back in. In my stash of light fixtures I found a white plastic chimney and slid it over the bulb; then I turned the unit upside down and sat it on the shelf. I fed the wires from the back of the lamp out through a tiny hole drilled through the exterior wall- "And then there was Light!" It totally opened up the visibility of the items on the shelves! HAPPY HAPPY DANCING!!! Arrrrggg! |
 |
 |
| At This Stage the shelves were glued in but not the wainscotting panels. Even so, I continued busily decorating the entire bathroom as if they were- talk about a commitment phobia! |
 |
| With the shelves done , it was over to the sink side...  I found a loose bit of Chrysonbon plastic plumbing which perfectly fit the underside of the thrift store sink; it was as if they'd been made for each other! Still not sure about the mirror however, I remain confident that the right mirror will eventually turn up. Progress is being made and I'm taking more photos!  as I'm looking at the shelf and the light fixture, I'm thinking that that corner still needs something... I LOVE the light but it's hard to photograph and now I want something to soften it, without changing it. I decided that the shelves needed a draping plant. Specifically a PLASTIC PLANT! I happened to have a set of scrapbook stickers of ivy which looked 50's vintage. I'd been pondering how to use ever since I got them. For my fake ivy I peeled the stickers off the backing and stuck them onto thin Japanese calligraphy paper. |
 |
below you can see the clear plastic outline of the stickers |
 |
I cut out the ivy vines from the surrounding materials. |
 |
 | ||||||
| using a felt pen, I painted the paper backings of the leaves with the green marker and the vines in brown. Then I took lengths of fine beading wire and glued the wire to the underside of the vines. If I'd been thinking ahead, I would have glued the wire in between the paper and the sticker FIRST, but this way worked equally as well. this is the glue I used for the wire
|


 |
| and down... and down ...   providing a thin "living" veil in front of the light fixture which visually softens each of the shelves as well.  Let me show you!  Next to the lamp are the ancestral photos of The Captain as a boy and then as a young man. The photos share the space with a treasured heirloom vanity set which the Captain had brought home for his wife after one of his extensive ocean voyages. The china is English and Beautifully hand-painted with delicate lily-of-the-valley flowers. (this was an indulgent Ebay purchase I made without any regrets!)   Next to the china is a glass jar of shell soaps ( nail appliques ordered from china) Next to the soaps are the toiletries of man of the house consisting of aftershave; deodorant spray; soap on a rope; liniment and cotton balls These reside in a shallow box closest to the sink. |
 |
On the middle and top shelves above the china, are stacks of assorted linen and fluffy white cotton towels tied with string or pale blue ribbons. You can find my easy towel tutorial here: https://studioeminiatures.blogspot.com/2013/03/throwing-in-towel.html  |
 |
| The middle shelf holds the towels and a fancy millefiori bottle and a gold lidded glass jar- ( two buttons glued together topped with a filigree bead cap) |

 |
| At this stage, I decided it was time to quit stalling and glue the wainscotting onto the walls- About time! |
 |
| Here's a quick tour of the lower sections of the bathroom walls. As I mentioned earlier, on the back wall of beneath the shelves is a strip of wood with the nail pegs imbedded for hanging wet towels onto. There's also a basket of Victoria Bliss magazines next to a hot water bottle and a bath brush; and an ornamental life preserver. The hot water bottle and back brush are painted Chrysonbon pieces and the life preserver was in my stash. I should also mention that by now I'd painted the tub and the underside of the sink with black acrylic paint followed with a couple of coats of a blue Quick Dry acrylic enamel which stubbornly refused to set- Quite Maddening! Eventually the paint did dry but not until after my fingerprint impressions were imbedded in the paint- ARGGGGH! >/< To try and fix(disguise) it I tried lightly sanding then aging the blue paint which was somewhat successful.  Also, because the inside of the tub is a yellowish/white and the inside finish of the sink is brighter, I began dirtying up the inside of the sink to lessen the contrast between the two fixtures but the truth is that they'll never match, so the back story is that the fitting of this cottage were reclaimed salvage which have been replaced piecemeal as necessary. But years of normal wear and tear have taken their toll and the once fresh paint is plainly showing its age. But as long as they still function, the owners are keeping them. To dress up the old tub, I made a bath tray from a section of white picket fencing. |
 |
| and here's the stuff I've put on it. |
 |
| There's a shampoo bottle and a lidded jar; a basket of two soaps made from a green eraser and some Japanese silicone putty. Next to the soaps are an emery board and a loofah. Here's how I made the shampoo bottle  for cleaning between your teeth, which were purchased from a dollar store. I removed the brush and cut down the rest with a box cutter.   to add interest to the front of the bottle and painted the top with black nail polish, before gluing it to the bath shelf.   I began with a pair of screw back earrings similar to the one pictured above. I cut off all the surplus metal from the screw posts. I used a piece of soft soldering metal to form a faucet and glued a sliver of hollow plastic tubing to one end and a flat bead spacer onto the other end. I painted all 3 units with a metallic nail polish for uniformity. |

 |
 |
| When they were dry, I glued them onto the wall. |
  | ||
The collection of bath toys are there for when the grandchildren come over on the weekends. Hey Birgit! do you remember giving me the rubber duck on the right for Christmas? ❤️ THE SINK
|

 |
| Initially I left the chain on but because the frame's hung with its backside forward, the mirror refused to lay flat against the wall and required lots of blue tack to keep it straight. |
 |
SO in the end I removed the chain But after I'd removed the chain I was left with a hole in the wallpaper where the nail had been and it was right where you could see it! SO HOW COULD I FIX IT? I ended up adding a light fixture over the bathroom mirror to cover the hole. I'd debated a long time on whether or not to put a light over the sink and now I had no choice. I'd tried out 2: one I made and one I'd ordered and went with the one I'd made. In keeping with the salvage restoration theme, I ran an electrical conduit up from the base of the lamp so that I could eventually feed the wire up and out through the roof. This lamp is actually pretty rough looking and after I'd made it I was going to scrap it because I didn't like the look of how I'd wrapped the wires around the curvy frame. WHY WHY WHY? I had painted the fixture numerous times trying to disguise "the ugly" wires but nothing worked and the successive layers of paint made the problem worse! Even so I went with it anyway; ugly and all.  Actually adding a light over the mirror was a good idea not only for its practicality but also because it balanced out the light on the shelf. and it seems that given enough time- even ugly will grow on you! |
 | ||
 I made some daisies for the bathroom sink but I'm not happy with the vase, so I ended up changing it.
|

 |
| A bathrobe hangs from a nail in the door. |
 |

Now skipping over to the loo!
As I've said at the beginning
I may end up changing out the toilet for an older model
but it happens to be as white as the sink
which makes it acceptable.
Janine's shabby pan has made a nice container
for assorted shells
 |
| Fatima's jar of blue hydrangeas grace the wall above. |
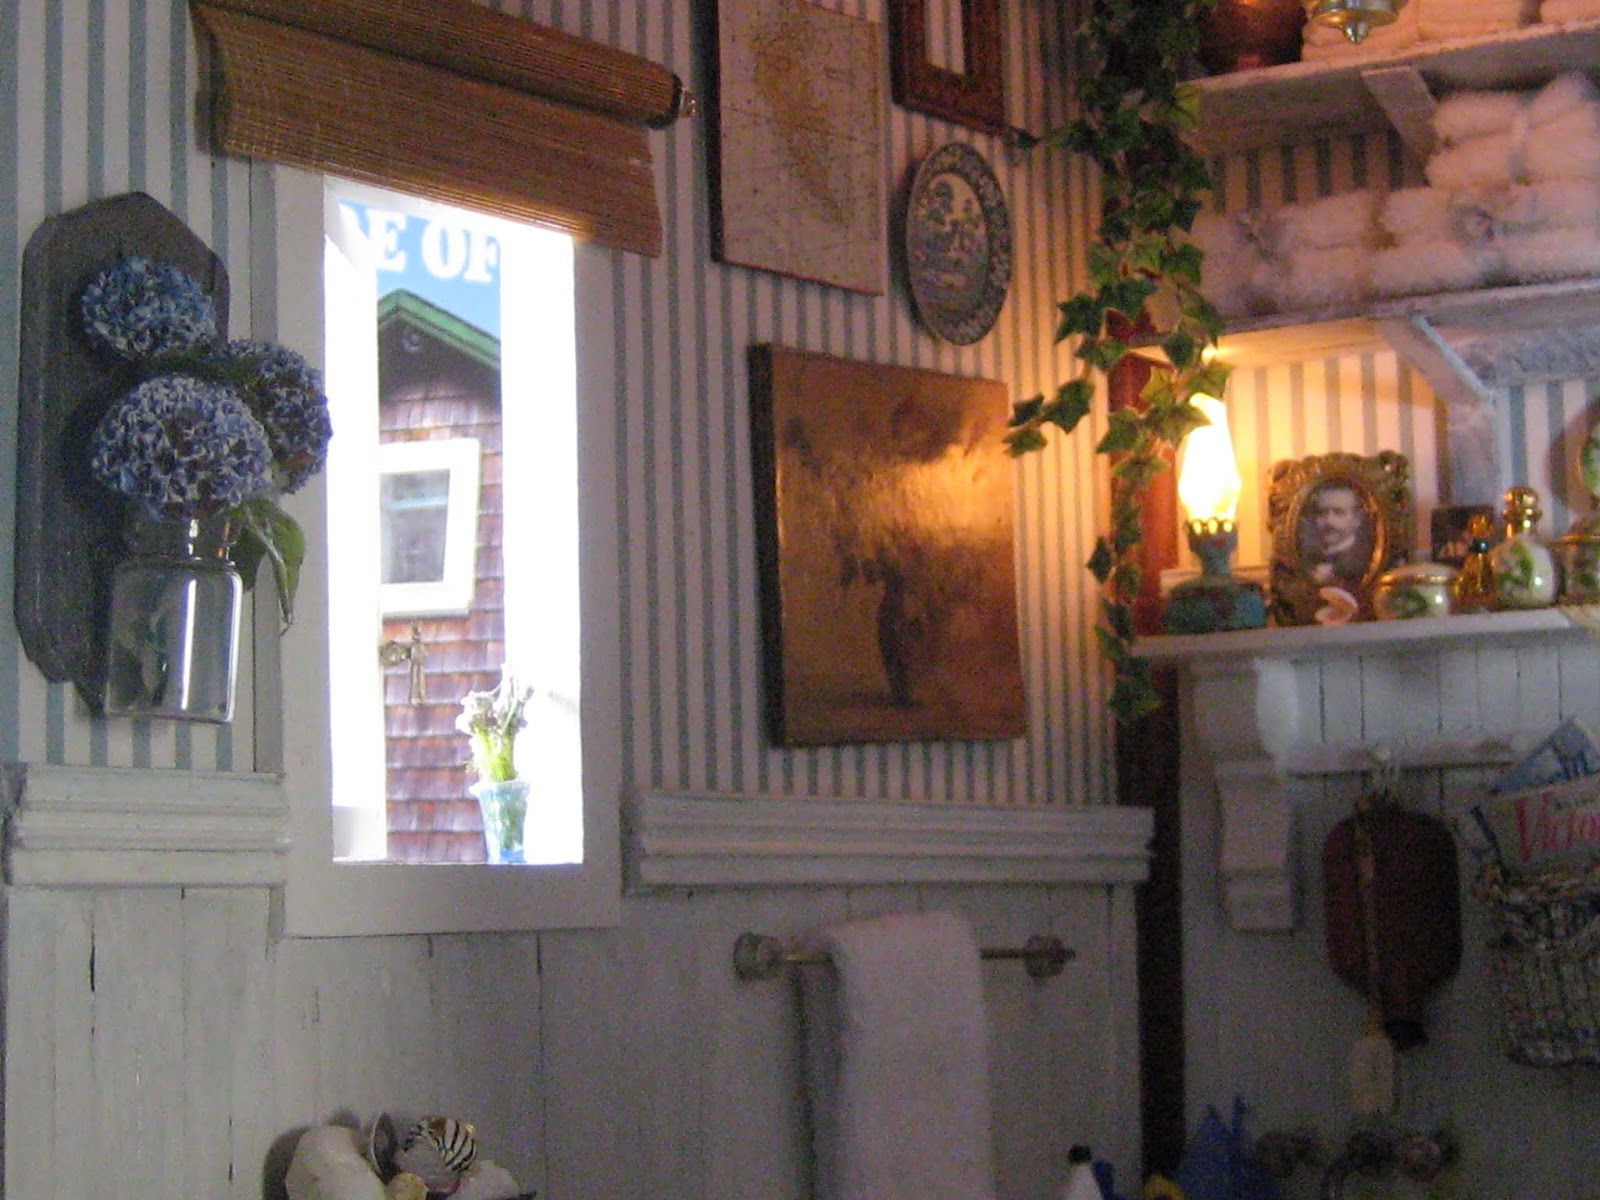 |
| And on the other side of the window, is a collection of fleamarket art consisting of: vintage floral painting on hardboard (cut from a magazine); a nautical map ( another magazine cut out); an empty carved square frame and a blue and white plate which I won in a Ebay lot of assorted kitchenwares. |
 |
| There were 2 plates included in the lot, one you've already seen above the side table in the bedroom. https://studioeminiatures.blogspot.com/2020/04/a-long-days-journey-into-night-lands.html Both are signed but remained unidentified until a couple of weeks ago when I saw 2 similar plates listed on Ebay. The initials on the backs were the same as the 2 I had. I was THRILLED to learn that my plates were by Ellen Krucker Blauer In case you're not familiar with her name, Ellen Krucker Blauer and her husband John, were owners of San Francisco's The Miniature Mart back in the early 70's and 80's. They were avid collectors and talented miniaturists, as well as regular contributor to the Nutshell News magazine. |

 |
| I was relatively new to the miniature world in the mid-seventies and a total devote to Nutshell News, which is how I knew who Ellen Krucker Bleauer was. When my husband and I took a late honeymoon trip to San Francisco I wanted to go to their store SO BAD!!!! but we didn't have enough time or enough money; my how things change... I loved my plates prior to my knowing who made them and even more so now because of all the mini nostalgia attached to them. |
 |
 |
re: WHAT'S ON DECK: Down on the warm cork floor between the sink and the tub, is a striped cotton area rug with a pair of slippers made from bent pipe cleaners, trimmed with bunka and lined with paper. |


 |
 |
| A basket of dirty laundry sits in the right corner under the sink along with a weathered blue stool. It took several tries before I was happy with the paint finish on the stool which looks neither too old or too new. So there it is - and now you've seen everything! but here it is all over again ...    and Now Voyager, you've journeyed through the bathroom and have arrived at your destination. watch your step as you disembark and please come again soon! Arrrrggh!  ⚓️ elizabeth Wwg1WgA |
.jpg)


Oh Wow! Elizabeth - you've made my morning posting this fantastic, fabulous, packed-full bathroom. It is truly wonderful....now I shall just go back and read it all again and study the pics/ even more. Thank you.
ReplyDeleteRx
What a WONDERFUL comment to being MY MORNING with Robin! :D
DeleteI Thank You Very Much for every encouraging word and especially that you are willing to traverse through this VERY LONG POST all over again which is VERY Gratifying to Hear! :D
elizabeth
Absolutely fantastic ! I don't know where to begin. It is all so perfect. Once again the attention to detail is amazing. Love it to bits!
ReplyDeleteThank YOU so Much Linda!!! :D
DeleteI didn't hold out much hope for this room at the very beginning, but as I was building it, it began to take on a life of its own, which is always what I hope for, yet I never know WHEN it will happen.
The shelves turned out to be the pivotal point, as well as my being able to add more towels and the painted china to the room which not only made me VERY VERY HAPPY to look at, but they also gave the bathroom a rounding out; filling in the rest of the history this tiny space required. :D
elizabeth
It's truly incredible what you managed to do in such a small space. You created a bathroom with character thanks to all the various accessories that tell a story (like the pictures of the captain). I also (of course) love the nautical touch. It was a great idea to have several shelves on the wall, the wall seems wider and less high and it's perfect to display your various miniatures. The view from the windows is fantastic. You never stop amazing me with your work.
ReplyDeleteGeneviève
Thank You Genevieve and I totally AGREE regarding you WONDERFUL comment about the shelves! :D
DeleteThe claustrophobic proportions of the bathroom would have become far more apparent without those shelves on the wall, because as you've stated, the shelves widen the view so that it feels and looks bigger than it actually is!
I tried my doll in front of the sink and there's just enough room for her to stand and turn around without falling backwards into the tub which was a great relief to me!
And regarding the view outside the bathroom window: I have been saving a magazine cover depicting a seaside cottage garden for over 5 years and my ultimate goal is to try and duplicate some of the vibrant colourful plants in miniature, which I know you've enjoyed seeing out the window, just as much as I have! :D
elizabeth
The bathroom is absolutely amazing. I am always overwhelmed by all of the accessories that you are able to find or make that you fill your rooms, giving them that lived in look. In the old farmhouse where I grew up built in 1890, the bathroom was an add-on to part of original house that burned and it was a very small, but functional bathroom. My dad commented once that the trend had been to build the bathroom as small as possible and still have it function. I'd say that you accomplished that with a great deal of style. Bravo.
ReplyDeleteThank YOU Ann!!! :D
DeleteI find it such an Encouragement to hear REAL LIFE STORIES regarding personal experiences, and how they translate into our various miniature projects. :D
Hearing your 'Old Farmhouse Bathroom' remembrances, has added to some of your house history, to mine.
Your story made me think about my great grandmother's old 1930's house, which had a bathroom the size of a hall closet, so I totally agree with your dad's comment about them being all about function rather than style.
My my, how far we've come! Bathrooms are no longer the places you quickly visit out of necessity, but rather destination rooms for you linger and be entertained in! and I am THRILLED Ann, that you've chosen not only to linger but have been entertained as well! :D
elizabeth
Oh MY!!! Seriously Elizabeth, I have never seen something like this bathroom. I have many favourite miniatures, I have seen many beautiful houses, rooms, I mean there´s plenty of talent out there! But girl, you are unique and your creations are soooo unique and wonderful that I have no words to describe how I feel about them. This bathroom feels so real, so authentic, it´s just perfect. I loved the discovery of every wall and every little detail, you didn´t forget a thing!! AMAZING!!😍😍😍😍😍😍😍😍😍😍😍😍
ReplyDeleteThank YOU so MUch Alexandra!!! :D I think that this is the HIGHEST compliment any miniaturist can ever hope to receive especially from one of their peers! ❤️
DeleteNevertheless, I have to say that having sunlight infiltrate a miniature room, will automatically make it look more real in pictures and definitely MORE than the sum of its Many Mini Parts ! ❤️
elizabeth
Once again, Elizabeth, I am simply awed by your talent and vision. I did get a chuckle when I saw the door at the beginning of your post. Just yesterday I had to solve my own dilemma of a tiny bathroom and a door that was too big so I ended up cutting the door in half and making it a double opening door - then I saw yours this morning. I guess I can't be going wrong when I find a solution that ends up being exactly what you would have done. The bathroom is fantastic and with the shelves and all the great details on them, the vertical stripes actually look fantastic. If you had placed them horizontally and then added all the horizontal details it wouldn't have looked right. Once again your first instincts turned out perfect in the end, even if you doubted yourself at the beginning. Absolute perfection!! - Marilyn D.
ReplyDeleteThank You So Much Marilyn for placing your confidence in my decision about using the split bathroom doors, and I am DELIGHTED to learn that you've taken the same course of action with yours too! YOU GO GIRL! :D
DeleteI wish I could say that I'd been "pre-inspired" but it all came about because I was too lazy to construct a door jamb along with 2 door frames for the loose single door I'd been considering, which is why I chose the split door kit which already had both.
It was only after I'd made my final decision to use the door kit, that I realized the added bonus it provided given the size of this bathroom, so it was my LETHARGY which made me chose it! hahahaha :D
elizabeth
OMG I don't know where to look first! It's so wonderful. The ivy plant to soften the light is inspired.
ReplyDeleteThank You Very Much Sheila, and I appreciate your Special Mention of the IVY which happens to be one of my FAVOURITE things inside this bathroom! :D
DeleteIt makes me smile everytime I look at, so I'll make sure to forward your compliments because plants, even mini ones; will thrive if you talk to them! :D
elizabeth
Impresionada me he quedado con tu cuarto de baño, me parece increíble la cantidad de cosas que has logrado poner y en total armonía, es para disfrutar cada rincón felicidades ,buen día:-)
ReplyDeleteI am VERY HAPPY that you've enjoyed this post Rosa Maria and especially that your approval of the various accessories I've managed to squeeze inside this bathroom! :D
DeleteI have been collecting minis for over 50 years and it feels good to be able to get many of them out where I can finally appreciate and enjoy them AND it give me even Greater Pleasure to know that YOU'VE enjoyed seeing them too- Thank YOU! :D
elizabeth
Thanks for this voyage through the small bathroom of "Land's End" cottage. I'm now discovering that this comfortable bathroom may be small, but it's decorated with all it needs for a relaxing moment of the residents!
ReplyDeleteThe ivy stickers are a great find for making a draping plant, but cutting the leaves with a scissor must have been given you a head ache ;).
Your way of making mini plants is inventive, I never would have thought about making them this way.
I love the alternating in things you've put on the shelves, the china is wonderful indeed. You've even thought of the men in Land's End, because they have a well thought out space on the shelf for their toilet) accessories: next to the sink, hehehe ;O)!
I think that I have seen everything into the smallest corner, but after I looked twice over again all of your pictures, I still discovered unseen things...... So thank you for this bathroom voyage, Elizabeth, it was a big pleasure to discover and see it all ;)! Amazing work!!
Stay safe, take care, dear Elizabeth.
Have a nice weekend.
Hugs, Ilona
Thank You Ilona for your Beautiful Compliments and for your Special Mention of the Ivy! :D
DeleteI LOVE that ivy and you're right about the trouble it took to cut around each and every little leaf- a bit of a strain on my eyes but worth it in the end! :D
And because I don't normally have such a noticeable male presence inside my dollhouses and since I had the men's toiletries waiting patiently for over 30 years- I felt compelled to give in and to make some room for them on the bathroom shelf! I'm still looking for a mini razor to go inside the box, but the Captain has agreed to grow his beard until I find him one! ;D
elizabeth
Que maravilla Elisabeth!! Me encanta el proceso, como vas yendo y viniendo con las ideas, adelante, atrás, todas hacemos lo mismo. De un espacio que prometía poco y además parecía demasiado pequeño, has sacado el máximo partido que se le puede sacar. El resultado final me deja sin respiración. Me encanta! Enhorabuena por tus ideas y tu creatividad. Un beso
ReplyDeleteThank You for your INSIGHTFUL comments Matzalen which are Much Appreciated! :D
DeleteI LOVE the way you've described the miniature process as both coming and going; forwards and backwards, which it IS Exactly!
AND
it's the same process for each of us every single time!
I believe that is what keeps us so intrigued and involved with this hobby/passion: that even though it IS the same, it's also always different!
5 years ago I had envisioned more of an Americana Style bathroom: 5 years later, it's become more "Vintage Houseboat", and I have thoroughly enjoyed the transition of it being a "space which promised so little", into one which is more than I'd hoped for! :D
elizabeth
Dear Elizabeth, as Always, I am rendered (nearly) speechless by your artistry!!! The Voyage from the striped walled shoebox to the amazingly perfect tiny corner retrofit bath in an old and atmospheric house-boat-like home is EPIC!!! Your process from one little change to the next... each so exactly rational and inspired by Life.... is masterful! You take us on your journey of "what would be right here...?" to the end result of perfection via an amazing assortment of dime-store finds, cast off pieces, ear-ring posts, tooth flosser cut-offs, sticker transformations and nail art conversions and not least, your Treasured relics...!!! What can I say? It is beautiful and homey and speaks clearly of the souls who inhabit this place (toys for the grandchildren in the bath!)... I don't know how you manage to squeeze so much into 5x7 inches space, but it is cohesive, natural and full but not overly-full! It's Perfect! And we all learn so much along the way, so thank you for this Voyage to Land's End!!! :):):)
ReplyDeleteMy Dearest Betsy- THANK YOU for such a Beautiful comment! :D
DeleteI've treasured Every word Especially "it is cohesive, natural and full but not overly-full! It's Perfect!" and although I can never see my own work as "Perfect" I DO try make it feel as "cohesive and natural" as I possibly can, and always with the objective of full yet not "overly-full" which is why I'm always taking pictures and editing it continuously. :D
I can't tell you how much I Appreciate your words other than to express my deepest Thanks to You, once again! ❤️
elizabeth
I just love a good story and the saga of how this charming bathroom came to be is both captivating and fascinating! You have created the perfect bathroom for Land's End and from such a dubious and humble group of items! It was so much fun to see the tryouts, the cuts, the adjustments and the winners! And to be so inspired by your innovative use of seemingly unlikely candidates! Inweaving your magical tale, you show us the way to think outside the box and never, never give up even when things aren't looking so promising! Every thoughtful detail is a supporting character in the delightful story and I find myself enraptured and ensnared! I am forever enchanted by your builds, in the creative way you make the most of the space but as always the jewels in your crown are the perfectly curated and charmingly featured decor and accessories! Oh Elizabeth! You've done it again and I am thrilled!
ReplyDeleteThank You Jodi for your Charmingly Delightful comment! :D
DeleteI have enjoyed reading and re-reading every word and laughing out loud re: your choice of the word 'SAGA" which is how my posts regularly tend to run: hahhaha! :D
But it makes me VERY Happy to know that you have enjoyed my "magical tale" of this bathroom's entire inception, which as I hope you can tell; was Great Fun for me too! ❤️
elizabeth
I'm crossing my fingers that I can post this...what a great bathroom! And a really good use if a strange space. I love your methodology, it's similar to mine, but you really do go the whole nine yards! I think your plate story is wonderful, it's great to have sentimental things that remind us of before. I'm not sure I could cope going to the loo with the dear Captain looking on though;) !
ReplyDeleteHurrah!
ReplyDeleteHurrah INdeed Jonquil!!!! :D
DeleteI am sooooooo Glad that your comment was able to break through the Blogosphere Barrier and I bid you WELCOME! :D
and THANK YOU for Lovely Comment too!
It was such a unexpected bonus to find out the origins of the plates and also a surprise that they could so quickly transport me backwards in time almost as if it were yesterday.
I got a good chuckle about your hesitancy of using the loo with "the Captain looking on" but rest assured that he only had eyes for his wife: LOve .... True Love! ..... :D
elizabeth
ya know they say kitchens and bathrooms sell houses but im thinking the salty old dog has a lady friend that comes in for a little afternoon delight and has the bathroom suited to her taste (she probbly knows hes messing about with the redhead at the bar and shes prettied up the bathroom) I watch way too many soaps. again youve hit it out of the park
ReplyDeleteLove
Marisa
Ha Ha Ha! :D Your script sound like a bit of Peyton Place Marisa but I can't deny that we each should be able to read a story of our own into the projects we see, So Thank You, even though the Captain would be SHOCKED to hear you say so!
DeleteIs there a redhead at the bar? hahaha :D
elizabeth
WOW another masterpiece. You have such a great imagination AND patience. I'm such a minimalist, once I've done the main work on a room I want to start on another, telling myself I will go back later to add accessories! I love the way you "see" what will work, and the way you adapt stuff from your stash. It's a gorgeous room.
ReplyDeleteThank You VERY MUCH Polly! :D
DeleteI do believe that there's a style(s) we naturally gravitate towards and sometimes it can be the exact opposite in miniature of what we would chose to live in in Reality.
I am a traditionalist at heart but I also enjoy scenes of minimalism both in RL and in miniatures although I feel unqualified to try and reproduce them, because I LOVE LOVE LOVE miniature accessories way too much!
I usually try and fit in everything I can from my stash; then take a bunch of photos; and then begin editing things out - it's quite a process but the photos allow me to see things as they are and to keep things in check, as I decide "what will work"
But I know what you mean about leaving one project to start another which is exactly what happen with Land's End- a 5 year time lapse!
It feels good to have the interiors DONE so I begin work on the outside; guilt free! :D
elizabeth
Elizabeth, your ingenuity and attention to detail is awe-inspiring! And your patience. This is so perfect.
ReplyDeleteAwwww Thank You Very Much for your Kind and Lovely comment! :D
DeletePatience never feels like a chore when I'm playing with my miniatures but the prep work leading up to it always does!
The next phase of completing the exterior is bound to be boring so I'm already gearing up for it, and no doubt MORE PATIENCE will definitely be required! :D
elizabeth
Hello Elizabeth, well my, my, you have outdone yourself once again! I am amazed - no astounded - that you saw candy at a dollar store called "mini sour flush", in the shape of a john of all things and you made a toilet for a gorgeous miniature bathroom! Your knack for thinking "outside the box" is phenomenal! Also a bottle of shampoo from a T pick! Very inspiring - Love everything about it...Michelle
ReplyDeleteYour comment gave me a chuckle and I Thoroughly Enjoyed reading it so THANK YOU, Michelle! :D
DeleteAll I can say in response is that Miniatures can turn it in the most unlikely places but when they're filled with candy, it's EVEN BETTER! :D
elizabeth
Quel voyage dans cette salle de bain !
ReplyDeleteIl faut faire le parcours plusieurs fois afin de voir tous les détails, que d'objets divers à découvrir.
Ce voyage est très enrichissant ! Je viens une fois encore de prendre une agréable leçon de miniature.
Ta détermination à faire et refaire pour parvenir à un résultat satisfaisant est impressionnante, je pense avoir été influencée pour refaire le mas ;)
Bon week-end Elizabeth !
It gives me Great Pleasure to have been influential regarding your determination to continue to realize your vision for your French Country FarmHouse, Joce! :D
DeleteI have done the same thing many times over with past projects such as Villa Leone and so I recognise how much bravery it requires to begin the processes all over again.
Our dreams and visions often change as our tastes and skill levels increase and speaking for myself, I'm happy that I took on this bathroom project now
instead of 5 years ago, otherwise I probably would have gutted it and started again too!
But I'm Satisfied with the results of this tiny room and as long as YOU and the Captain are content, then I'll be contented with it too! :D
elizabeth
Nunca terminas de sorprenderme! es increíble el maravilloso baño que has hecho en tan reducido espacio,es tan real y fantástico,cada detalle se conjuga y acopla perfectamente a todo el conjunto,felicidades de nuevo Elizabeth!!!
ReplyDeleteThank YOU for your Congratulations PIlar! :D
DeleteFor me this bathroom was a labour of Love because other than installing the doors, the majority of its construction developed rather smoothly and without too many redo's.
It makes me VERY HAPPY that you have enjoyed your visit and I Treasure your BEAUTIFUL comment! :D
Wonderful bathroom, I love all little details. Time to improve mine! :) The ivy tutorial is incredible. Hugs, Melli
ReplyDeleteThank You VERY Much Meli! :D
DeleteCutting out the strands of ivy was a bit fiddly and time consuming but once they were in the jug and draping over the shelves, it was worth every minute!
It is one of my favourite features in this bathroom and I'm DELIGHTED that you' have enjoyed them too! :D
elizabeth
Elizabeth your attention to detail and use of the simplest items leaves me speechless! I am in awe of your talent and in how you bring a room together. It's quite amazing! I love all the little details that bring this room so perfectly together. I'll be drawing inspiration from you as I finish the newly renovated bathroom in Pennethorne Manor. Thank you for sharing your process!
ReplyDeleteThank You for your comment Teresa and may I say that I feel the same way about your work too! :D
DeleteThe details and atmosphere you've infused into your Pennethorne Manor are Totally Inspiring and your bravery in gutting finished rooms and starting all over again reminds us all, that it is never to late to make/ or remake your mini dreams into a reality- it may just take a little longer! ;D
elizabeth
This is a such a wonderfully realistic bathroom! What I really love, though, is your inventiveness. The way you used a candy store toilet and covered the hole in the top; the tub taps and faucets made from earrings; the shampoo bottle!!; the slippers made from bunka and pipe cleaners. And it all works together to make a delightfully eclectic, charming and inviting bathroom. It was a joy to walk through your pictures and the stories behind the items.
ReplyDeleteHI Deborah and THANK YOU Very Much for your Terrific comment! :D
DeleteI naturally gravitate towards the eclectic and I've always enjoyed mixing slightly odd things together in Real Life but especially in mini.
The items you've mentioned in your comment came about either through accident or deliberate intent: it was a lucky accident finding the toilets in the candy department and deliberate laziness when it came to the faucet and taps.
I find it Very Satisfying to make the junk store stuff work together with my highly prized purchases which when I think about it philosophically, reflects how
A Real Life
Really is! :D
elizabeth
Every detail in the bathroom is great. Everything is thought out to the last detail.
ReplyDeleteI love the details in the miniature!
Thank You VERY MUCH BurSel! :D
DeleteIt took me more weeks than I'd originally thought before this bathroom finally came together, but I am VERY Happy with how it has turned out AND
So PLEASED to know that you have enjoyed it as well! :D
elizabeth
Oh Elizabeth: I have read and re-read your descriptions and methods and everyone's comments over and over again. What an exceptional treat! I don't know what else I can say except everything is "spot on" and ditto to all the thoughts presented. Truly you love your littles and it shows in all you do, and by your sharing, it helps us all to try harder. Thank you.
ReplyDeletePS: I do like the lamp over the sink-especially the wrapped wire:)
I have Appreciated reading and re-reading your BEAUTIFUL comment JCH and I Thank You VERY Much for each and every word, especially your special mention of the lamp over the sink: you're Very Kind! :D
DeleteIn hindsight: IF I had threaded the wires over it in a less conspicuous fashion, then the lamp would have looked better, but I wrapped it oddly and when I couldn't undo it; I tried to paint over it which didn't work. I had to repaint over the previous paint disasters to try and salvage it and so it looks better than what it was. And having a light over the sink has made such a significant difference to the rest of the room, that I'm easily able to forgive AND to forget! ;D
elizabeth
Dear Elizabeth, I read your post yesterday and was interrupted by visits from my daughters. I'm reading it today and am blown away with your work. You managed to load this stunning bathroom with fantastic details which all look lived-in belonging to the master of this house.
ReplyDeleteStay safe and healthy!
Hugs, Drora
Thank You SO VERY Much Drora for you Wonderful comment! :D
DeleteI makes me Happy that you decided to make a return visit here and I enjoyed your infectious enthusiasm regarding the details in this bathroom.
When it comes to our miniatures, there's a 100% enjoyment when building our environments and 100% enjoyment getting feedback from others and I've Greatly Appreciated yours, Drora! :D
elizabeth
comment est ce possible de faire tenir autant de choses dans un si petit espace ???
ReplyDeletewhaouuu , on ne sait pas où poser le regard . il y en a partout ...plein de détails qui racontent beaucoup de choses sur le propriétaire . c 'est génial ! merci pour toutes les photos . c 'est aussi beaucoup de travail mais cela nous permet de tout voir . j 'adore la façon que vous avez d'accumuler plein d'objets . on reconnait tout de suite votre travail . j 'avoue que cela me donne envie de faire le ménage haha ! je ne suis pas une maniaque du rangement mais j 'ai une phobie avec les salles de bain ... c 'est grave docteur ?
j 'aime beaucoup l'idée de la petite lampe qui éclaire les étagères et l 'ajout du lierre pour tamiser la lumière . c'est un très bon choix . j 'adore la couleur de la baignoire . c'est une petite pièce parfaite .
Thank You Very Much Catherine! :D
DeleteI remember when I saw the photos of Ninette's bathroom in your mouse house and how AWE Inspiring and Beautiful it was to me!
I was immediately able to see that it was located inside of a ancient tree, very elegant and spare, well- organized AND of course- Very Very French! ;D
So I'm Absolutely DELIGHTED that the bathroom at LAND'S END (although of an opposite aesthetic), has been able to convey who the owner is to you, by the plethora of objects you see and by what's stored on the shelves!
I LOVE accessories because they are able to tell stories to the viewer without any additional words but, as your own work so Beautifully demonstrates, you can say as much with less in a room, as you can with more; depending on your choices- aren't miniatures WONDERFUL?!!! :D
elizabeth
Es un baño tan acogedor, lleno de encanto y preciosos detalles !!!!
ReplyDeleteI am SO GLAD that you have enjoyed your visit to this bathroom @ Land's End Eloisa, and I think that "Cosy" is the Perfect word to describe it! :D
DeleteI tried to develop an environment which the owners would enjoy being in and having their grandchildren get cleaned up in, so it makes me Very Happy that you have enjoyed being inside this room, too! :D
elizabeth
¡Increíble todo lo que has metido en ese pequeño espacio! Has unificado los elementos sanitarios de una manera muy ingeniosa. Las luces está claro que ayudan mucho a la ambientación.Me encanta ver tu lógica para ir introduciendo todos los detalles.
ReplyDeleteWhat a Lovely comment Isabel, and I Thank you Very Much! :D
DeleteHow to unify the bath fittings was a great concern of mine as well as a bit of a challenge! and yet it turned out alright in the end AND I still have most of my hair! ;D
elizabeth
Despite all the beauty, the amazing details, the fabulous work and the brilliant ideas that went into the making and decoration of this stunning, awesome and truly beautiful bathroom I'm a bit confused now... Why on earth did you start this wonderful post with an excuse and apologizing for the long time this post took??? With all the work, trials and decisions that went into this room it's more than amazing that you've already finished it! ;O)
ReplyDeleteI've truly enjoyed this voyage and yes, I'm feeling a bit proud that a tiny modest piece of mine made it into this outstanding room. You've created so much atmosphere and this room tells for sure a tale about the inhabitants. I've said this before but I have never problems with repeating myself - you have a really good hand at decorating a scene with things that tell a story and make it realistic and vivid. There are so many stunning details to be discovered that it would make my comment explode if I'd start to mention everything that fascinated me so I'm just concentrating on a few... Making an ivy with the intention that it shall be a fake plant due to the lack of light for a real one is brilliant, this is so realistic. And as Ilona already pointed out - cutting out all those tiny leaves would have been worth a task for Hercules. Amazing is also the way you're creating your miniatures, may it be the tooth cleaner or the way you made your soaps and the lamps... And all of this creates a stunning, inviting and cozy bathroom... one that has grown and was filled with personal stuff over the years. Oh, and adding the shelves was a great idea, in a small room it's important to use every space. And don't regret the toilet opposite the door - sometimes you have no other choice than to just stuck to the water connections in the walls... ;O)
Hugs
Birgit
As usual Birgit, your comments have made me Grin from ear to ear! :D
DeleteI think that this project went as quickly as it did (even with the lag time in between) because of its basic requirements within a very limited space, and so once those were decided; everything else became gravy- AND OH HOW I LOVE GRAVY! ;D
And your so right regarding the fake ivy although I hadn't thought about the lack of light until you mentioned it, but more about the regular inconvenience of trying to bring it down to change the water- very precarious and somewhat dangerous!
The reason behind my choice to make a plastic (tooth-cleaner) shampoo bottle was because if it accidently fell into the tub, it wouldn't break. :)
But I especially appreciated these words of yours "all of this creates a stunning, inviting and cozy bathroom... one that has grown and was filled with personal stuff over the years." which is precisely how I'd hoped it would be interpreted as a room which has grown and evolved and aged throughout the years to become what it currently is, so Thank You for saying that Birgit!
And I have been itching to use your rubber duck since you sent it to me and whenever I look at it waiting there on the tub, I think of all of the enjoyment my imaginary grandchildren will get when they come over to playing with it in the bath- so THANK YOU for contributing to that vision too! :D
elizabeth
... and what an extraordinary journey you bathroom is dear Elizabeth. Some things just cannot be rushed, can they? It has taken me three enjoyable trips through this fabulous room to reach the end. There is so much to discover and and oooohhh and ahhhhh about on the way, that it is simply impossible to swish through it.
ReplyDeleteIt is so absolutely fabulous the mix and match of new, old, cheap finds, fixer-up's. The wall light above the zink - why do you not like it? It is a perfect partner in look and age to the lamp on the shelf I thought.
Best
Anna x
I have Totally Enjoyed reading your Lovely comment Anna AND I THANK You for championing the old lamp over the sink too! :D
DeleteI don't entirely dislike the fixture I just wish that I had given more thought to how to wrap the wires more discreetly around the frame. I'd already made 3 of the same style of lights for Villa Leone in which the wrapped wires are nearly invisible, and I should have used the same technique when constructing the smaller one for the bathroom- but I didn't. Knowing what I should have done and didn't will continue to bug me, however, the lamp itself is growing on me: so Hip Hip HOORAY!!!! :D
elizabeth
I find that often you have to wait for inspiration to grip you before proceeding on to the next phase of making anything. The bathroom has many lovely ideas in it which we all thank you for sharing with us. I love the shabbiness of it and how old it looks like it needs renovating. Really, you must renovate it soon to update this family's house. Hehehhe Just kidding but I love it all!! I especially like the idea of using things that belong somewhere like the sink and toilet. Love that sink. Great Job!!! I like using the pink kitchens out of the Barbie houses. Some of them fit right in with the minis's. I have used one of them in one of my apartments and have another to paint.
ReplyDeleteMini huggs,
Conny
Thank You Conny and I certainly enjoyed reading your comment and I couldn't Agree with you more when it comes to learning to wait until inspiration has you in its grip, before more progress can be made- SO TRUE! :D
DeleteAND I also agree that this bathroom is long overdue for an upgrade but the owners have lived with it for so long, that the old fixtures have now become dear friends which is why the owners have adopted the philosophy of " if it works fine / why replace it?!" ( which applies to their hip joints too! hahhaha)
But your Spot On about some of the Barbie pieces being the right scale for 12th scale minis which is why I'm regularly scouting the thrift stores where so much unwanted Barbie stuff, usually ends up! YIPEE! :D
elizabeth
I'm speechless!! So can I just say I want to repeat everything that Alexandra Martinez said. This little bathroom is an absolute triumph Elizabeth, the crowning glory of a history of triumphs in your journey through miniature creations. It's going to take me a long time to appreciate every little thing but it'll be time very well spent. You truly have taken bathrooms to an entirely new level.
ReplyDeleteI feel SO HONOURED after reading your Beautiful comment Norma and I'm struggling over how best to respond; but Thank You VERY Much!!! :D
DeleteI have been surprised and overwhelmed by the outpourings of enthusiasm over this bathroom and Delighted that it has been so well received by fellow miniaturists, whose Amazingly Creative works, leave me feeling just as "Speechless!" too! :D
This was the last room to complete inside this cottage and now I'm moving onto the exterior, and since shingling isn't much to get that excited over; it's good to go OUT with a Bang! hahaha
elizabeth
How gorgeaus bathroom Elizabeth! You must be proud of this :) You have selected lots of lovely details as always. Somehow I especially love shabby hanging basket with magazines.
ReplyDeleteIt makes me VERY Happy that you have enjoyed viewing this bathroom at Land's End Riitta- Thank You!!! :D
DeleteAnd after the usual ups and downs, I AM proud of the way it turned out!
I have Loved reading the VICTORIA BLISS magazines since the early 80's and so I look for old copies in the thrift stores whenever I'm there and I often find back issues that have old subscription card inserts, tucked between the pages. Some of the cards will feature reduced front covers of the Victoria magazines, which is what I made the mini ones from.
There's nothing like a long relaxing soak in the tub, while reading your favourite magazine. :D
elizabeth
Wow love your bathroom those shelfs with all those wonderfull items so very carefull picked out for this room. The sink and toilet great inspiring work. This blog is better than a magazine I could buy thank you for making it en share it with us!
ReplyDeleteHave a nice day,
groetjes van Marijke
I am Very Happy that you have enjoyed reading about the makings of this bathroom Marijke, and I must also say THANK YOU for such a Wonderful Compliment regarding my blog-
DeleteIt has Made My Day! :D ❤️
elizabeth
Utterly gorgeous. I love how every problem produces a glorious solution. I am convinced your snags are meant to be. Delivered by the mini gods to test your ingenuity.
ReplyDeleteThank You VERY MUCH Susanna and Marilyn:Blogger is not allowing me to answer my comments individually today but I want to express my Sincere Appreciation for your Beautiful words about my Land's End bathroom, it does my heart GOOD to hear it and know that it strikes a cord with both of you as well! ❤️❤️
ReplyDeleteelizabeth
Dear Elisabeth, Like every one of the rooms of Land's End this bathroom is stunning, awesome and beautiful! I have enjoyed the rollercoaster of zooming in and zooming out only to zoom in again on some wonderful miniature or other. I cannot stress enough that you have a gift for assembling miniatures from all kinds of sources and materials and make them work together. I hope to learn that skill/gift too. For now I learn by watching. :-)
ReplyDeleteAnd about your apologies at the beginning of your post... Believe me when I say it was worth waiting for!
Huibrecht
Awwww Shucks Huibrecht! Thank You VERY MUCH for your kind compliments in your comment which I Greatly Appreciate!
DeleteLittle Things have always been fascinating to me, but what makes this hobby even MORE SPECIAL is to be in a community where we can express our GOD-given skills/ gifts, in whichever forms they take- and I am learning by watching YOU too! ❤️
elizabeth
maravilloso!
ReplyDeleteMANY Thanks from me to You, Carmen! ❤️
Deleteelizabeth