
I just happened to be in
DOLLARAMA
a couple of weeks ago and chanced upon a package of Christmas Stocking stickers which I thought I could use for miniatures.
 |
| If I remember correctly, there are are at least 16 stickers in the package. |
 |
| Of course the stickers were, far too shiny and artificial looking, as they come in the package however, I thought that if I tried covering them with fabrics, then they'd be usable. I found an old Christmas tea towel in with my fabrics, and began experimenting with the stickers. I was having a grand old time with this project, when suddenly the thought occurred to me that perhaps the stocking stickers would make a good CHRISTMAS TUTORIAL for anyone else who might require some mini Christmas stockings. Since I'd already made quite a few stockings before I'd decided to write the tutorial, quite a few were already used up. Even so, the leftovers you see in the photo below, represent all the various sizes and shapes inside the package of stickers. so- here's what I did... |
 |
These stickers from DOLLARAMA, come in either red or green, but either colour works, since they'll be completely covered over with a fabric of your choice. |
 |
| You can see that the stickers are composed of shiny foiled card on the front but backed by a thin and sticky foam. |
 |
For my first demonstration I'm using the longest and simplest sock sticker in the package. There were 4 of this shape in my pack.  I've chosen to use a medium weight tie silk to cover this sticker. For glue, I chose to use a permanent clear adhesive, specifically designed for fabrics. |

 |
THIS GLUE doesn't Bleed through fabrics when it's allowed to get tacky, although you still have to be careful with it on very thin silks: AND
it works Great on synthetic materials as well!
An additional PLUS is that it won't dissolve the foam.
Railroad modellers use it when constructing their complex landscape bases from pressed insulation foam which was why I started using it.
Equally good is the FABRIC-TAC ( although it's a little more expensive) look for them at Walmart and/or Michael's |

 |
| Step 1 coat the TOP SURFACE of the stocking sticker with the glue and let it get just a little tacky and then place it face down onto the fabric |
 |
| cut A GENEROUS allowance all around the stocking shape as shown in the photo below |
 |
| add small cuts from the outside in towards the sticker leaving APPROXIMATELY an 1/8th 'seam allowance' around the perimeter of the stocking form. |
 |
| Add glue along the edge of the foam and onto the fabric itself START WITH THE FOOT then work your way up to the top of the form. Begin by pulling the fabric up around the foot to the back of the stocking. This procedure takes the most time. It is also the most messy and you'll need to constantly clean the glue and loose threads from your fingers as you go! Cut away the excess fabric as needed but don't cut off too much! |
 |
| The back of the stocking is relatively unimportant to me, since it will be the side facing the fireplace, which means that I don't worry too much about what it looks like. I focus more on keeping the front of the stocking smooth and neat as I continue gluing and pulling the fabric taut at the back. |
 |
 |
| The sharp points on the foot of the sock means that the fabric needs to be pulled in a little tighter |
 |
| Keep checking the front of the stocking as you are pulling and smoothing away the sharp points; ensuring also that the sock doesn't become twisted or distorted in the process. |
 |
| Once you have finished gluing around the foot; begin gluing the fabric up the leg of the stocking, trimming away the excess fabric as you go. I folded over one side of the leg of the sock and then overlapped and glued the opposite long flap onto it. |

 |
| Here was my finished fabric covered stocking |
 |
| Step 2 Remove the foam inside the top of the sticker This is achieved with a pair of sturdy tweezers, or needle nosed pliers. Insert the tool into the foam and begin tearing and pulling the foam out from the top of the sock to a depth of no more than 1/2 inch. The remaining foam left inside, will act as a support for whatever you insert. |
 |
The foam free cavity is now ready for the teeny tiny presents! |
 |
| Step 3 PLAYING DRESS-UP! If you intend to hang your stockings onto a fireplace, then it might be a good idea to sew or glue a loop to the top of the sock before you begin to add your decorative trims. |
 |
| To decorate this stocking I used some matching twisted cord, glued around the perimeter of the form. Then I added a cuff of grosgrain ribbon around the top of the sock with some lace trim overlay. |
 |
I decided to give this model a "Romantic Victorian" look. |
 |
I used metal NAIL DECALS to decorate this stocking along with these peel and stick cameo decals. |

 |
After a little bit of holly and extra lace: the stocking was finished! |
 |
| Below are the same stocking sticker shapes which I covered using sections of an old cotton tea towel |
 |
Here are some of the other Stocking shapes from the same package |

 |
and a CURLY TOE STICKER |
 |
| with gold "jingle bell" beads on the curly toe and cuff |
 |
| fyi The CURLY TOE Sticker was the MOST DIFFICULT |
shape to work with:
but
but
for a repeat of the sticker stocking tutorial,
I'm going to use the nefarious
curly toe sticker,
curly toe sticker,
as outlined above.
this time with 100% cotton fabric.

 |
| I cut out a rough shape from the fabric. |


 |
I added glue to the front face of the stocking shape and allow the glue to get a little tacky |

 |
| I pressed the sticker face down onto the back of the fabric |
 |
| I Snipped small cuts around the foot of the stocking to within an 1/8th around the form: |
 |
 |
| I put the glue onto the sides of foam back and onto the fabric. Beginning at the foot, I pulled the fabric taut around the form; making additional tiny cuts as needed, smoothing down the sharp points around the foot and toe as I went along. |

 |
| the curly toe is a challenge and it DOES take some extra time, but just "stick" with it! |
 |
| I used tweezers to help pull the fabric snuggly around the curly toe point |

 |
| Front side |
 |
| Backside = Ugg DON'T LOOK! 😖 |

 |
| okay, now for the FUN PART! |
 |
| For this stocking I'm using squiggly Nail stickers Organza ribbon narrow Silk ribbon and a pale pink loopy trim |
 |
| I decided to ruche the narrow silk ribbon. |
 |
To ruche the silk ribbon; grab a thread from the center of the silk and gently pull and gather it along its length. It forms a lovely ruffle! |
 |
 |
| Initially I was going to use the ruched silk along the top edge of the stocking but changed my mind and gathered it into a rose shape instead. fyi If you're using self adhesive nail stickers, they'll need to be GLUED onto the cloth with Fabric Hi-Tak otherwise they will eventually dry out and begin to lift away from the fabric. I glued white cording to the outline of the sock, then made a cuff of pink organza ribbon and glued the loopy pink trim to the bottom edge of the organza ribbon. I trimmed the top edge of the stocking with more cording, tied a pink bow for the corner and used the darker pink ruched ribbon as roses with two leaves under it. For a bit of glitz I used gold nail decals as embroidery on the toe, on heel and on the organza cuff.  Then the stocking was stuffed with Christmasy stuff! |

 |
| The tiny package is a foil wrapped flat bead which I ribboned with pink metallic nail tape. The snowman is a polymer nail decal, as is the red and white candy cane. Most of the NAIL ART that I've featured here, was purchased from NAIL ART FAIRY https://www.etsy.com/ca/shop/nailartfairy?ref=simple-shop-header-name&listing_id=515243472§ion_id=1&page=31#items there are THOUSANDS of nail appliques for you to choose from- SO HAVE FUN EXPLORING! ⛄️ The green candy cane is a paper clip |
 |
I saw the paperclip candy canes featured on a blog
a number of years ago.
unfortunately
can't remember whose blog it was
These are easy and fun to make.
The Paper Clips
were purchased at a local dollar store.
I used the red and green ones
I used the red and green ones

 |
| This is how you cut them apart. Trim both of the cut ends of the cane to the length you want, then bend the rounded end in lightly using a pair of pliers. You'll get 3 Candy canes from 1 paper clip, but save your offcuts to use as peppermint sticks! Below are some repurposed resin Christmas earrings which I recently found at a thrift store. I clipped off their posts and used them to fill some of my Christmas Sticker Stockings as already seen in the photos above.  |
END of TUTORIAL #1
TUTORIAL # 2 is for CHRISTMAS WREATHS
I REALLY enjoy making Christmas Wreaths
Here are a few which I've constructed in the past:
the Ball Wreath below was a gift to Fatima for the front door of her VITORIA Christmas dollhouse.
 |
The next one is a Frosted Holly/ berry wreath using holly wire from my stash

 |
APPLE /WALNUT wreath using preserved lycopodium as its base
 |
The one I am going to construct for this particular tutorial is a really simple evergreen wreath using basic holiday evergreen wire. I loosely form the size and shape of a wreath, then thread through the form with a second circlet of evergreen wire to bulk it out. |
 |
| first layer above second layer below |
 |
| This wreath is approximately 1 1/2 inches diameter I cut a length of silk ribbon (about 7 inches +/-) to wrap around the circumference of the wreath. |
 |
| I put a little glue on the end of the silk ribbon |
 |
| Then I wrapped the ribbon over the frame and back it onto itself |
 |
| then I wound the ribbon loosely around the wreath until I returned to the start. |


 |
| I gave the wreath a light trim, then I removed some of the holly leaves from the holly wire and glued them into the evergreen, by tucking them under the silk ribbon using the same Hi-Tak fabric glue to keep them in place. fyi I'm using up what I already have on hand, but you could just as easily use a holly leaf paper punch or hand cut your own leaves from folded paper . |

 |
| Since the colours of the holly and the evergreen, are nearly the same, I decided to paint the leaves a lighter green for more contrast. I used a Leaf Green acrylic paint and a tiny brush and carefully painted each leaf of the holly. |

 |
| Once the leaves were painted, I added the Christmas coloured NO HOLE beads which Fatima had recently given to me. (I think she bought them at Michaels) |
 |
| Gluing the berries onto the wreath: I first painted the leaves with a light coat of MOD PODGE then still using the wet paint brush, I lifted the berries with the brush tip and placed them onto the still damp Podge at the base of the holly. Using the wet brush as a tool to pick up and transfer the beads to the wreath, worked BETTER and FASTER than trying to apply them with a pair of tweezers. |

 |
| WALNUTS: To add some additional texture to the wreath, I used dried Cardamom seeds purchased from the spice section of the supermarket. I broke them in half using pressure from my fingers and then I glued the halves onto the wreath with the fabric adhesive. |

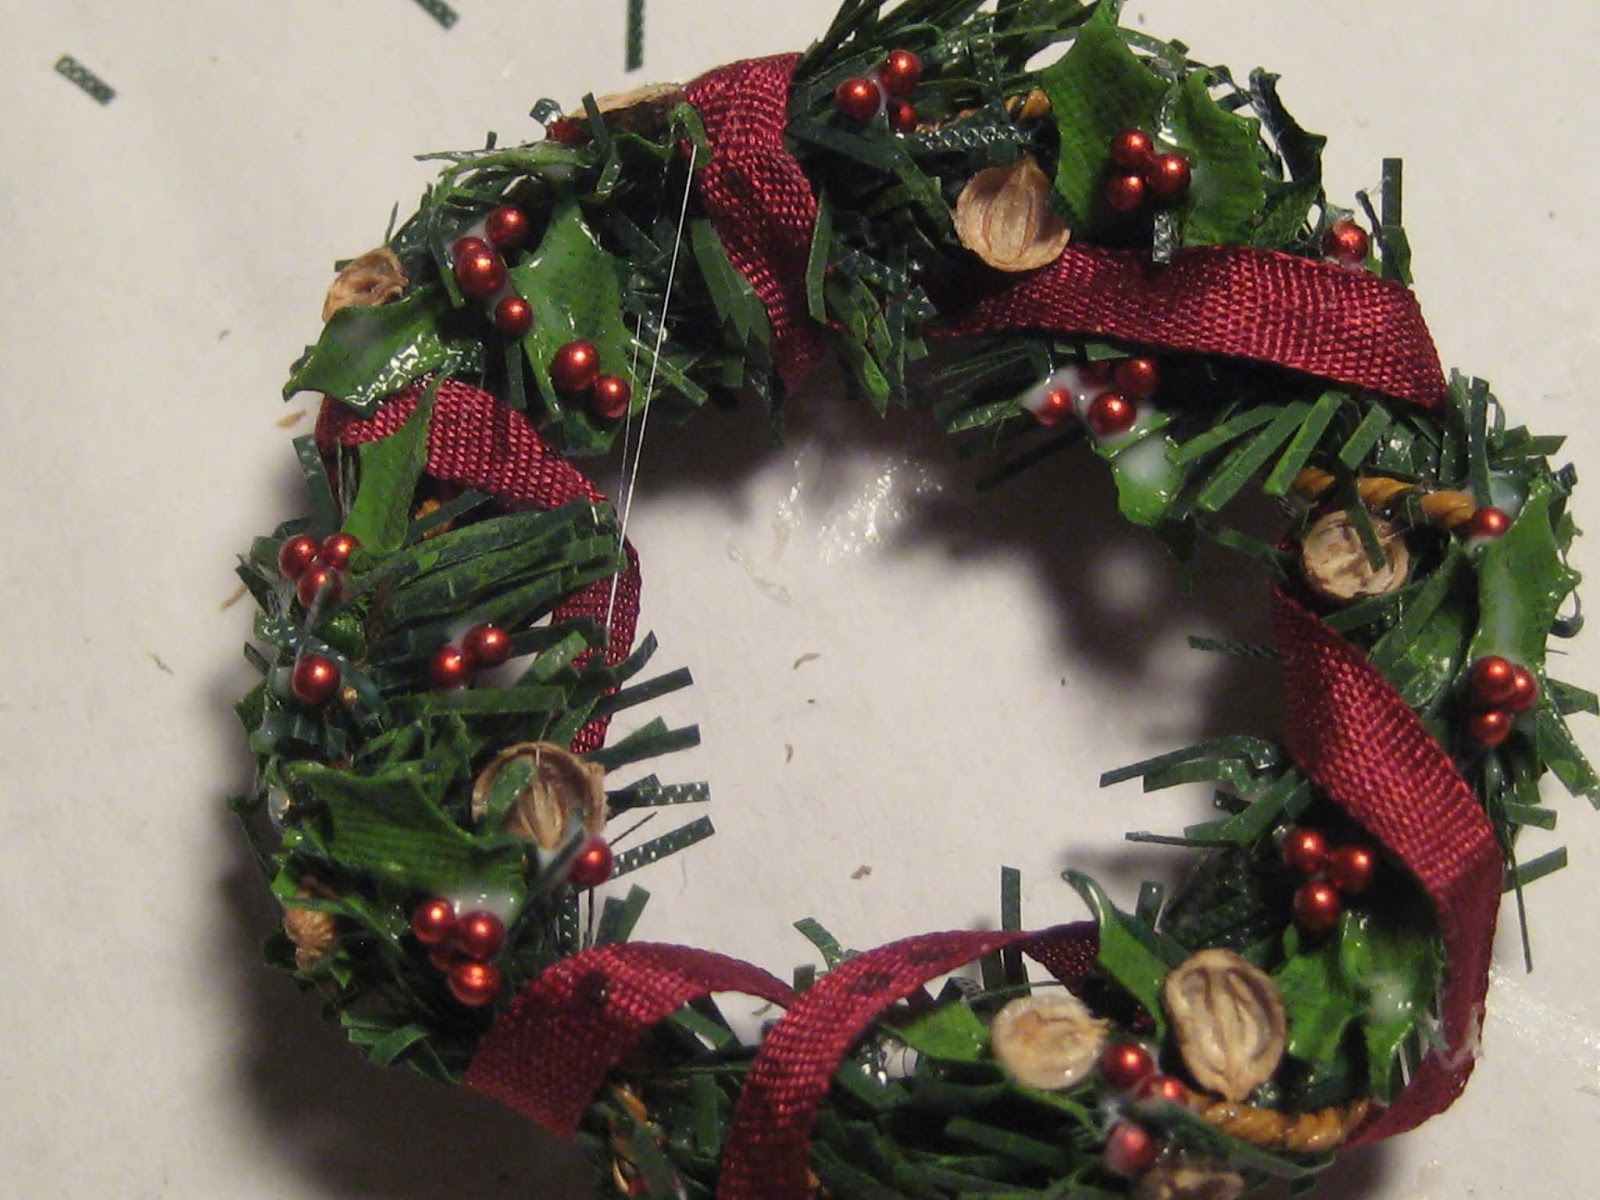 |
| after looking at a photo of the wreath I decided to lighten the holly up a little more by using a thin wash of yellow fabric paint mixed with water. |
 |
| I carefully went over each leaf once again with the paint and water mixture. |
 |
Lastly I added a silk bow to the top of the wreath and then  It was Done!  Below are a couple more Christmas Wreaths. The resin Santa heads were removed from a cheap pair of seasonal earrings  I made the diameters of both wreaths wide enough to accommodate the Santa heads. Then I threaded the evergreen wire through the existing metal loop on the top of the hat to secure the heads to the frame. ❄️ |
 |
| ❄️ ❄️ The Santa wreaths measure about 2 inches across and were super quick and easy to do! |
❄️
 |
| ❄️ Well, this brings us to the end of Tutorial # 2 I'll probably be making a few more wreath since I'm currently on a roll and perhaps I'll make some Christmas swags too- ❄️I'll keep you posted IF I do! ❄️ so until we meet again❄️ ❄️❄️ |
 |
| hO hO hO! ❄️ elizabeth |


