Showing posts with label "Age and Decay". Show all posts

Thursday, 10 October 2019

A Bohemian Rhapsody

Bohemian Rhapsody
Is this the real life?
Is this just fantasy?
Caught in a landslide,
No escape from reality.
Open your eyes
Look up to the skies and see,
I'm just a poor boy, I need no sympathy,
Because I'm easy come, easy go,
Little high, little low,
Any way the wind blows doesn't really matter to me,
to me


For the past couple of weeks, I have been feeling at loose ends and in a creative limbo.  
I have promised my sister that I would begin working on her bedroom roombox project so I've been mulling that over in my head, whilst simultaneously considering what I will be working on for myself.  
One thing I knew for sure- 
I didn't want to do another long term BIG DOLLHOUSE project; 
any time soon! 
Villa Leone is still sitting on my only work table in the middle of my Studio with nowhere else to go.  The updated interior photos I took of it using my phone are stuck somewhere inside my computer and I can't seem to get them onto my blog: I need my techy daughter to come here and show me all over again what I'm still doing wrong.  
ALSO
I currently have no more room in my studio to do any work, although I have been trying to thin things out, and getting things organized in order to make the space I have, more USER FRIENDLY rather than the Hoarder Horror that it currently is. 
ALSO #2: 
 I'm Unable to DO ANY major clean up of it until AFTER our Canadian Thanksgiving which is this weekend, which explains to me, why I'm feeling   STUCK creatively.
In the meantime: 
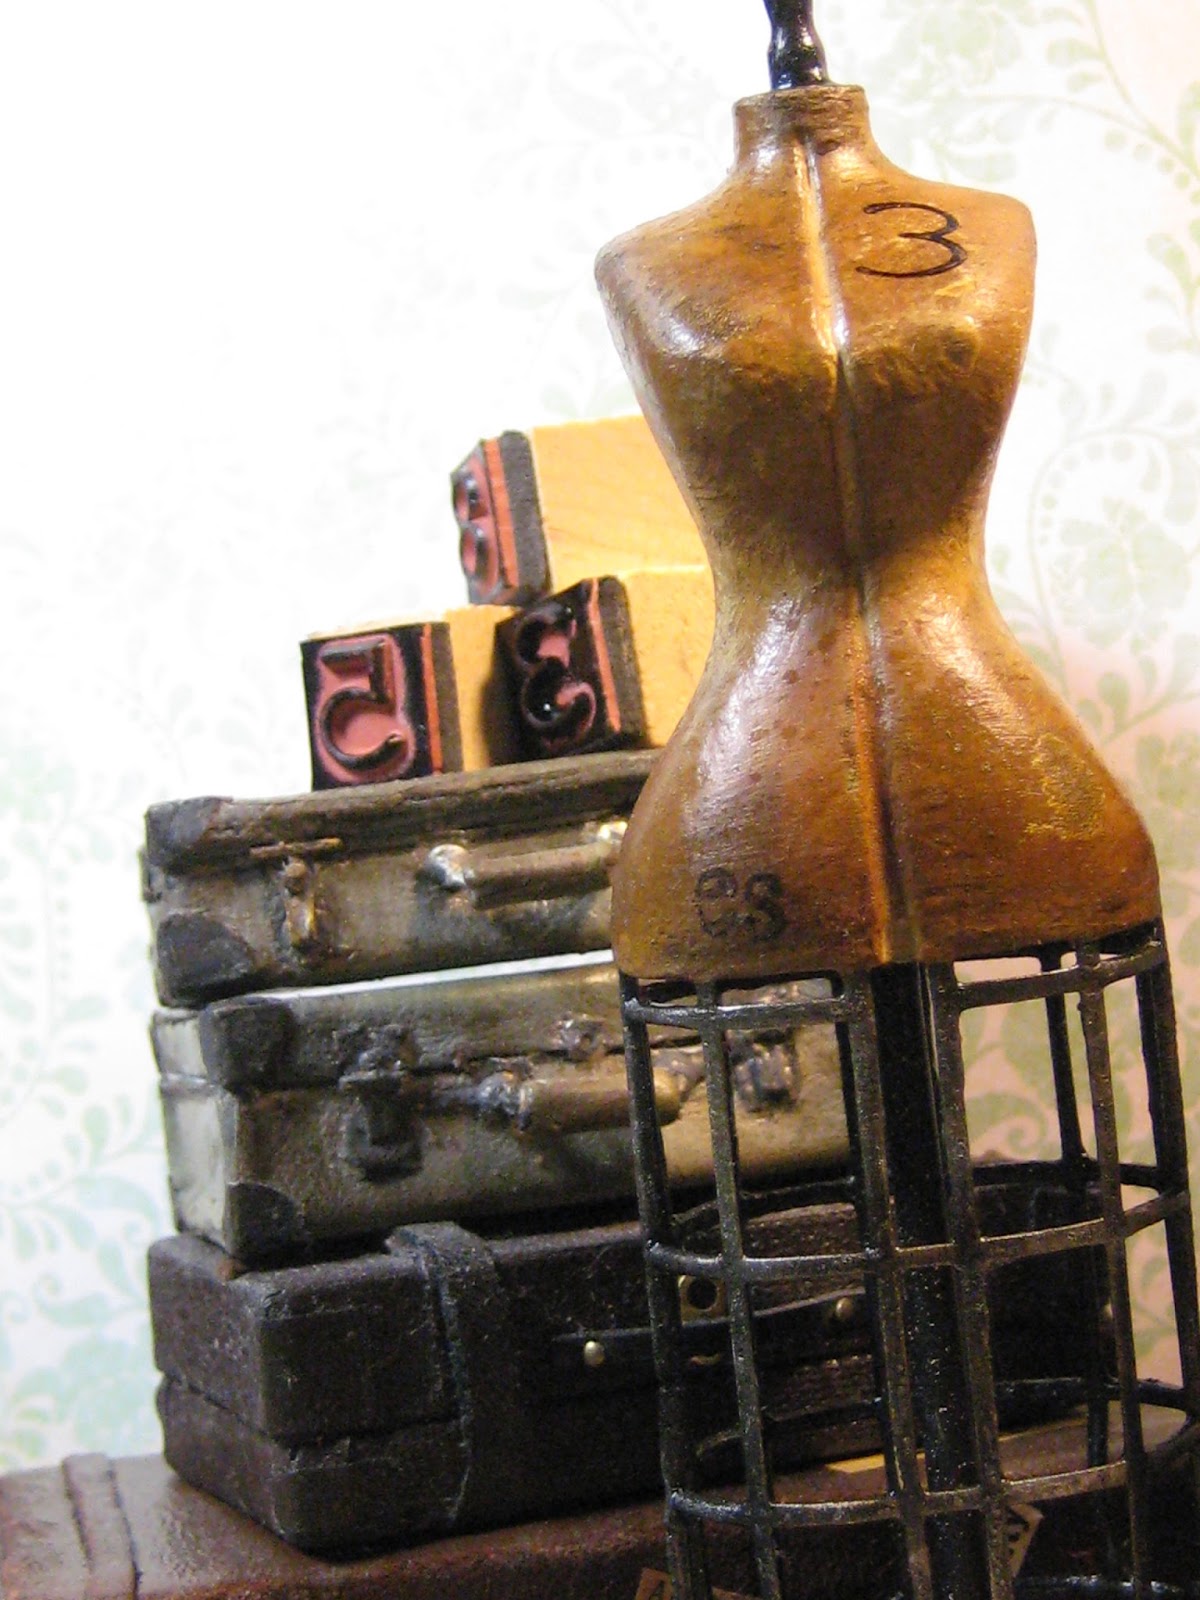
 I've been re-organizing my collection of mini furniture pieces which are stored on a couple of high shelves so I can SEE them and remember what I have. 
It was during the course of shuffling and grouping, that I was inspired by some of the furniture to play and to rough out a loose living room scene on my already messy desktop using some of my favourite and usually forgotten pieces.  
One thing led to another and before I knew it, I was flipping through reference books, rifling through storage boxes, and tearing through stuffed drawers: re-discovering many minis which had been tucked away for "safekeeping" never to be seen again!
It was like shopping second-hand- at home! 

And so, as things began taking shape, I started thinking of a story behind my one room scene which  could reasonably explain the presence of the various disparate furnishing as representative of a salvage/ bargain / and thrift-store shopper lived; 

mixing both old and new found items together as she saw fit- 
"Little High, Little Low" 
...doesn't really matter to me"

As it happens, I've been playing around with this scene for a few days (when I SHOULD be doing some REAL HOUSEWORK, i.e. vacuuming and dusting- for when my company comes for dinner this Sunday
But Hey!!! 
"I'm just a poor [girl],
 I need no sympathy" 
because doing 1:12 scale housework is much more fun!    

FYI
Scrapbook Wallpaper is only held upright by kleenex boxes, stacked bead containers, and Blue Tac, so if the paper "walls" of the room appear to be leaning funny-
 it's because they actually are;
now on with the show- 


I began my scene with an
old brown leather sofa
 clawed to shreds by the cat;

[naughty kitty!]
There are assorted old rugs 

which had been found languishing 
in the corners 
of various charity shops.
They're layered one on top of the other, 

in a bizarre mix of colours and styles
i.e.
 a blue Chinese 

on top of a graphic Arts and Crafts rug,
on top of a
multi colored
Persian carpet


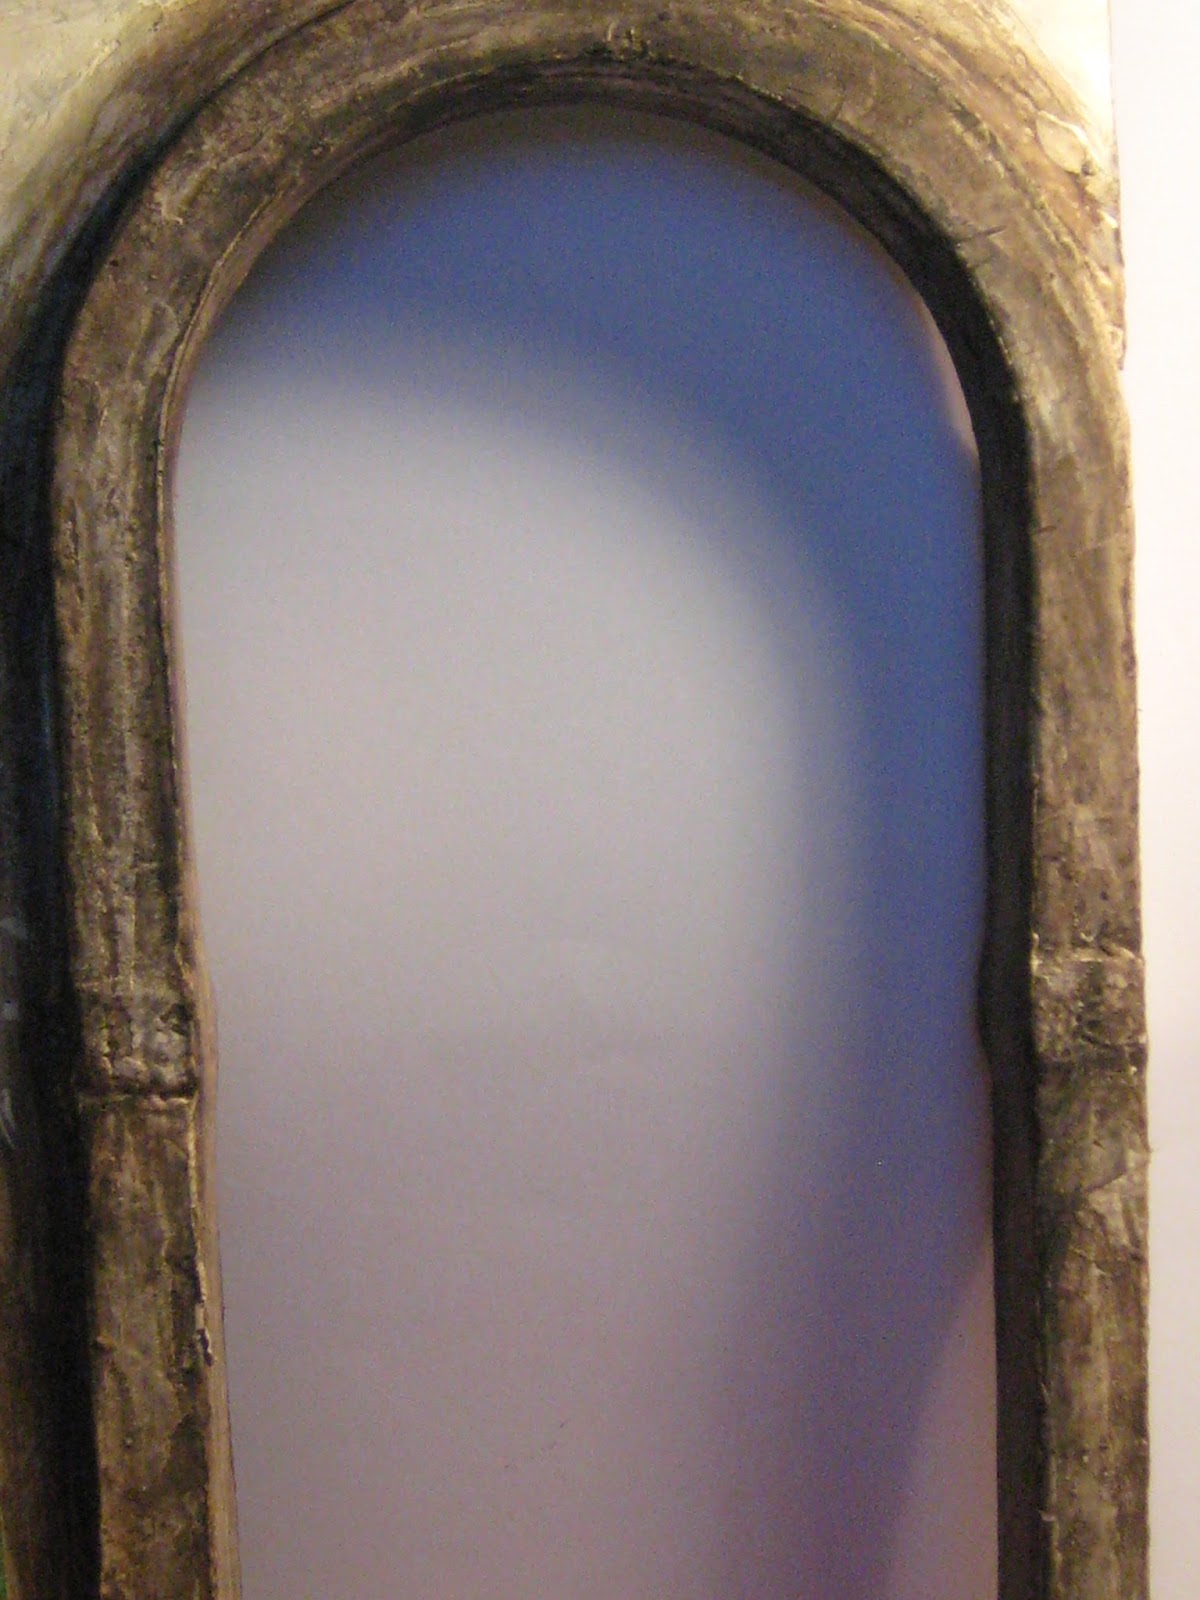
a narrow drop-leaf mahogany table
 sits behind the ruined sofa. 
fyi
(I've balanced the unstable Victorian window frame by seating it on the table, 
which was the only way I could get it to stay upright,
so my green lamp from the early 90's
 is currently shadeless for lack of tablespace)  
A tatty lace shawl, is draped over the back of the sofa which the cat likes to sit on and chew on
Assorted needlepoint cushions
are casually strewn about.
 A lush bouquet of fragrant old-fashioned roses 
(from Linda Park's garden), 
are temporarily displayed in a handmade blue pottery bowl 
 and are positioned
between 

a reclaimed bust from the city salvage yard 
and a
wire nest of blue eggs by a local nature artist.
The view outside is of a misty country morning.
a peeling tea table on rusted casters 
was rescued from a city sidewalk.
It holds a collection of well-loved,
 mismatched china. 

A tiny ornament 
of a dog in a basket, 
was a gift from one of the homeowner's friends.

by the front door sits a
rusty milk can:

(garage sale find) 
soon to store   
 canes and/or wet umbrellas. 
 The owner's
dog, 

sits silently beside it
and
waits to go out-

What! AGAIN?


really!??? 


Fading vintage mismatched wallpapers 
adorn the walls

a TREASURED 
AND
 Very expensive 
side chair 
was a
bequeathed gift

 from a great aunt


A "new" unfinished  bargain desk 
was purchased from 
 a local discount dealer. 

 still waiting ...
Meanwhile-
the cat moves off of the battered old sofa 
and is later replaced 
by an exhausted toddler with his tiny teddy tucked underneath him.


( this house must be well insulated!)
FYI
I have had this boy doll since 1984/85  after my son was born.
 When he was a baby,  he used to sleep in the same way 
with his bum up in the air which was why
 I bought this little guy from  
 Jean Day 
who was making Wonderful porcelain dolls 
back then, 
and believe it or not;
it's the first time I've used this doll in a scene!


***
The huge and badly cracked 

stone fireplace surround,
is yet another of the thrifter's,

 "salvage rescues!"
*** fyi #2
I really did salvage this fireplace!
It was originally a tea-light candle holder 
I'd found at Value Village.
 I hand-sawed the thick resin hearth from the base of the fireplace surround -
and let me tell you-
  THAT 
was a job and a half! 


An ever evolving
 display of second-hand treasures
on the mantle.


******

The mishmash of  items you can see 
in the foreground below,
are just some of the many rejects on my desk 
which I haven't put away yet.
however
I don't dare show you the entire desk with its
piles of
papers, books, fabrics, boxes, minis,
 missing tweezers, 
my glasses...

"WHERE ARE MY GLASSES!!!!?"

whew! 
finally found them! 

And so there it is-
my

temporary
Bohemian Rhapsody

along with a tiny glimpse of
  the chaos 

Behind the scene!


*******
AND SO!
after I'd played with everything for a couple of days,
I began to wonder
IF
I could actually find a solid home for it. 

Hey! 
What about....?

...this old HERITAGE 
which I bought for $20 
at a garage sale last year?

It's in really rough shape-
it's filthy dirty-
it's badly damaged with parts missing.

the wood's very dry and quite brittle
in other words
IT'S PERFECT!!! 
yes
  I think that with some concentrated 
TLC
this wreck could be given a new lease on life  
and 
what could be better 
for a second-hand house which has seen better days,
 than to be filled with beloved, 
eclectic
Old Stuff 
from an inveterate and unrepentant mini collector;
[such as myself] 
wink wink! nudge nudge!

 And 

as QUEEN says

"Is this the real life?
Is this just fantasy?"

"caught in a landslide,
no escape from reality"


"Open your eyes
look up to the skies
and SEE....
"


that it's
another 
BIG DOLLHOUSE project

for me! 😎

elizabeth

https://video.search.yahoo.com/yhs/search?fr=yhs-sz-001&hsimp=yhs-001&hspart=sz&p=Bohemian+Rhapsody#id=37&vid=b5bc500bc2e4821fc5deaa6191d2bb4b&action=view

Thursday, 3 August 2017

True to FORM


I'd been working steadily on Villa Leone for nearly 3 weeks straight before I grew weary, and ran out of gas. 

I needed to do something different before I jumped into the next phase of that build; 

which brings me to the beginning of this story:✈

My friend Bettie is downsizing her miniature collection and has given me some of her miniatures to play with.

Among the items she has placed at my disposal, were a number of Chrysnbon dressmaker forms which had seen better days.
They had already been spray painted with a white enamel paint which had reacted badly with the plastic forms and had bubbled and melted them certain places. 


Some of the plastic cages on the lower halves were broken in places as well.  
In short- they were all in pretty rough shape.

I was looking at them not knowing exactly what to do with them, when I decided that it might be fun to mess around a with them, and see if I could perhaps give them 

 A NEW LEASE ON LIFE. 

"Nothing ventured 
Nothing Gained"

I'd think of the time, as a bit of a vacation break from work on the villa 
 ✈ ☀
 
The photo below is to show you what the dress forms actually look like in the raw although the metal cage on this one, is also somewhat mangled.


The 5 which I used had bubbled where the plastic had melted, both in the front at the bust, and on the back and on the bum.

Unfortunately
I didn't bother taking the before photo of the them 

although I should have, but I'm sure that you get the idea. ☹
The dress form still on the sprue, comes with a stand 

The first thing I did was to try and smooth the most damaged and lumpy places by paring them down with a craft knife, 

then I sanded any remaining sharp edges.  
Following that,
 I painted both sides of the metal cage along with the carved 'wood' top, with black acrylic metal paint.
When it had dried I glued the two halves of the 
dress forms together and secured them with large spring loaded clamps until the glue had completely set.
I had to use the clamps because there was so much paint along the edges of the form that I wouldn't get a tight fit otherwise.


The bodies of the dress forms were then painted using a brush with my LIQUID STONE mix.
( gesso, water based acrylic sealer, drywall patch, water)
I used this mix primarily to fill in and to try and correct some of the most corroded areas on the dress forms. 

The mix was painted onto the forms in an even coat. 

My Liquid Stone Mix
the wet stuff is on the bottom of the container
After that had cured, I painted the torsos with 
Natural Tan acrylic paint.
When it was dry, I sanded the forms again using a fine grit sanding sponge which really ground the tan paint into the underlying plaster.
Some spots were sanded through and exposed the black plastic underneath
The torso was then stained with some browns & a black ink using a make up sponge.
The silver ink was applied sparingly to the black metal cage.
When the inks had dried then I sprayed them lightly with
"STIFFEN STUFF"


{sidebar}


 I bought this spray with the idea of using it for fabrics but it didn't work for me, so I have been using it for setting the color on paper, and to set chalks as well as ink and it is Wonderful!
It's a lot cheaper to purchase than the SceneARama  scenic spray glue which I was buying before
 
Anyway,
when the Stiffen Stuff was sprayed onto the inks,
it did just as I'd expected-

the wet colors ran.
I used a makeup sponge to lightly DAB at the wettest puddles as they quickly dried down, trying not to disturb certain areas which I wanted to remain as is.  

The blend of colors gave a real leathery look to the painted surface. 

I repeated this process onto the metal cages, then sprayed and lightly stippled them with a brown Iron Oxide acrylic paint, to add a little rust.
To tone down some of the shine, 

I went over the body rather randomly with 
Revlon
Clear Matt Nail Varnish.  


Lookin' Good Ladies! 

hey!
I think I'm done


NOPE- NOT YET!
After re-examining an inspiration photo of some
VINTAGE FRENCH MANNEQUINS,
I decided to add one LAST detail and
 make the metal attachments at the shoulders.
I chose some suitable press studs from my stash and flattened them a bit with a pair of pliers; stuck them onto some masking tape and painted them with the black acrylic metal paint. 

When they were dry I glued them onto the dress forms
using Jeweler's glue.  


I touched up any missing paint and sealed them with CLEAR MATT NAIL VARNISH 

okay

 NOW THEY ARE DONE!


EVERYONE WAVE 
GOOD-BYE ! 


and it's back to the Villa I go ✈

elizabeth


Saturday, 27 May 2017

DON'T FENCE ME IN ( a stone arch tutorial)


WELCOME BACK 
Benvenuto indietro!
 Just to satisfy any curiosity regarding what I decided regarding the wood nymph with 3 arms; as you can see
I changed it
however, 
in the picture of the 2 dancing maidens-
the raised right arm, 
 doesn't actually belong to either of them.

but it works!


 Now on to the tutorial

I am making a stone archway leading from the entry of the Villa, 
into the kitchen 
using plastic garden fencing purchased from the dollar store.

The hard plastic fencing comes in snap together sections made up of 4 arches with center spears.  
It's available in either white or black. 
I chose white because I wasn't certain about what color I was going to finish it in.

This is what the fencing cost in Canada.

I cut 2 of the arched sections free from the fence panel
I scored the joins with an utility knife and then snapped them apart using an old pair of wire snips
The rough edges were cleaned off with a utility blade
I measured the frame for its height, and cut it down to the right size. 


Matte board was cut to fit around the arch and glued onto the frame using E6000 glue.

fyi
(The second wall template on the kitchen side, has not yet been glued around the arch, because I still can't decide on a wallpaper.)


Gaps around the frame, were filled with drywall patch

To finish the arch, I repaired any rips and blocked up the open gaps in the frame using masking tape and/or foam core board.

 I painted the interiors of both arches with black acrylic paint and let it dry.

then I wedged pieces of scrap foam board inside of one of the frames and made sure that the second arch would fit snugly over top,
 making adjustments for a tight fit, where needed. 
Then I glued the two halves together using E6000 glue and ran a bead of glue down the inside center where the two halves were joined.  
They were clamped together until dry. 


I scraped off any excess glue and painted the entire frame in a white acrylic paint.

Then using a spatula I layered on drywall patch, filling in any gaps around the frame as well.
This was then sprayed with hairspray to seal it and gave it another coat of acrylic paint.
I applied a coat of drywall patch to the front surfaces to disguise the "tooled metal" texture, hoping to make it look more like old stone. 
 I normally use hairspray to seal the raw plaster 
BUT
 I decide that there had to be a better way to get a stone effect without taking so many steps, 
so I experimented a bit and came up with a recipe which worked out much better for me; 
a type of LIQUID STONE
here's my small batch recipe: 
all amounts are in approximate measurements but are easily adjusted up or down 
 1 tablespoon GESSO
1& 1/2 tablespoons DRY WALL PATCH
 2 teaspoons LIQUID ACRYLIC SHEER COAT MEDIUM
[gives a transparent finish when mixed with acrylic paint,
 but in this case it serves as a sealer + binder ]
1 teaspoon OF WATER.

the products were mixed until smooth and the consistency of a Heavy Cream.
They were then troweled onto the face of the arch with a flexible spatula.

the photos below
show what it looked like after the
liquid stone recipe
was
applied  

If you find it too shiny after it has dried as I did, then add a bit more drywall patch and a few more drops of water.
You want it to have some gloss, but not too much.
I applied 2 coats.
any rough bits I burnished over using the metal spatula. 
The resulting finish is smooth with a light gloss
now for the color

Using an assortment of grated chalk pastels, water, brushes and sponges, I painted over the arch with a very thin, watery mix of all the above colors
 adding the color with a brush and subtracting it with a sponge.
I continued with this process
 until I was satisfied with the final color of my stone.

The white liquid stone base resists the water,

 while the powdery nature of the chalk pastels, dries splotchy,
enabling me to build up the colors with the white still showing through under the various grays.  
The more water mixed in with the chalks-the more translucent the finish; 
with more chalk than water- the more color density.


so this is what it looks like now


Not Bad
if I do say so myself :D
Hope you've enjoyed this
"trash to treasure" 
tutorial 

See you again soon! 
caio caio


elizabeth

DO OVERS! a Glencroft Living room redecoration

    Back in April of 2022, I made up a storyline for my Glencroft renovations, which went something like this...   "After due considera...