 |
My apologies
for taking so long
to log my
ADVENTURES re: the making and re-makings of the bathroom
@
LAND'S END
I've no excuse to offer
other than that there were times I was just too lazy
and/or uninspired to work on it.
Inspiration for the bathroom
came in waves
but as of today,
(fingers crossed)
all that's left to do
is to add the ceiling to the cottage and then move on to the exterior.
So without further delay-
let's weigh anchor and
let the Orinoco flow!
|
 |
| so.... Back in March 2020, before I began work on the bedroom, https://studioeminiatures.blogspot.com/2020/04/a-long-days-journey-into-night-lands.html I took the opportunity of replacing the bathroom's original wallpaper to what you see above. Both the bedroom wallpaper and the bathroom wallpaper, were glued end to end onto a single template, then that template was glued onto the exterior wall. The bathroom wallpaper also needed to be installed onto the interiors of all the connecting walls before I could finish the bedroom, and the kitchen. It was only after I'd completed both of the other rooms, that I took a long, hard look at the effect of the vertical stripes on all 3 of the bathroom walls. |
 |
| The space felt like a shoebox very tall and narrow, and the skinny vertical stripe accentuated its "elevator-look" even more. After thinking over what to do and where to begin, I decided the best course of action was to break up the vertical stripes with some "cottagey"wainscotting, similar to what's in the living room. In hindsight, it would have been better to have installed it as shiplap but that's now water under the bridge. I made 3 wall templates using cereal boxes and proceeded to glue coffee stir sticks to the card. I made the wainscotting higher on the back wall than on the sides, just as I'd done in the living room; but because of the protrusions of the 2 channel supports which I needed to use to stabilize the interior walls, it caused the wainscotting to stop short of the corners which presented an additional design problem for me, of how to tie the panels in. |
 |
 |
| I didn't want to paint over the dark wood nor did I want to paint the wainscotting panels dark, so I postponed making any decisions until all the wainscotting was finished. |
 |
The Bathroom door(s): |
 |
It had taken me a while to finally go with a split door (minus a threshold) rather than with a single one. These doors proved to be more difficult to install than the bedroom door had been. Very Frustrating! Even so, it resulted in additional usable floor space inside this tall skinny space which was worth the extra effort. TUBS: I have at least 4 different styles of miniature tubs in my drawer of bathroom fittings. I've been finding them here and there, usually in the toy department of thrift stores. Some are in decent shape and some are not. I decided to use this ceramic one because I think it suits the style of this cottage. The interior of the tub is rather crude. And even with some sanding it's only just "OKAY" which is Ideal for Land's End! |
 |
The toy sink and toilet pictured below are also from the thrift store. |
 |
And although they're obviously a set, the toilet is puny next to the HUGE bathroom sink so I jetisoned the toilet and only used the sink which was not only the right size but the right vintage style too! |

 |
It was easy to unsnap the sink from its backing, and cut away the support brackets from the body of pink plastic. |
 |
 |
| As work on the bathroom continued, I eventually cut the brackets down to their bare minimum and painted them black which you'll see later on in this post. In the meantime... The toilet I decided to use came from the candy section of a dollar store with lollipops sticking out of the hole at the top of the tank and a bowl full of sour powder. The lollipops were Yummy but the powder was chucked overboard! - YUK! |
 |
| And because the light passed through the plastic, I ended up painting the insides of the plastic with a couple of coats of white chalk paint as well as black acrylic paint for more opacity and it worked! I've covered the hole on top of the tank with a little pan which Janine had given me and filled it with a colourful collection of tiny sea shells. I still have to decide on an flush handle but this is how it looks so far. By the way, the lid opens and closes but there's no seat over the bowl and I can't be bothered making one for a lid I'll never lift. |

 |
Because the style of this toilet is more modern than vintage, I went online and ordered a vintage looking one and will wait to see which one looks best: but in the interim; this one will do. I'll also mention the addition of a shelf on the back wall.  was instrumental in determining the final layout of the bath fittings, because in order to easily access the hooks and the shelf; I needed to move the tub to the side wall. In order to put a mirror over the sink I needed enough wall space above it which by default left the toilet under the bathroom window and directly in front of the bathroom doors: not an ideal location for a toilet in my estimation, but hey! "them's the breaks". I didn't realize at the time I was installing the doors, that the toilet would end up in front of it, but I'd intentionally installed the door opening in line with the window so that when you look through there's a view staight into the kitchen from the outside; here's the view from the outside the bathroom window-IN:  And from the inside the bathroom -OUT  LIGHTING: I was going to go with the lantern but I felt that the light was too dim and yellow. I ended up making one from brass tubing; a white plastic ball and assorted bead caps |
 |
| I threaded the wires through an overhead beam and hooked them up to a transformer to see if I liked it and I DO! Later on, in the build I shortened the brass tube by 1/2 inch to raise the fixture higher. |
 |
As the bathroom began acquiring a personality; I was taking more and more pictures. It was as I was looking at the following one, that I thought about adding more shelves  Obviously, I needed a place for storing towels, bath products, photos and other related items AND I had all this available vertical wall space! At first I tried an enclosed cupboard shelf unit which looked top heavy as well as impractical. I felt that the shelves should be open and simple, so I made some with tongue depressors, and stained them brown to tie in with the support beams in the corners. I didn't like it that much |
 |
| and although the green towels fit; they didn't look good either. So- I painted the shelves in a watery, off-white chalk paint; enough to cover the wood stain but not completely obliterate it. Then I glued the shelf unit onto the wall and began searching through my stash to find better towels and other cool stuff to place on the shelves. I spent the next few days trying out different combinations until I could get most of what I wanted, on display, after which I continued editing and tweaking and photographing it. |
 |
| It wasn't long before I decided I wanted to add a light to the corner of the bottom shelf, so I found one I'd saved in my stash, which had suffered severe damage during those infamous"garage" days. It used to be a shiny hanging lamp fixture, but 12 years of neglect in my damp garage had corroded the metal so badly that it literally fell apart in my hands. Nevertheless, it was precisely because of all of its green rust that I'd held onto it, and I was determined to find a way to reuse it. I carefully unthreaded the fragile wiring from the lamp housing, and then removed any left over crumbling bits of metal. Then I reglued the main housing back together and rethreaded the wires back in. In my stash of light fixtures I found a white plastic chimney and slid it over the bulb; then I turned the unit upside down and sat it on the shelf. I fed the wires from the back of the lamp out through a tiny hole drilled through the exterior wall- "And then there was Light!" It totally opened up the visibility of the items on the shelves! HAPPY HAPPY DANCING!!! Arrrrggg! |
 |
 |
| At This Stage the shelves were glued in but not the wainscotting panels. Even so, I continued busily decorating the entire bathroom as if they were- talk about a commitment phobia! |
 |
| With the shelves done , it was over to the sink side...  I found a loose bit of Chrysonbon plastic plumbing which perfectly fit the underside of the thrift store sink; it was as if they'd been made for each other! Still not sure about the mirror however, I remain confident that the right mirror will eventually turn up. Progress is being made and I'm taking more photos!  as I'm looking at the shelf and the light fixture, I'm thinking that that corner still needs something... I LOVE the light but it's hard to photograph and now I want something to soften it, without changing it. I decided that the shelves needed a draping plant. Specifically a PLASTIC PLANT! I happened to have a set of scrapbook stickers of ivy which looked 50's vintage. I'd been pondering how to use ever since I got them. For my fake ivy I peeled the stickers off the backing and stuck them onto thin Japanese calligraphy paper. |
 |
below you can see the clear plastic outline of the stickers |
 |
I cut out the ivy vines from the surrounding materials. |
 |
 | ||||||
| using a felt pen, I painted the paper backings of the leaves with the green marker and the vines in brown. Then I took lengths of fine beading wire and glued the wire to the underside of the vines. If I'd been thinking ahead, I would have glued the wire in between the paper and the sticker FIRST, but this way worked equally as well. this is the glue I used for the wire
|


 |
| and down... and down ...   providing a thin "living" veil in front of the light fixture which visually softens each of the shelves as well.  Let me show you!  Next to the lamp are the ancestral photos of The Captain as a boy and then as a young man. The photos share the space with a treasured heirloom vanity set which the Captain had brought home for his wife after one of his extensive ocean voyages. The china is English and Beautifully hand-painted with delicate lily-of-the-valley flowers. (this was an indulgent Ebay purchase I made without any regrets!)   Next to the china is a glass jar of shell soaps ( nail appliques ordered from china) Next to the soaps are the toiletries of man of the house consisting of aftershave; deodorant spray; soap on a rope; liniment and cotton balls These reside in a shallow box closest to the sink. |
 |
On the middle and top shelves above the china, are stacks of assorted linen and fluffy white cotton towels tied with string or pale blue ribbons. You can find my easy towel tutorial here: https://studioeminiatures.blogspot.com/2013/03/throwing-in-towel.html  |
 |
| The middle shelf holds the towels and a fancy millefiori bottle and a gold lidded glass jar- ( two buttons glued together topped with a filigree bead cap) |

 |
| At this stage, I decided it was time to quit stalling and glue the wainscotting onto the walls- About time! |
 |
| Here's a quick tour of the lower sections of the bathroom walls. As I mentioned earlier, on the back wall of beneath the shelves is a strip of wood with the nail pegs imbedded for hanging wet towels onto. There's also a basket of Victoria Bliss magazines next to a hot water bottle and a bath brush; and an ornamental life preserver. The hot water bottle and back brush are painted Chrysonbon pieces and the life preserver was in my stash. I should also mention that by now I'd painted the tub and the underside of the sink with black acrylic paint followed with a couple of coats of a blue Quick Dry acrylic enamel which stubbornly refused to set- Quite Maddening! Eventually the paint did dry but not until after my fingerprint impressions were imbedded in the paint- ARGGGGH! >/< To try and fix(disguise) it I tried lightly sanding then aging the blue paint which was somewhat successful.  Also, because the inside of the tub is a yellowish/white and the inside finish of the sink is brighter, I began dirtying up the inside of the sink to lessen the contrast between the two fixtures but the truth is that they'll never match, so the back story is that the fitting of this cottage were reclaimed salvage which have been replaced piecemeal as necessary. But years of normal wear and tear have taken their toll and the once fresh paint is plainly showing its age. But as long as they still function, the owners are keeping them. To dress up the old tub, I made a bath tray from a section of white picket fencing. |
 |
| and here's the stuff I've put on it. |
 |
| There's a shampoo bottle and a lidded jar; a basket of two soaps made from a green eraser and some Japanese silicone putty. Next to the soaps are an emery board and a loofah. Here's how I made the shampoo bottle  for cleaning between your teeth, which were purchased from a dollar store. I removed the brush and cut down the rest with a box cutter.   to add interest to the front of the bottle and painted the top with black nail polish, before gluing it to the bath shelf.   I began with a pair of screw back earrings similar to the one pictured above. I cut off all the surplus metal from the screw posts. I used a piece of soft soldering metal to form a faucet and glued a sliver of hollow plastic tubing to one end and a flat bead spacer onto the other end. I painted all 3 units with a metallic nail polish for uniformity. |

 |
 |
| When they were dry, I glued them onto the wall. |
  | ||
The collection of bath toys are there for when the grandchildren come over on the weekends. Hey Birgit! do you remember giving me the rubber duck on the right for Christmas? ❤️ THE SINK
|

 |
| Initially I left the chain on but because the frame's hung with its backside forward, the mirror refused to lay flat against the wall and required lots of blue tack to keep it straight. |
 |
SO in the end I removed the chain But after I'd removed the chain I was left with a hole in the wallpaper where the nail had been and it was right where you could see it! SO HOW COULD I FIX IT? I ended up adding a light fixture over the bathroom mirror to cover the hole. I'd debated a long time on whether or not to put a light over the sink and now I had no choice. I'd tried out 2: one I made and one I'd ordered and went with the one I'd made. In keeping with the salvage restoration theme, I ran an electrical conduit up from the base of the lamp so that I could eventually feed the wire up and out through the roof. This lamp is actually pretty rough looking and after I'd made it I was going to scrap it because I didn't like the look of how I'd wrapped the wires around the curvy frame. WHY WHY WHY? I had painted the fixture numerous times trying to disguise "the ugly" wires but nothing worked and the successive layers of paint made the problem worse! Even so I went with it anyway; ugly and all.  Actually adding a light over the mirror was a good idea not only for its practicality but also because it balanced out the light on the shelf. and it seems that given enough time- even ugly will grow on you! |
 | ||
 I made some daisies for the bathroom sink but I'm not happy with the vase, so I ended up changing it.
|

 |
| A bathrobe hangs from a nail in the door. |
 |

Now skipping over to the loo!
As I've said at the beginning
I may end up changing out the toilet for an older model
but it happens to be as white as the sink
which makes it acceptable.
Janine's shabby pan has made a nice container
for assorted shells
 |
| Fatima's jar of blue hydrangeas grace the wall above. |
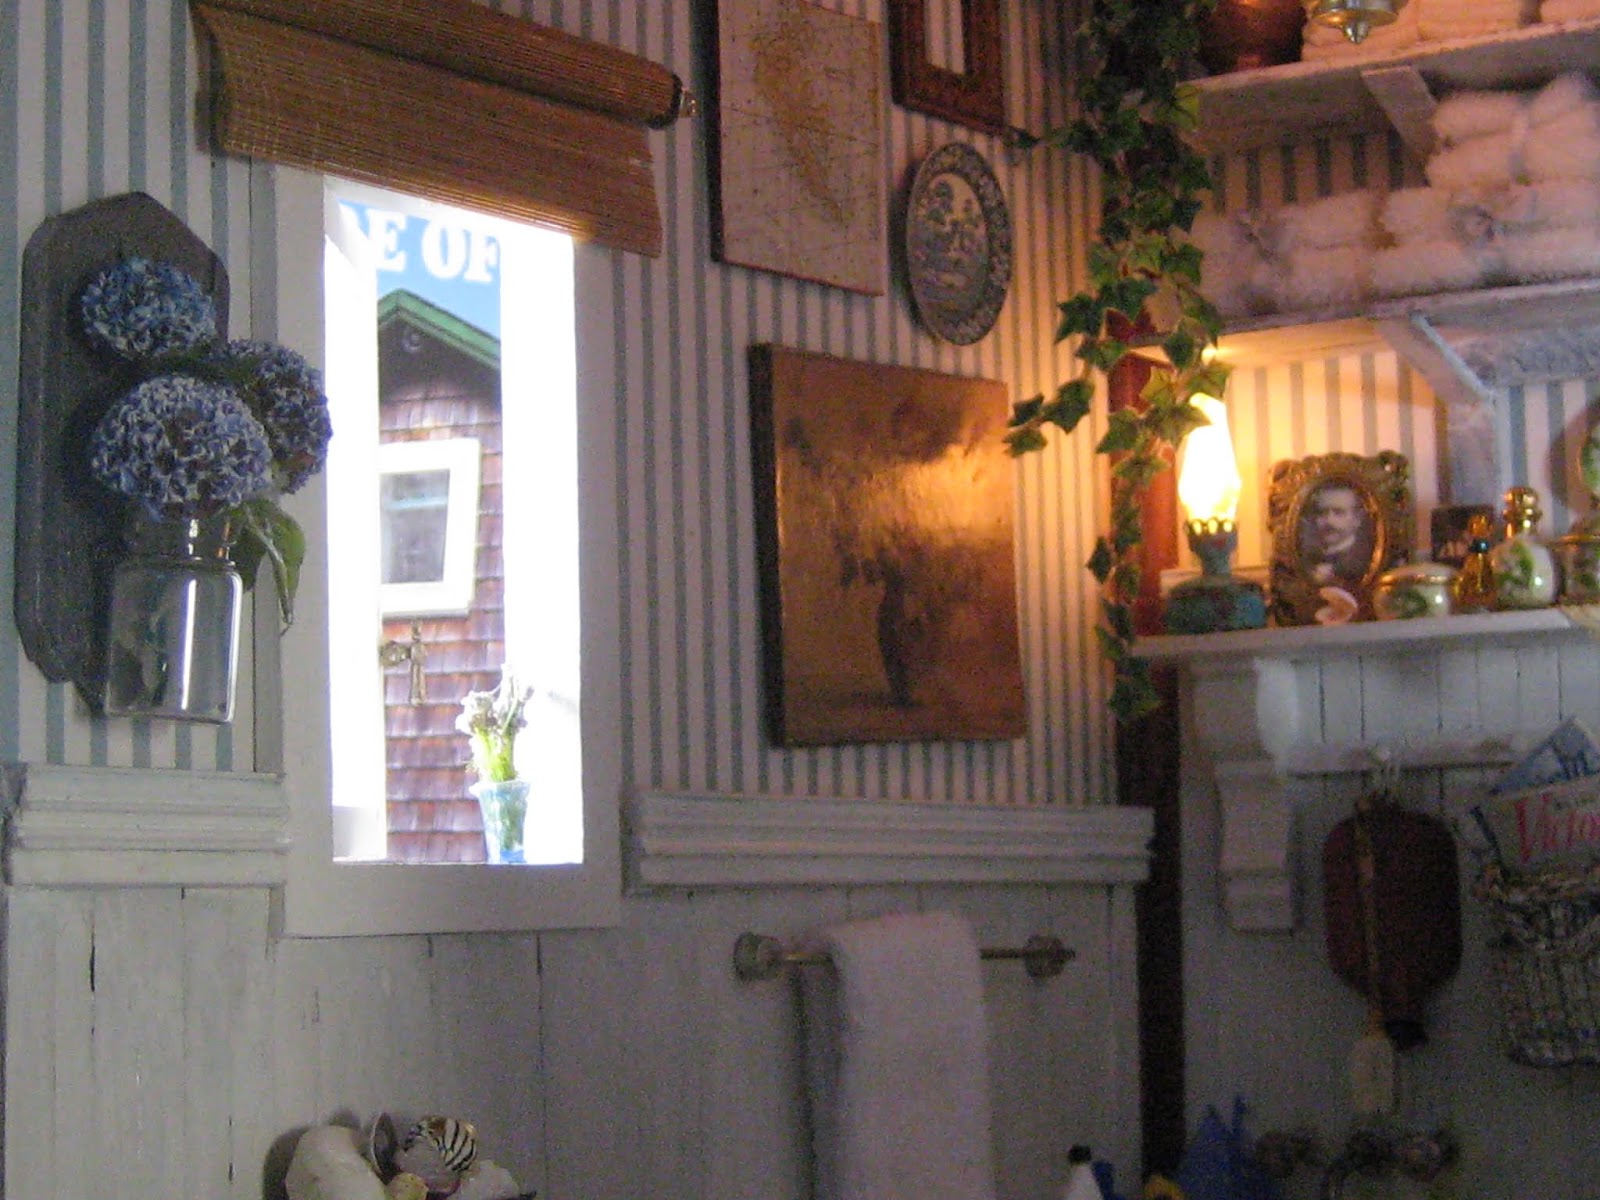 |
| And on the other side of the window, is a collection of fleamarket art consisting of: vintage floral painting on hardboard (cut from a magazine); a nautical map ( another magazine cut out); an empty carved square frame and a blue and white plate which I won in a Ebay lot of assorted kitchenwares. |
 |
| There were 2 plates included in the lot, one you've already seen above the side table in the bedroom. https://studioeminiatures.blogspot.com/2020/04/a-long-days-journey-into-night-lands.html Both are signed but remained unidentified until a couple of weeks ago when I saw 2 similar plates listed on Ebay. The initials on the backs were the same as the 2 I had. I was THRILLED to learn that my plates were by Ellen Krucker Blauer In case you're not familiar with her name, Ellen Krucker Blauer and her husband John, were owners of San Francisco's The Miniature Mart back in the early 70's and 80's. They were avid collectors and talented miniaturists, as well as regular contributor to the Nutshell News magazine. |

 |
| I was relatively new to the miniature world in the mid-seventies and a total devote to Nutshell News, which is how I knew who Ellen Krucker Bleauer was. When my husband and I took a late honeymoon trip to San Francisco I wanted to go to their store SO BAD!!!! but we didn't have enough time or enough money; my how things change... I loved my plates prior to my knowing who made them and even more so now because of all the mini nostalgia attached to them. |
 |
 |
re: WHAT'S ON DECK: Down on the warm cork floor between the sink and the tub, is a striped cotton area rug with a pair of slippers made from bent pipe cleaners, trimmed with bunka and lined with paper. |


 |
 |
| A basket of dirty laundry sits in the right corner under the sink along with a weathered blue stool. It took several tries before I was happy with the paint finish on the stool which looks neither too old or too new. So there it is - and now you've seen everything! but here it is all over again ...    and Now Voyager, you've journeyed through the bathroom and have arrived at your destination. watch your step as you disembark and please come again soon! Arrrrggh!  ⚓️ elizabeth Wwg1WgA |


