 |
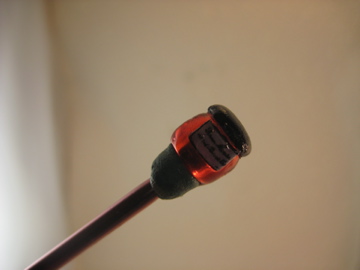
| Often I have been asked, "Elizabeth, how do you make those really amazing jelly jars"?!! I'm making that up; nobody asks me that ever, but I,m going to tell you anyway. They are amazingly easy and can fill up a mini pantry or cupboard in record time. So Let's Get Started.... Above is a plastic pony bead which are found at the thrift store, (Yay) or at or in the craft section of places like Michael"s or Wal-Mart. You need to get the ones that look like a jam or jelly. This one could be strawberry or raspberry. |
 |
| Then you need these metal paper fasteners. These are available at craft, office supply, dollar stores....you get the idea. I am showing 2 different styles with the gold toned ones being the most readily available and the black ones more pricey and at specialty craft stores. |
 |
| Here they are again, along with my rather dry fingers! ( Now, where did I leave my hand creme???) |
 |
| The fastener has to fit the pony bead. Don't worry about the tails, they will be cut off, but the head of the fastener needs to look like a jar lid. |
 |
| This is Quick-Grip an this is what I have been using lately for a number of different projects. It sets up super quick, so you have to be READY to apply from the tube and then cap it A.S.A.P. as it doesn't know when to stop, and will just keep oozing out and then it is wasted. Don't bother trying to dispense it into a container to work from because it dries up too fast and it will get on your nerves trying to replenish it. Take it from me, it is easier to use it directly from the tube. I put the glue onto the pony bead and then turned it upside down onto the metal lid, then I adjusted as needed so the lid was centered. |
 |
| This is the jar with the lid waiting for the next step: THE LABEL! |
 |
| Labels are fun and I love them and I have files of all different kinds that I find in magazines and store flyers and if the label is right I photocopy it and shrink it down and make duplicates and then cut them out and then make sure they will fit the jar they are to go on. This one is from 'Bonne Maman' a really DELICIOUS jam that I personally love and I think you will too! I was not paid to say that, either. |
 |
| Ahh, here's my baby. I LOVE this glue for paper, and I glued the label on with it. I use it because will dry flat and if you brush it onto the surface it will dry MATTE. Some sealers 'say' that they are matte but they lie, they are shiny, shiny, shiny! This guy is a 'No Lie Guy'. I want shine for some projects but mostly I want the paper to dry flat and that is why I use this. I buy it at Michael's and it is Not cheap but worth it if you are hanging wallpaper in your doll's house and you want it smooth and not all wet and wrinkly. I give it 2 thumbs Waaay Up! |
 |
| Once again my very dry skin, (this time also coated with Quick- Grip glue) showing the labeled jam/jelly jar. Once the label is dry we are ready for the next step. ADDING SHINE. After all that fuss about Matte, what's the matter with me? |

 |
| I have wrapped some blue-tack to the end of a toothpick and stuck the jar on top so that it is easier to add the gloss. I've tried the TRIPLE THICK and CLEAR NAIL POLISH and the winner is ..... |
 |
| The clear winner is NAIL POLISH as it dries fast and comes with its own brush. Plus, it is easier to APPLY SEVERAL COATS to get the 'glass' effect which is what you want. This was bought at the $1 store for $2.15. The price is right! |
 |
| This picture is out of order! I cut the tails off of the fastener photos earlier! But now you see what I cut them off with. These snipers cut close to the source and I use these regularly. I bought them from Michael's in the bead section. |
 |
| NOW, what am I doing? Wiping down the jar? No, I am sizing up a 'hat' for my little friend; "yes, green is definitely your color". I cut a 3/4'" square for this jar of marmalade. This shows a variation of the jelly jars, kicking it up a notch. |
 |
| Just before I took this shot I gave the lid an application of 'QUICK-GRIP' glue. I made sure the entire black cap was covered lightly in glue to ensure the fabric would stick and stay down. You could use fabric glue but the Q-G is faster. |
 |
| I'm using beading wire to tie the cloth lid onto the jar snugly. I've no idea what gage this is but it is very fine. I needed to double it up to enable me to twist tighten it around the base of the jar lid. |
 |
| Here is the wire thread single... |
 |
| and here it is doubled up. TIP: to keep the wire from shifting, add a tiny bit of QUICK-GRIP glue to the "U" inside the wire. Then it will allow you to tighten up the wire around the cloth hat as seen below. |
 |
| Looks like a U.F.O. |
 |
| Ahhh, that's looks better! This is nearly finished. I did add a clear acetate disk that I punched out with a circle cutter the same diameter as the pony bead and glued it to the base of the bead with what, you ask?........Yes,..you guessed it, QUICK-GRIP glue. I trimmed the fabric with embroidery scissors and then of course, cut off the excess wire. |
 |
| And finally, we come to the end. I have assembled a group of jelly jars and honey jars and jars with creme, just to show how different sizes of pony beads and paper fasteners can accommodate a variety of applications. I hope that you have enjoyed my first photo tutorial because I have often been asked about how I make these really AMAZING jelly jars.... Now you know. Have fun! |
.jpg)


Elizabeth....I'm holding myself back from commenting on all of your posts....but I can't help myself! I'm so impressed with your new talents (techno-talent ie) that I look forward with such eagerness to see what you will be doing next. Love love the pony express jelly jars how to. You are generous with your craft....thank you.
ReplyDeletefats
Hey Fats, I have you to thank for never giving up on me even when I said I was not interested in technology. Persistence wins the day! hahah I am glad that you liked the above tutorial even though it is rather simple I had to start somewhere. Funny though, even though it was something I've done many times over, I had to really think of how to break it down for the photos and then of course the stupid jars wouldn't cooperate and the glue was determined to do its own thing...Whaaaa!!! I loved it.
Deleteelizabeth
Good idea nice
DeleteGreat tutorial thankyou. Does this mean I have no excuse not to make my own honey jars!
ReplyDeleteJanine
Well Janine,honey; To BEE or Not to BEE?? That's a "sticky" question. But yes, No Excuse!!! ha ha
ReplyDeleteelizabeth
Very nice tut! thank you so much for sharing. Love the jars.
ReplyDeleteThank you Leilani! I did this tutorial a couple of months ago and it is still very popular and I believe it is because it is soooo easy and so much fun to do! I hope that you will try them out and fill up your mini pantry shelves with them. Enjoy!
Deleteelizabeth
I have just found a box of glass pony beads that I bought in a charity shop, looks as if I might be making a jam shop. Thank you.
DeleteJust wanted to say I love this tut. I am making them right now, well remaking them, lol. Everyone please test your clear nail polish on the beads first. My brand (LA Looks) had a weird reaction to the plastic beads and turned them frosty. Totally my fault for not testing before clear coating them all. I just don't want anyone else to make this same mistake. I ended up using Gallery Glass Chrystal Clear and they turned out great. Thanks again for the inspiration.
ReplyDeleteHi Alicia! Thanks for this follow up! I have never had a problem with the nail varnishes but I know that it Can happen that there is an adverse chemical reaction, so I appreciate any feedback! You know that this was my very first tutorial and it has become the second most popular posting, just after the measuring spoons! It continues to surprise and of course , please me, at how much people enjoy this jelly jar project! I am still making them too! Thanks for your comment, Alicia, and I am Delighted that you are having so much success and so much fun!
ReplyDeleteelizabeth
This is super cute! Love what you can do with beads. The jelly jar is really cute too! I have been thinking of the best ways to make jelly jars.
ReplyDeleteHi Lindsey! Fancy meeting your here! :D I am so glad that you have enjoyed this little tutorial of mine, and I thank you for taking the time to comment. I have more beads than I know what to do with, so at every opportunity, I am looking for more ways to use them up. This was a fast cheap and easy project to do and you can make scads and scads of them in record time. Finding labels is the biggest challenge but with so many free Printies on- line to down load, that should prove easier than the way I have gathered mine. Have lots of fun ( as I know you will ) when making this project! :D
ReplyDeleteelizabeth
I'm sorry but I don't get this. So these are beads that are made into tiny jars? Why? Sorry, I think I'm ignorant of the purpose. What is a pony express? I thought they were going to be for a fairy garden like a human garden. 😳
ReplyDeleteThe Pony Express was a horse and rider mail and delivery service in the early days of the American post office. The beads are called ( for reasons unknown) "pony beads" probably because they can be made into hair ornaments ie. for a pony tail. This tutorial was a kind of play on words but the point of the tutorial is to make tiny jam or jelly jars to place in a doll's house. And although I wouldn't recommend them for a fairy garden, I don't see why they couldn't be used there if perhaps they were glued onto a garden table for the fairies to enjoy!
DeleteI hope that clears it up for you and Thanks for your inquiry. :))
elizabeth
Hi Elizabeth. Just "discovered" your post, and I LOVE it. Your attention to detail is fantastic. Thanks for sharing.
ReplyDeleteI'm happy to know that you are enjoying it- Thank You! :D
DeleteLOVE IT THANKS FOR THIS PAMIE
ReplyDeleteYou're most welcome Pamie! :D
DeleteI have almost as many beads as Wally world does!So imalways looking for a way to use them up. Great tutorial
ReplyDeleteLast year I spent a full two weeks, weeding out and reorganizing ALL of my beads, one by one. What a job! I vowed not to buy anymore but I love them and can never seem to resit a good bargain and/or a pretty color; so it's comforting to know that I'm not alone ;D
Deleteelizabeth
Very interesting tutorial on the jars and one that I will use, however, was waiting for the finished hat. In the photo it's difficult to see it completed.
ReplyDeleteThank You for your comment regarding the cloth covered jam jars. The cloth around the edges was trimmed to fit the jar and the wires around the lid were twisted very tightly and then snipped down as close as possible to the jar. To keep the cloth from fraying, simply add a little clear fray check or white glue clear nail polish to tidy the edges of the cloth.
DeleteHope this helps! :D
elizabeth
great tutorial! From another Canadian!!!! Just found your site and I'm impressedwith all you do! I have just started 4 months ago as a miniaturist and I'm loving it!!!
ReplyDeleteWELCOME Haze to the Wonderful World of Miniatures!
DeleteSo glad to see you here and hope that you new journey into this fascinating hobby will bring you many many years of creativity and personal satisfaction, just as it has done for me- EH!? ;D
elizabeth
Just found your site. Like everyone else I love the little jelly and jams jars. Haven't made them yet but I will. I have lots of beads also. Need some pony beads the color or jam or honey.
ReplyDeleteThanks so much for such a cute ideal. Keep crafting please.
Thanks for your sweet comment and the positive feedback! I think that once you get started making these you'll see how adaptable it is using a variety of different shapes and sizes and before you know it, you'll have an entire larder full to bursting!:D
Deleteelizabeth