"The glory of Lebanon shall come unto you, the cypress, the pine, and the box tree together, to beautify the place of my sanctuary; and I will make the place of my feet glorious." Isaiah 60:13

This year, I've decided to dress up the Dower House living room for Christmas.
It's not something I usually do, although in the past I've made a Christmas scene in Land's End (A Land's End Christmas- 2015) and also a small roombox- Victorian Bliss, both dedicated to and in memory of my mother who LOVED the Christmas season.
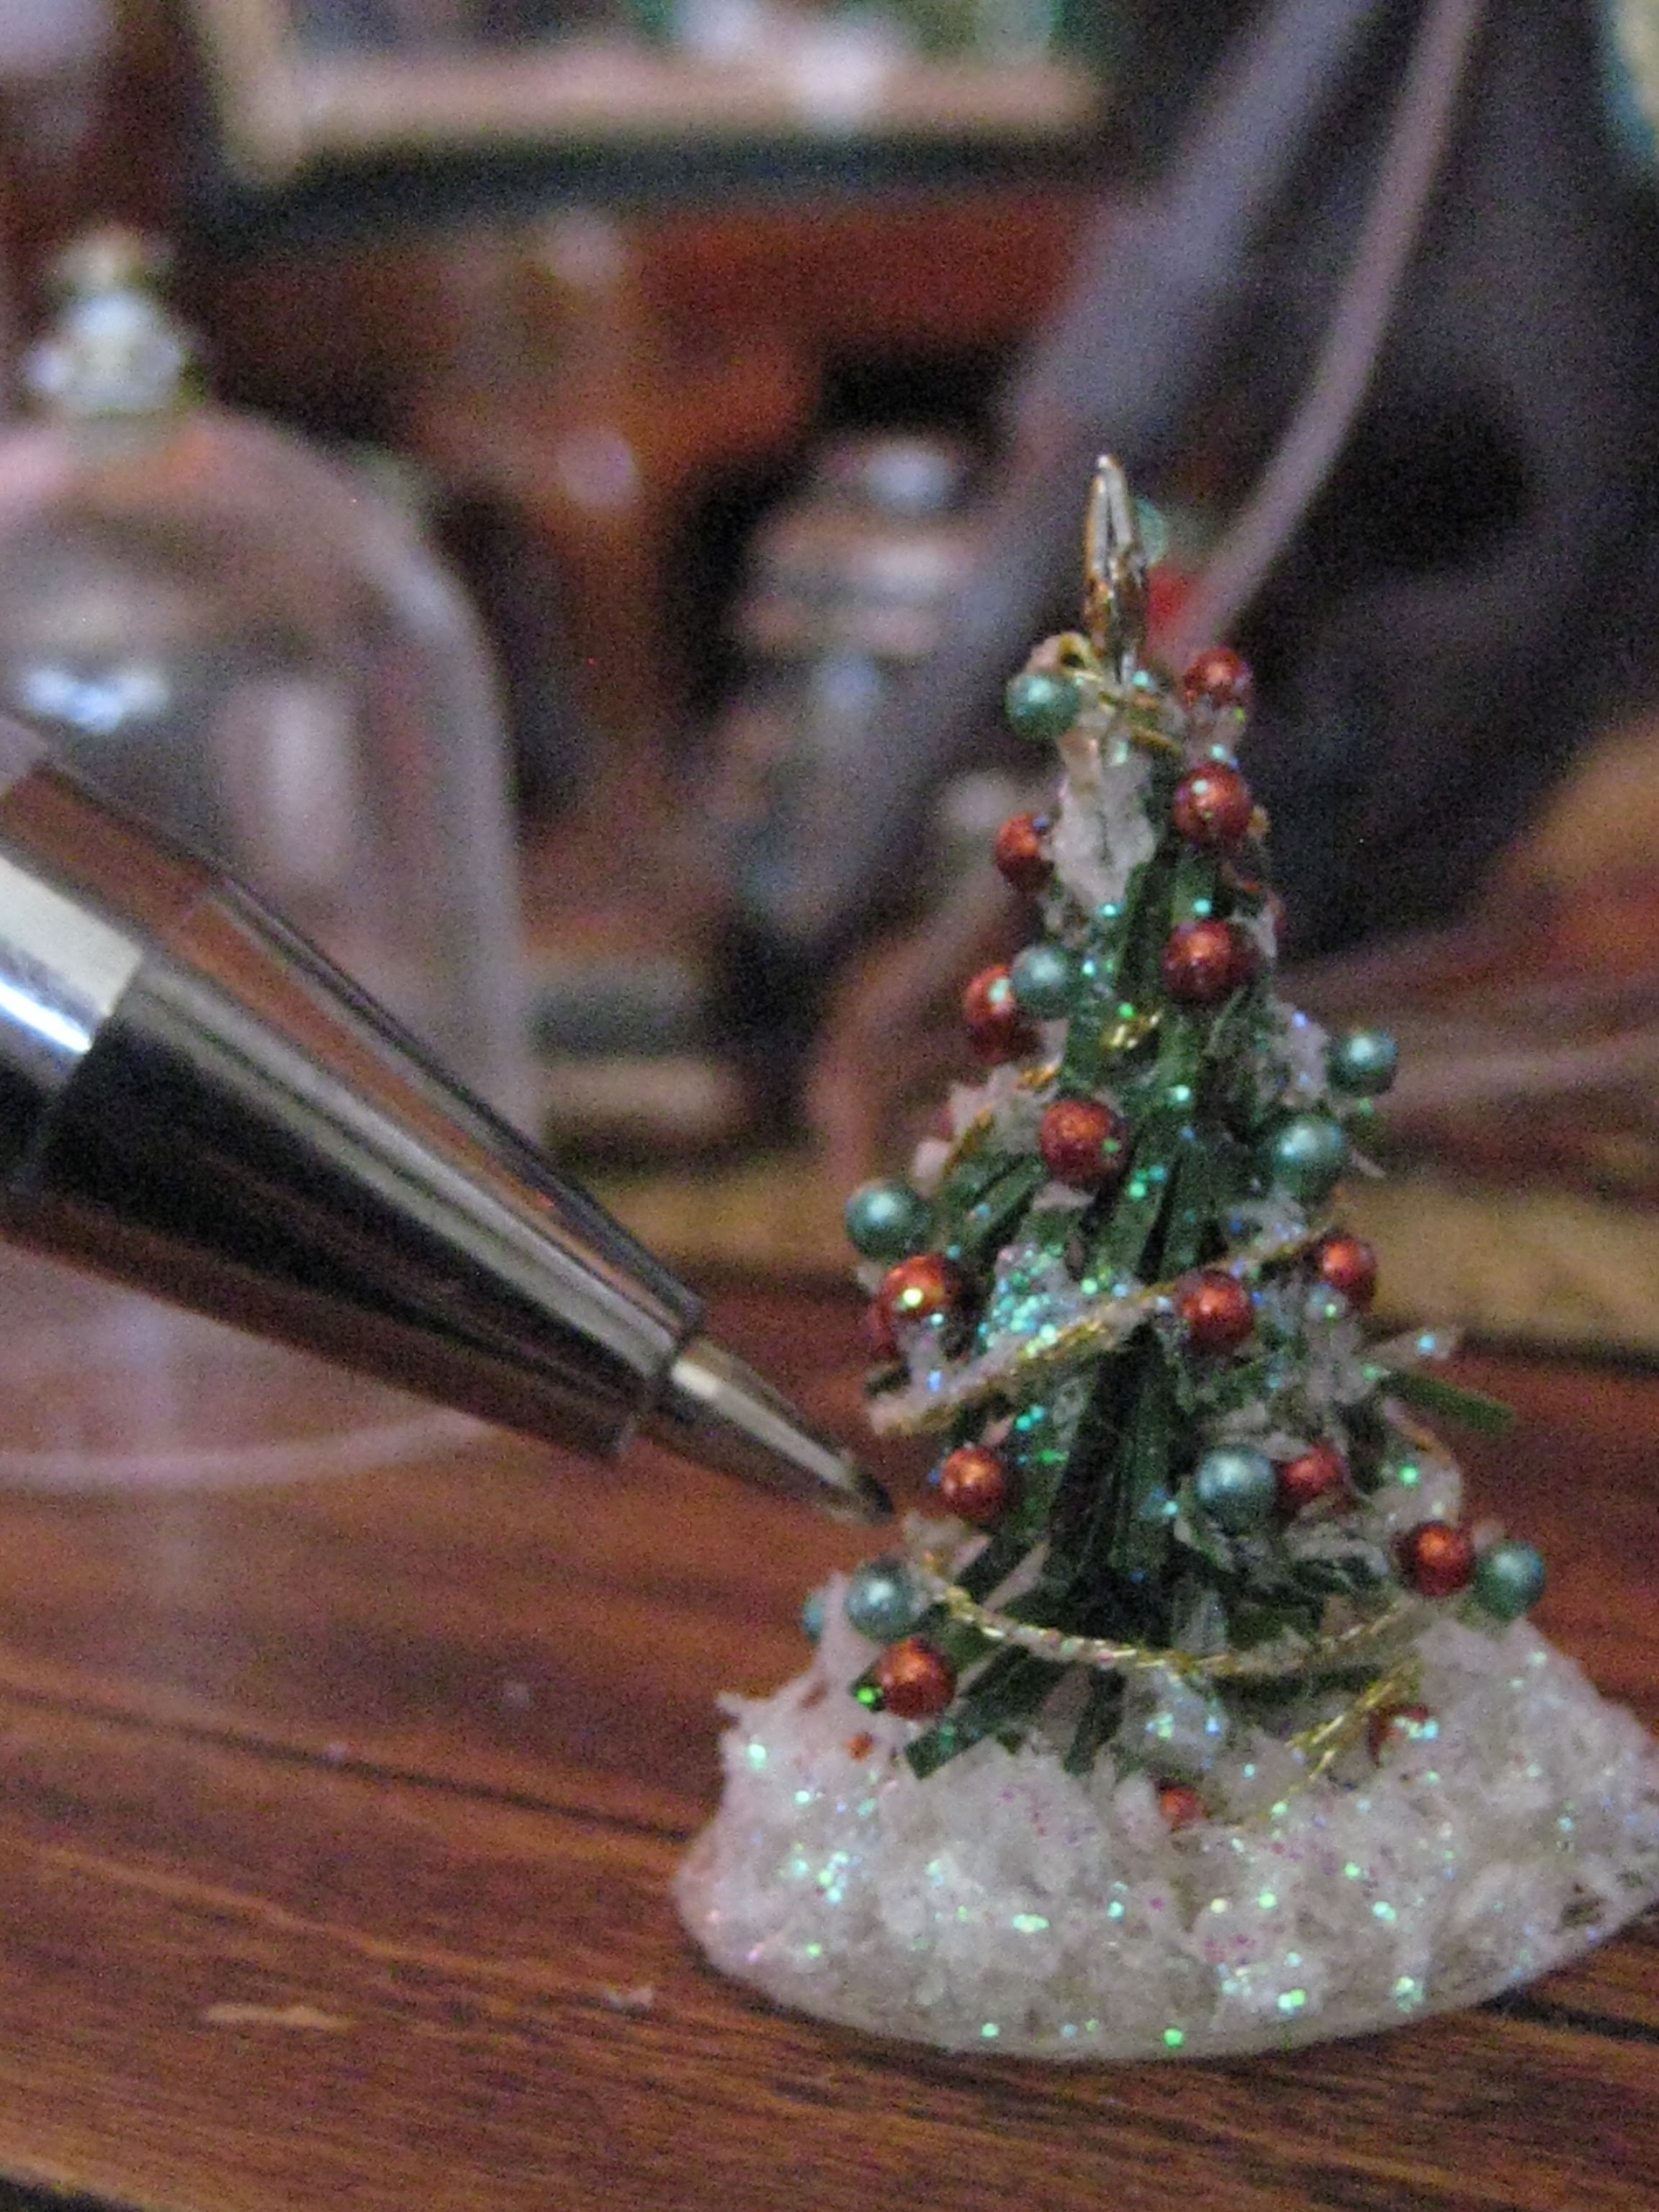
Anyhoosie: My ongoing complaint is that I never seem to have enough room for a Christmas tree in any of my displays, which is why I usually don't bother.
But this year, I decided to squeeze in a small tree for the table top in front of the Dower House Living room window.
Initially I used a bottle brush tree, but later I removed it in order to make a slightly smaller tree entirely from scratch, which I'm going to demonstrate in this post.
FYI: I purposefully chose NOT to electrify it with mini lights as I find they don't photograph well. What I did instead, was swap out the original non-working table lamp with the black shade,with its working TWIN, a decision I'm glad I've made.
NOw on with the show......
 |
| I used toothpicks for the trunks |
 |
| I coloured them with a brown felt pen. which was an unnecessary step, but I did it anyway. |
 |
| I stained more than I needed in case one of the toothpicks broke which it did as I was working with it. |
 |
| I used a metal hair comb which I found at the thrift store in a package of 2. |
 |
| I removed the beads and saved them for another project |

 |
| Then I unwound the metal from the shaft. |
 |
| Beginning approx. 1/3 up from the end of the stick, I wrapped the metal up and around the wood. |

 | ||||||||||||||
| I used pliers to crimp the metal against the toothpick. This is where I accidently snapped the wood because I'd applied too much pressure. After the wire was secured I clipped the rounded loops from the ends of the metal comb  I spread the cut loops apart to fill out the gaps
of a Christmas tree.  along the entire length of the tree to prevent the wire from sliding off.
  After the Super glue was dry I painted the entire skeleton with brown acrylic paint
This is what it looked like.
 The lycopodium contains a preservative which makes getting an instant bond more frustrating than you'd think.  I ran the glue along the metal branch and then pressed the lycopodium onto each of the limbs. Each application took a lot of glue and several tries.
|


.jpg)


.jpg)
.jpg)
.jpg)
.jpg)


Great tutorial and the result is fantastic. Thank you!!!
ReplyDeleteGeneviève
Glad you've enjoyed it Genevieve! ❤️ It was an enjoyable set of Xmas tree projects to explore, and although not all were created equal, I successively improved them as I went along. Wishing you and yours a VERY MERRY CHRISTMAS🎄
Deleteelizabeth
Hi Elizabeth! Your mini trees are beautiful! What a brilliant idea using the hair comb for the branches. I admire your perseverence with gluing the lycopodium on - I tried making a similar tree once and gave up as it was such a pain to glue. But this is encouraging, so maybe I’ll try again. I look forward to seeing the tree in situ!
ReplyDeleteThank you Shannon! ❤️ At the time I'd purchased the combs, my intent was to somehow make them into trees however, I didn't figure out how until earlier this month, and although the resistant glue was annoying, I encourage you to give yours another go because perseverance prevails!
DeleteAnd I'm already hard at work on the "in situ" post, which will be soon!
Wishing you and yours a Very MERRY CHRISTMAS🌲
elizabeth
Fantástico tu arbolito y también todos los demás por supuesto. Deseo que tengas una Feliz Navidad. Un beso
ReplyDeleteThank You Very Much for your comment Matxalen!❤️
DeleteIt was satisfying to finally take an idea that had been renting space inside my head and turn it into a reality!
Now I can focus on another "Big Idea" which has been keeping me awake at night, but more about that for future post! 😉
Wishing you a VERY Merry Christmas, Matxalen🎄
elizabeth
Merry Christmas, for sure! I love the tree. I do remember when it bleaching and dying the bootle trees was a thing. I never did. I love that you find the most unique materials to create exactly what you want. Just use up what you have. Bravo.
ReplyDeleteThank You Ann and re: "the thing" you're so right! 😄There was a WAVE of bleaching and dying bottle brush trees which coincided with the Shabby Chic decorating style, both real and in mini, so I thought I'd give it a try and wound up with drawers full of pastel coloured trees- some better than others which I now don't know what to do with! 😂
DeleteSending you Merry Christmas wishes too and once again- Thank You! ❤️
elizabeth
Beautiful trees. The candles look very interesting.
ReplyDeleteThank You Very Much Minimeble!❤️
DeleteMaking the candles was an experiment which fortunately worked out as planned. They're extremely lightweight therefore easily supported by the tree branches and give the effect of old fashion Christmas decorations 😊
Wishing You a VERY Merry Christmas. 🎄and do come again for my "part 2" of this holiday post.
elizabeth
Hi, I have a different that you made! It looks like Pom poms of snow ! It is great as well. These trees look like quite a challenge but once again, oh so clever! J
ReplyDeleteGood Morning Janine! ❤️
DeleteI've forgotten half what I've made and/or given to you over the years so you'll have to send me a photo of the one you've described because my old brain is - OLD! 😂
Other than getting the greenery to stick quicker, the trees themselves were quite easy. The challenging part was decorating the tree which is as much of a struggle in mini as it is for me in Real Life since I kept on "changing my mind"🤪
Wishing you and your "Trusty Man" a VERY Merry Christmas my friend, and we'll touch bases again soon! 🎄
elizabeth
Me gusta la forma que has hecho el árbol y las velas. Es muy ingenioso. ¡Me encanta como queda!
ReplyDeleteThank You Isabel! ❤️ It was gratifying to me, that these trees actually turned out as I'd planned because very often they don't! 😀
DeleteThe simplicity of shape made the candles a better option than using a strand of electric lights and I'm so glad that you like the candles too!
Merry Christmas wishes to you and yours, Isabel 🎄
elizabeth
Thank you LInda!❤️ They were quick and easy to make but trying to decide on how to decorate them took a long time!
ReplyDeleteI wish you a Very Merry Christmas too, and eagerly looking forward to your next visit back to Canada!
elizabeth
Hello Elisabeth,
ReplyDeleteThe tree has turned out very well. I love the idea of using red coloured glass shards to mimic burning candles. they have turned out well!
The other trees you have made look good too. It shows that there is often more way than one to reach a goal (in miniature). This post has been inspirational for me. This year I will not make a tree yet, but next year I definately will.
Merry Christmas to you and your loved ones,
Huibrecht
Thank You Gonda and a MERRY CHRISTMAS to you and yours too! ❤️🎄
ReplyDeleteelizabeth
You are so right in that there's more than one way of achieving our goals in Real Life as well as in miniature. Making miniature Christmas trees is not my favorite pastime but I am satisfied with the ones in this post and I'm happy that you have found them inspirational for future use. All the best of the season to you and your Loved ones too, Huibrecht! ❤️🎄
ReplyDeleteelizabeth
Merry Christmas Elizabeth
ReplyDeleteNo, I don't want to make such a small tree. my fingers do not agree, in winter, to do such small things. and in summer it's me who doesn't want to make Christmas decorations. bravo for the idea of breaking pearls for candles. I hope this idea will settle in my brain. I like small trees of all colors. have a great family holiday.
Dear Elizabeth, I LOVE your old fashioned looking tree! And thank you as always for sharing your ingenious methods! The crushed glass beads for candle flames is not something I would have thought to try! Your little non-electric candles remind me of antique ones designed to mimic candles for real trees! And all the other little tiny trees you have made just prove that you know how to make anything!!! I hope someday (when I am retired) I will have enough time to make Christmas trees and really do them justice the way you have! As always your work is an inspiration!!!
ReplyDeleteI hope you have a Wonderful Merry and Peaceful Christmas.... with plenty of minis too! :):):)
Wow that's brilliant. You have some great ideas. I would never have thought about unravelling a hair slide! Merry Christmas :-)
ReplyDelete