 | ||
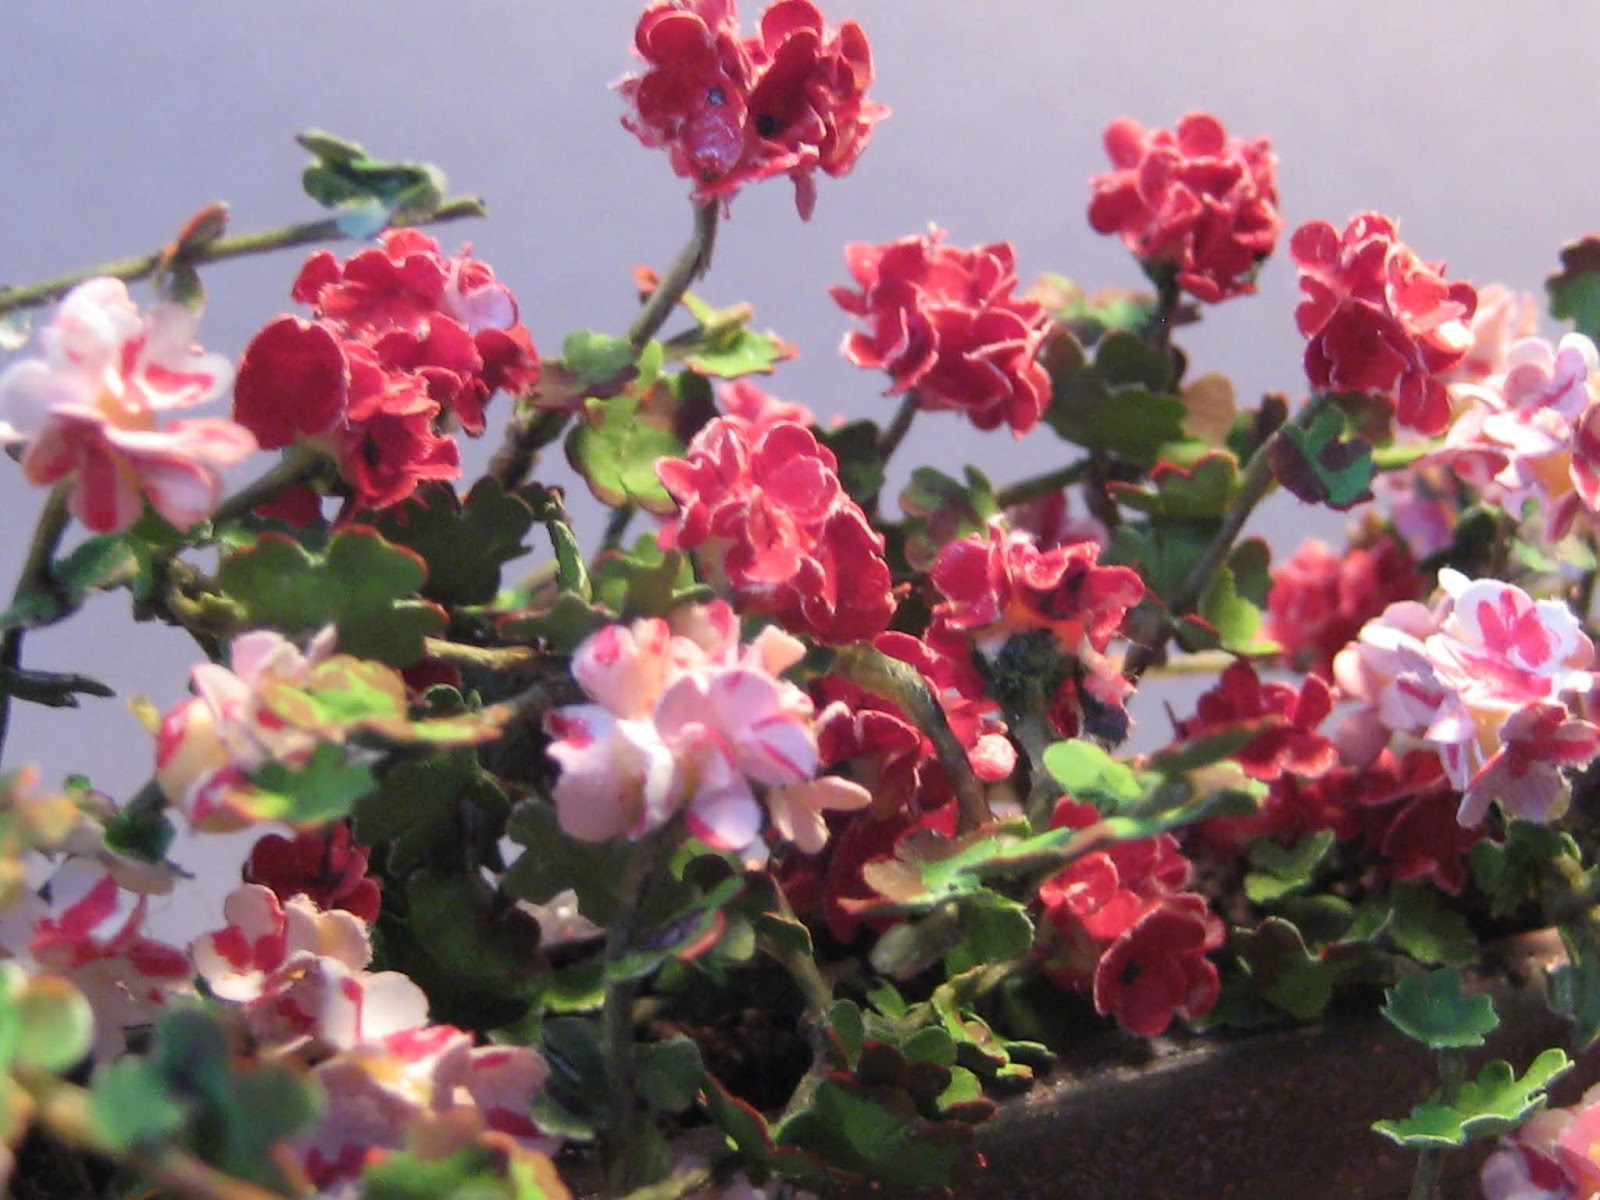
VENICE is famous for many things, with one of them being its flowered covered balconies, and so, since I am patiently awaiting some products for the Villa's bathroom, and since I am STUCK once again in a miniature limbo, I thought that I would try and make some flowers to fill up a long planter box which I'd also made, to eventually sit on the wide ledge directly outside the Villa's 3rd floor bathroom window. The length of the planter box is 6.5 inches/16.5cm which is unrealistically long but since I didn't want to make 2 planter boxes, I'm okay with it. I decided to fill the box with IVY LEAF GERANIUMS. Having previously made regular geraniums from kits, I felt I already had a good idea of how to do it. And having collected A LOT of paper punches from thrift stores and on-line vendors, I thought I could do it from scratch and hopefully well enough to give me the look I was aiming for; AN EXUBERANT ABUNDANCE!
There are a total of SEVEN individual plants in the planter box.
4 pink & white ones
and
3 solid red ones.
It took me about 3 days to completely assemble all of the plants.
I'm pretty happy with the way they look
and so I'm going to pass on what I did, which is neither special or unique,
nevertheless-
I thought you might like to see the entire process
from beginning to end. FYI To any "professional"mini flower maker looking at these be forewarned- they ARE NOT "anatomically correct" because I'm far too lazy to be that precise what I'm showing you here is how I've chosen to make them using a style I'm very fond of and like to call: "Close Enough!" so with that said- On With The Show! The pink geraniums are made using both plain and acrylic painted photocopy paper. Some of the red ones were also made using the painted photocopy paper. After making 2 of the red plants with the photocopy paper, I switched over to Japanese writing paper, which I'd originally found at the thrift store. I later found the same packs of paper at a local mall retailer which sells DAISO Japanese products. It was $2.00 for 80 sheets. The weight of the Japanese #19 writing paper is similar to old cigarette or tracing paper.
I used a 5 petal paper punch for both the blossoms AND for the leaves .  |

 |
| The smallest of the flowers was what I used for the flower heads and the medium and the large punches were what I used for their leaves. |
 |
| Here's what I punched out sorting through the 3 sizes was a bit of a pain since they all looked the same! |
 |
I used all 3 sizes in green for their leaves |

 |
| For the red geranium plant I switched to using the painted Japanese writing paper. The reason was that it was not only thinner, but the blossoms held their shape better. I'll elaborate more on this a little further down. |
 |
Here's how I built the plants: I began with 3-4 lengths of 30 gage paper covered florist's wire |
 | ||
I folded the ends up about a third
Using a pair of pliers I twisted the folded ends together to a length of about 1 and 1/2 inches. This stem gave me plant base as well as a handle to hang onto as they were being constructed. |

 |
| I fanned out the stems and cut them down into irregular lengths. The upright ones would be the taller plants and the bent wires; the cascading ones. |
 |
 |
| I then cut pieces of the leftover wire into short lengths of less than an inch |
 |
| The short lengths were bent into a "V" shape |
 |
| The "V's" were then wrapped around each of the stems. To secure them into position, I pulled both ends tightly by using my pliers |
 |
| Each sub-stem will support flower heads and/or leaves. |
 |
 |
| This is what it looked like when the armature was done |
 |
| The only glue I used throughout this project was Carpenter's Wood Glue. To stabilized all the connections and add strength to the armature, I coated everything with a thin layer of the wood glue. I used a metal ball tool to apply the glue but a toothpick would've worked equally as well. |
 |
| I made sure to completely coat the joints of each of the sub-stems so they wouldn't move about when the flowers were attached. The glue blobs which you can see below where smoothed out using the ball tool. |
 |
 |
| Everything dried quite quickly! Once the glue had set I prepared to add the flower heads. I found some fake plant parts in my stash which had tiny styrofoam balls glued to it. I carefully picked the little balls off. |
  |
| Once the styrofoam balls were removed I pierced them through with a corsage pin, Glue was added to the ends of the stems and the tiny balls were slipped onto the ends through the hole I'd made. ( I am showing a straight pin in the photo below however the corsage pin was better since it made a hole which was the right size for the wire) |

 |
| The petals will be applied to all of the little balls |
 | ||
| The balls were given a coat of Wood glue right before the petals were attached. The petals for the pink/white geraniums were first cupped using a ball tool which helped to break the tension of the paper, but for the red ones I changed my technique to what I show below. Using a sharp pair of scissors I cut each of the paper flowers towards its center.
|


 |
| I dipped the end of the flower cone into the wood glue |
 |
| and then onto the styrofoam ball |


 |
| I continued this process until the entire ball was covered. HOWEVER, After I began building the red geraniums, I noticed that the stiffness of the paper was causing the flower to unfurl as they dried. |

So it was at this point, that I stopped using the photocopy paper and switched to using the Japanese Writing paper, which continued to hold its shape as the blossoms were glued to the balls.

 |
 | ||
| To make the pink/white geraniums more interesting, I coloured the flower heads with felt pens. then
I cut into the petals of each flower head with very sharpe scissors, to help separate their petals.
|


 |
| The shamrocks punches came in two different sizes. Using a ball tool I pressed along the outer edges of the leaf shapes which cupped them. |
 |
 |
| Then I flipped them over and using the same ball tool I pressed them down in the middle of the paper. This gave the paper an undulation. This technique is found in Pepperwood Miniatures booklet of HOW TO MAKE FLOWERING PLANTS |

 |
| To apply the leaves I dipped the tiny stems in the Wood glue and attached a leaf at the joint of the sub-stems. I used my tweezers to compress the paper stems around the wire armature of the geranium eventually working my way up and down the length of the plant |


 |

 |
| The photos above illustrate how I applied the leaves for each stem of the geraniums HOWEVER in reality I finished ALL the flower heads FIRST and THEN I applied all of the leaves. as shown in the red plant below |
 |
Once all the leaves had been glued on, I finished around their edges with a red felt pen. I also used a green felt pen to fill in the white undersides of each of the flower-head balls. When that was done, I clipped off some of the length of the handle leaving enough of a stem to be able to 'PLANT' into the styrofoam base of the planter box. I made a potting soil mixture of wood glue, dried coffee, and tea grounds. This thick dirt paste, was layered onto the top of the styrofoam inside the box. Then the wire ends of each of the the geranium plants was forced through the wet soil and into the foam base. and VWAH LAA! a planter box a la'Venetian Style and as we say in Canada, not bad eh? |

 |
elizabeth 😊 |
So: painting the paper with acrylics gives it more stability, cuts cleaner without requiring any paper backing, and doesn't compromise the weight of the paper or it's flexibility.
Just so you know. 😉
.jpg)


Absolutely genius! They look so real. thank you for sharing.
ReplyDeleteCheers, Linda
Your welcome Linda and I hope that you're able to use this info for your Conservatory build.
Deleteelizabeth
They look so real, they remind me of a holiday in the south of Germany where every balcony was covered with this plant in various colours.
ReplyDeleteThank You Very Much Kieine Vingeres! :D
DeleteThese kinds of floral displays are what I generally associate with Europe and your Lovely comment certainly confirms it! My dear miniature friends who regularly travel the world, have made the same observations when they saw them, and so I know that I am definitely on the right track with these geraniums. :D
elizabeth
You're GENIUS, Elizabeth, they are a feast for the eyes (and your bathroom planter ;)) they look fabulous! And thank you for this outstanding tutorial!
ReplyDeleteHave a lovely Sunday!
Hugs, Ilona
Thank You VERY MUCH Ilona! :D
DeleteYour are one of those Professional Miniature Florists who have MORE than MASTERED your craft, so I'm Delighted that you've given these your personal stamp of approval! ❤️ :D
elizabeth
Not bad at all I would even say fantastic flowers!!! I love the colours. Thank you for showing us all the steps to achieve this great result.
ReplyDeleteGeneviève
Thank You Genevieve! :D
Delete40 years ago pink and red weren't a very popular colour combination, and I wouldn't have chosen to place them side by side, but today I feel entirely different. I love their contrast as well as their harmony and I am Thrilled that you have enjoyed this colourful paring as well! :D
elizabeth
You are as always a miracle worker. Love the geraniums and as I like to remember something you once said to me...it is not that it has to be exactly as the real thing but that it gives you the essence of the real thing. ...And that is exactly what you have accomplished! Sitting in the airport in Lisbon on a 4 hour delay...a welcome post .Thank you for sharing...you are so very kind to share your talent as you do. Hugs and "MISSES"
ReplyDeleteWhat a Pleasure to hear from you during your travels Fats, and Thank You for reminding me about what I'd forgotten I'd told you! ;D hahhaha
DeleteI glad that like the geraniums Fats, and that you've taken the time to reconnect during your long delay in Lisbon; Thank You! :D
I'm wishing for you a safe and "RELAXING" time while you're away and counting down the time until your return.❣️
elizabeth
Bellissimo!!!
ReplyDeleteGrazie mille Judy! :D
DeleteIt makes me Very Happy that you like them!
elizabeth
Thanks for the tutorial. Your geraniums are amazing and so real. Beautiful colors.
ReplyDeleteYour Most Welcome Faby and Thank You for your encouraging comment- Much Appreciated! :D
Deleteelizabeth
Your 'close enough' style has definitely teetered into the realistic school of modelling. Such patience -all that cutting, sorting, bending, snipping and sticking but even more talent and patience with the wonderful subtle colouring - they absolutely beat many a 'pro'seller of flowers. Take a bow Ms Elizabeth x
ReplyDeleteThank Yo for your comment and your compliments, Marilyn! :D
DeleteIt gave me a bit of a chuckle because I wouldn't have done it if I felt I had to cut out each of the flowers or the leaves individually- I'm just not that kind of girl! ;D
Using the multi-flower paper punches made the process move along much faster and once I developed a rhythm, it also became( dare I say it? )..... FUN!
elizabeth
Hi, Elizabeth - You are the ultimate inventive genius! When I saw the first photo in your post, I assumed that you had included a photo of real geraniums as an introduction. I was amazed and in awe when I realized that those were the miniature geraniums that you had made! Your "close enough" style has hit realism with complete accuracy. Thank you for including each step in creating these beautiful geraniums. Your technique for making the complex stems is at the heart of such realism, and the color mixtures and folding techniques for the leaves and flowers complete the effect. I love, love, these flowers and can't wait to see them in all their glory on the ledge outside the villa's bathroom.
ReplyDeleteMarjorie
What a Great Pleasure it was to read your Beautiful comment Marjorie- Thank You! :D
DeleteIn the beginning I was just trying to pass the time until my mail order arrived, then as I got more into it and as I saw how the geraniums were coming together, I was ready and willing to make even MORE!
The armature is a technique which I've used before when making ivy and since it worked for them, I knew it would work for these geraniums too. :D
elizabeth
Geraniums are such a perfect choice for the villa's window boxes, and I love your method for making the armatures because I think the final versions look so much more realistic and natural! I had a little trouble with my leaf and petal punches when using thinner paper. It would tear rather than punch a perfectly cut shape. To solve this I was able to punch both a piece of printer paper and the thin rice/tissue paper at the same time. I wonder if you experienced the same with the Japanese writing paper? I am so excited thinking about what the exterior of the villa is going to look like, and teasing photos of the geraniums makes me even more so! The tiny peek at the box itself and it's old world aging is intriguing! Your detailed rendition of the plants is like everything you do - straordinario!
ReplyDeleteAs soon as I read your comment, Jody, I retrieved the painted Japanese Writing Paper and re-punched the flowers using the same punch, and it cut through it cleanly without any back up paper.
DeleteThen I tried a little cheapie dollar store single shape punch and it still cut through the painted paper without tearing it.
The hand punches were a different story and I DID require the use of back up paper when punching through the Writing Paper so I am THANKFUL for your inquiry as it has helped me to know too! :D
Now that I have a flower box full of geraniums for the ledge, I feel that I MUST make some more specifically for The Balcony on the second floor as well. This makes me Happy because the flowers will serve to soften the hard surface of the Villa, which is still undergoing extensive renovations, butThank You Jody for your observations AND for each of your Encouraging words too!
:D
elizabeth
Not bad and close enough??? Your geraniums look amazingly realistic and thank you for the well explained tutorial. A Japanese Daiso shop was recently opened not far from where I live. I'm going to find out if they carry this paper. By the way, I also use tiny styrofoam balls and paint them green before I glue on the flowers.
ReplyDeleteYou're Most Welcomed Drora and Thank You for your Beautiful comment! :D
DeleteThe styrofoam balls make EXCELLENT bases for the geraniums and so I'm not surprised to learn that you've used them too, since you're more experience in making mini flowers than I am. I make them in fits and starts and only if I HAVE to! ;D
But I was SO EXCITED to find a Japanese Daiso shop in the local Mall and the best part was that it carried a lot of the "exotic" craft items which I've seen for sale on line and on Youtube channels i.e. Polymer Air Dry Clays which I've just discovered and LOVE, so make sure to look in their craft section at DIASO when you go Drora, because there is far more there than just the paper! :D
elizabeth
Thanks you for the tutorial. The flowers and the colors look real.
ReplyDeleteThank You VERY Much Joc! :D
DeleteThat is the Greatest compliment a miniaturist can hope to receive and I Cherish it! :D
elizabeth
Dear Elizabeth,
ReplyDeleteThank you for the detailed description of the making of the flowers. They are so realistic and the colours are perfect.
I would love to try and do this.
You always say how impatient you are but this project must have been quite tedious but you pulled it off brilliantly.
Hope to see it in person soon.
My workroom has been taken over by the first granddaughter for the next few weeks so things will be at a standstill here.
Thinking of you,
Janine
Thank You and Hellooooooo Janine! :D
DeleteAfter reading your detailed comment regarding my detailed description, I hope that you WILL try and make them!
BUT-
if you can arrange to come over, we can do them together. :D
They ARE a bit tedious but not at all difficult, otherwise I wouldn't have bothered.
and I AM impatient but perhaps because I was getting good results and could still be just as sloppy with the glue as per usual; I was determined to keep at it until they were done.
I do however, need to make some more for the Villa's balcony so....
let me know what works for you :D
elizabeth
Lovely Elizabeth! Really love these, and the colours are great. I have heard of people dampening the flowers before shaping so they hold their shape better. Anyway, not sure that helps at this point! Haha! Can’t wait to see these on the outside of the villa. Xx
ReplyDeleteThank You for your comment Shannon AND for your Lovely compliments! :D
DeleteI've not tried the dampening method so THANKS for this information. I have more of these to make so I WILL give that a go! :D
I'm Still re-working on the exterior of the Villa so it will be a while before they are able to be installed so I'm looking forward to that event too! :D
elizabeth
Está muy bien. Se ve frondoso y el colorido es perfecto. Un gran trabajo!!!
ReplyDeleteThank You Very Much, Isabel! :D
DeleteI am So Glad that you like the leaves of the geraniums because I had been Dreading the application of so many leaves. But much to my surprise, THAT turned out to be my FAVOURITE part! :D
elizabeth
Gracias por el tutorial, un trabajo fantástico y el resultado genial.Buena semana:-)
ReplyDeleteGracias Rosa-Maria and you are Most Welcome to the tutorial! :D
DeleteI had fun building each of the plants and I'm Happy to share, because it also helps me to remember what I did and how I did it :D
elizabeth
Beautiful work, Elizabeth! Love seeing your technique and problem solving :)
ReplyDeleteHello Nancy and Thank You Very Much! :D
DeleteI actually surprised myself!
I had a picture in my mind of what I hoped to achieve and the geraniums turned out BETTER than the vision;
and how often does THAT happen? ;D
elizabeth
They are beautiful Elizabeth!
ReplyDeleteThank You Carrie! :D
DeleteI am VERY Pleased that you like them!
Because I like them too! ;D
elizabeth
Wonderful! The colors, particularly on the pink ones, are absolutely beautiful. Thank you so much for the tutorial. It's always fun to learn new techniques. I will need to find that paper at my Daiso. It sounds perfect for flower and leaf making. P.S. I have used the exact same punch (just the small shamrocks) to make geraniums in half scale, and it works great! It's close enough to a geranium leaf for me. :-)
ReplyDeleteHello Deborah and Thank You for your comment- Very Much Appreciated! :D
DeleteI must say that I am love with the pink flowers too.
Initially I was going to make purple Petunias as their companion plant in the planter but then Linda Park suggested that i just make them All Geraniums so that's when I decided to include the red ones and to change their leaves. The shamrock punch worked like a charm, and I'm not surprised to learn that you've used the smaller leaf in your Half-Scale projects because it's size and shape would be Ideal! :D
elizabeth
Absoluely fantastic!!! They certainly turned out much better than 'near enough' whether or not they're "anatomically correct' lol
ReplyDeleteHa! Thank You Very Much Norma! :D And since I don't do "anatomically correct " very well in any case,; "close enough" will always have to be "good enough" for me
Deleteheeheehee ;D
elizabeth
Pa mal ... Je dis et même je proclame que ces géraniums sont criants de réalisme !!!
ReplyDeleteJ'aime beaucoup les teintes choisies, cette jardinière est très belle. Merci Elizabeth pour ce joli tuto !
Bonne continuation ! Bises. Joce
Thank You Joce, you Always say such Very Nice things to me regarding my work! ♥️ :D
Deleteelizabeth
Thanks for the tutorial! Looks a bit tricky...problable takes for hours :)Your flowers look just amazing!
ReplyDeleteThank You Mirel for your comment and for your compliment! :D
DeleteI have been making more of these plants for the Villa's balcony and have found that the "Trickiest" part is wrapping the little sub-stems onto the main branches of the armature. That part was definitely the most fiddly. And although these DID take hours, I had the time and I was also in the mood, so the time flew by and before I knew it- They Were DONE! :D
elizabeth
Que explosión de colorido,espectaculares tus geranios hiedra! Muchas gracias por el tutorial!
ReplyDeleteBesos.
Thank You SO MUCH Pilar because "An Explosion of Colour " was PRECISELY
Deletethe effect, which II was hoping to achieve! :D
elizabeth
Your geraniums are absolutely beautiful. Thank you for a very detailed tutorial and congratulations on the fab results. I love flowers and plants and always look for ways to make them, although lately I am a bit lazy about it. So, I will save this tutorial to try it in the future as your flowers are not just beautiful but very realistic and charming. I really love them. xxx
ReplyDeleteYou are Most Welcome to this tutorial Alexandra and I Thank You for your Lovely comment! :D
DeleteI am lazy too and always looking for short-cuts and so I was pleased to be able to use the paper punches for all of the leaves and their flowers.
The building of each of the plants took me more time that I had imagined but I was also making each of them one at a time.
With the new plants I currently constructing, I am building them as per an assembly line, which SEEMS to make their construction move along much faster! :D
elizabeth
Im a great fan of 'close enough' - your geraniums are absolutely fabulous and look very realistic. Love the planter! xx
ReplyDeleteHahaha! :D
DeleteI think that we should start a Close Enough Club, Robin because I don't think that we would any trouble getting new members to join! ;D
In the meantime, Thank You for your Compliments - always Greatly Appreciated when coming from a RL Gardener! :D
elizabeth
Buongiorno Donna Elizabeth,
ReplyDeleteYour geraniums are fantastic. I really love them and they look quite realistic. Thank you for posting such wonderful and clear instructions, though I don't know if I would ever have the patience to try flower making myself. The window boxes will be the absolute perfect touch to your venetian masterpiece.
Un grande abbraccio,
Don Giacomo
Mille Grazie Don Giacomo! :D
DeleteSpeaking to the "patience" part of your Most Welcomed comment: I KNOW that I would NEVER have the "patience" to build with precision, the Incredible structures you make Giac or the "patience" to construct the complex floors, walls ,ceilings and doors you do; so perhaps the word "patience, is relative;
or is it subjective? ;D
Un Grande abbraccio Back, mio caro!
elizabeth
Your geraniums are very realistic, Elizabeth! They are beautiful. Love the colors, and japanese paper sound perfect for flowers making! great methode for armatures too! Thank you very much for tutorial!
ReplyDeleteThank You Very Much Nono! :D
DeleteKeep in mind that making the armature is perhaps the most fiddly part of the process, but I like the delicate airiness which the cascading stems produce.
I am still testing out the Japanese Paper by making more plants and painting the paper with different colorants. Thus far the acrylic paints are still working for me for the flower heads although I still prefer using the photocopy paper for their leaves. More experimentation and exploration is required regarding the Japanese Paper but one thing for sure, is that the price is right! :D
elizabeth
Absolutely stunning!
ReplyDeleteThank You Very Much Megan! :D
DeleteI've made many geraniums in the past, but must say that I am ESPECIALLY pleased with these!
So much so, that I have decided to make more; striking while the mojo is hot! ;D
elizabeth
Aww these are really beautiful! You are so creative and I love "watching" you work :)
ReplyDeleteMany Thanks Linda! :D
DeleteI am feeling pretty chuffed about how these geraniums have turned out and Glad to hear that you like the look of them too! :D
elizabeth
Your work is beautiful and inspiring as always! I love the realism in your miniatures. Celia
ReplyDeleteThank You Very Much Celia! :D
DeleteIt's true that I strive for a certain degree of realism in my work, but I also want it to remain looking like A Dollhouse. For me it's similar to straddling the middle of a seesaw between how much realism and how much make-believe- if you know what I mean? :)
elizabeth
Thank you so much for this very well explained and shown tutorial - your geraniums looks awesome and very realistic. It was fascinating to follow your process and it's always interesting to see how many ways there are to achieve a terrific result. Or as we say here - all ways lead to Rome. ;O) And it was amazing to see that although you did not paint the balls in advance no white showed up - a sign for a very good job at attaching the single blossoms. Your planter turned out so beautiful and I'm already looking forward to see it in place at Villa Leone. And although your geraniums are far from being just close enough your "Close Enough" style made me smile - when it comes to flower making my aim is something in the range of "Hopefully it will be recognized that this is supposed to be a flower in the end" *LOL*
ReplyDeleteHugs
Birgit
Thank You Very Much Brigit and may I say that I Really Appreciate your comment and observations regarding how many roads there are which lead to Rome! ;D
DeleteI have seen many different approaches to making not just geraniums but other plants as well, and each artist makes them just a little differently and so that you feel you've learned something new from reviewing their process.
But I hear you about making flowers and then "hoping" that they will be recognizable in the end- if you could only see my BOXFUL of Fails!
elizabeth :D
Dear Elizabeth, perhaps I need to take a page from your book and learn to make my plants in the "not anatomically correct" way! It might reduce my labor from a year of fiddling to a month of breezing along! LOL! Your geraniums look Fantastic! (And I have grown ivy leaved geraniums... so I know them well!) In the first picture I was not sure if I was looking at the "real thing"! I particularly admire the pink variegated blossoms! And as usual, your methods make so much sense and are quick to produce! I think I need to make some "Elizabethan Venetian Geraniums" just to soothe my overworked finicky obsessiveness! (This morning I was even dreaming of making a lilac bush in a not-anatomically correct way just to see if it looked much different from my obsessive ones in the end! LOL) I know... Ii am nearing the end of my Marathon and getting a little punchy! :) But seriously, I LOVE your ivy leaved geraniums!!! You have proven that the results don't depend on anatomically correct parts! And thank you for sharing all the details.... glue type and paper type and painted or not painted... I learn so much from you! :):):)
ReplyDeleteDearest Betsy!
ReplyDeleteI am all about reducing labour when it come to minis but don't you EVER stop doing what you do to PERFECTION! ♥️
I think that I must have been born looking for short-cuts but not you! You are one of my "miniature Hero's" precisely because of your "anatomically correct" correctness, so please don't even speak of changing -even in jest! ;D
I am just glad that these ivy geraniums have passed inspection with you and with Ilona- WHEW! such a relief! :D
elizabeth
Wow your flowers look amazing I love them. Thank you so much for the wonderful informative tutorial.
ReplyDeleteHugs Maria
Thank You Very Much Maria! I have been getting lots of practice making these plants, so far I have made 11, and although it does takes time, the end results have been worth it! :D
Deleteelizabeth
Han quedado preciosos, y tu técnica es genial !!!!
ReplyDeleteThank You for your Most Welcomed comment Eloisa! :D
DeleteI have tried to make this tutorial as concise and as detailed as possible so that each step was illustrated, just in case anyone should wish to try making them too! :D
elizabeth
Genius at work ! Absolutely fantastic tuto ..... I`m sure I will use it in my balconies (whenever I start them ;)).Thanks a lot , Elisabeth !!!
ReplyDeleteBig hug
Greetings Luli and Thank You for enjoying this tutorial and the end results of it!
DeleteI have enjoyed making these plants and have since made 4 more! It's not hard but they are time consuming so if and when you ever do decide to make them -
be prepared! ;D
elizabeth
Oh wow! So neat, thank you for the tutorial!
ReplyDeleteYour Most Welcomed to the tutorial Brandy and I Thank You for your comment! :D
Deleteelizabeth
Thank you for not only producing the most amazing geraniums, but sharing such a great tutorial with us all. Bless you for your generosity and effort that it takes to create such great tutorials. xxxxx
ReplyDeleteHello Kathrene! :D
DeleteI LOVE the enthusiasm in your comment and you are Most Welcomed! :D
I was well on my way of making these plants before I felt that I should stop and take the photos for a specific tutorial since I hadn't presented one for a long time.
PLUS, I'm sure that it will come in handy as a future reminder for ME too! ;D
elizabeth
Elizabeth hello , I am soooo admiratif ! I love geraniums, mum gran used to have her porch filled with them and I remember the scent still. I always have a lot of them on my terrace and in winter they sit around the house hibernating. I can't wait to fill my dollhouse with them and your tuto is amazing! You gave me an idea to use cigarette paper when I begin. Thank you for sharing this, huggs Stephanie xo
ReplyDeleteHello Stephanie and Thank You for your comment! :D
DeleteI have made paper geraniums before and they haven't turned out as well as these ones have so I Really Appreciate your mutual admiration of them! :D
And since I don't have as much success with my Real Life annual geraniums it feels quite satisfying to be able to grow them in such wild abundance for the dollhouse. ;D
But do keep us posted regarding using the cigarette papers whenever you begin to construct your plants. I know that I'll find your ventures in miniature garden totally engrossing!
elizabeth
Magnificent! thank you
ReplyDeleteThank You Very Much Gonda! :D
DeleteI am so glad that you've enjoyed the results of the geraniums and this tutorial! :D
elizabeth
These are wonderful Elizabeth! So gorgeous when bunched up together like you've done. I will add this to my must try list. And that extra tip at the end I think will make a big difference I've run into copy paper tearing on me before as well. Okay, just need some spring weather outside now!
ReplyDeleteHello and Thank You Very Much Kristine! :D
DeleteAfter posting this tutorial I made some more of these plants assembly line style, and the process went a little quicker than building each one to completion before beginning the next. Even so, I have to say that it has given me Enormous Satisfaction to haveI actually stuck with it to the end seeing as how I tend to get bored and/ or distracted quite easily.
And I'm Happy with them all bunched up and intertwined too, and although it was more work to make multiples of the same small plants, yet I think that they've worked better together than a few individual bigger ones would have done. :D
elizabeth
OMG, they look gorgeous! I admire what you've done, that was a lot of work. But it was worth it, they are amazing!
ReplyDeleteThank You Kamelia! :D
DeleteIt was a lot of work but because it was a project which I'd been contemplating for a while, it took me less time actually making the plants, than it did in thinking about making them! :D
elizabeth
This is fabulous Elizabeth! Your geraniums are much much more than good enough. Thank you so much for sharing your technique which I must try. I’m particularly enamoured with your paint job on the petals and leaves. Adding the brown & yellow tones to the leaves in particular adds so much. I’m so inspired by this post, I can only hope mine turn out half as good!
ReplyDeleteHi Sam!:D
DeleteI am Happy to hear that you've enjoyed this post and have plans to give this tute an try, sometime in the future- Thank You! :D
Regarding the paint job on the petals and leaves; I used brush tip felt pens and made random strokes on the petals and outlines on the leaves- very casual colour applications and yet they turned out just as I wished.
Easy Peasy! ;D
elizabeth
Elizabeth! You did an awesome job on these geraniums! They're stunning! Thanks for sharing how you made them. It will come in handy once I start landscaping the manor!
ReplyDeleteHugs,
Teresa
Hello Teresa and Thank You Very Much for your lovely comment!:D
ReplyDeleteI was on a roll when I made these plants and although they were time consuming, they turned out better than I'd expected so I am Satisfied! However whether or not I shall be making any more in the near future, still remains to be seen, since I'm back to focusing on the interior construction of the 3rd floor.
Nevertheless, if you Do decide to give them a tryout, please let me know since fresh eyes, often produces Even BETTER results! :D
elizabeth
Gracias por el tutorial, voy a intentar hacerlo para un futuro jardin , es ideal , Hugs
ReplyDeleteI am So Glad that you've enjoyed this tutorial Xisca and that you hope to try it for a future garden. It took me about 3 days to build all 7 of the plants that are in the container so make sure to give yourself lots of time. The results are rewarding! :D
Deleteelizabeth
These are very lovely. You have made it look easy but I know these parts have to be tiny! You have done an amazing job!!
ReplyDeleteMini huggs,
Conny
Hello Conny and THank You Very Much! :D
DeleteThey actually ARE easy but they're also more labour intensive than I'd initially thought. Nevertheless, once I got started, I was determined to have a LOT of volume for visual impact, so I kept at it. It gets to feel more exciting once you get past the flowers and onto applying the leaves and the plant begins to fill out... Quite Rewarding, I must say! :D
elizabeth
Dear Elisabeth,
ReplyDeleteI have missed a few of your wonderfully inspiring posts during my absence. All of them a joy to read. But this one is even more special. You had me hooked at "exuberant abundance" :-)
I look forward to trying making them myself. Thank you for this nice tutorial.
Huibrecht
What a Lovely Comment Hubrecht- Thank You! :D
DeleteI am Delighted that you've enjoyed this "exuberant" tutorial and that you might try to make them yourself- a Double "abundance" for me! :D
elizabeth
splendid! thanks for the explanations Elizabeth!
ReplyDeleteThank you Claude a.k.a."Queen of the Flowers" :D
DeleteI am So Pleased that you have dropped by and that you like the results of my vining geraniums, which I had fun making.
I am working up the nerve to start constructing my Italian Garden so I KNOW that I will be making More plants very soon!-
but not geraniums ;D
elizabeth
Tus geraneos son fantásticos, que maravilla, hasta noto su aroma.
ReplyDeleteGracias por el tutorial, aunque hacerlos tan preciosos como tú no es fácil.
Un abrazo
Maite
Your Generous compliment is Greatly Appreciated Maite, and I Thank you Very Much :D And although making these plants can be time consuming, once you establish your own work rhythm, they become easy!
Deleteelizabeth
Ciao Elizabeth, grazie mille per questo tutorial! Io so già che la mia pazienza non è sufficiente per un lavoro così perfetto, ma sono tentata di provare! I gerani sono fiori tipici di tutta la zona nord dell'italia, quindi è una scelta perfetta per la tua casa veneziana!
ReplyDeleteA presto e scusami per la mia lunga assenza...
ReplyDeleteHello and Welcome back Elene' and Thank You for enjoying this tutorial! :D
Constructing these geraniums was totally enjoyable and I was "in the zone" as I was making them. It took 3 days to get as many plants as I wanted, and so even though it was labour intensive, the time flew by quickly.
They have become a colourful feature on my Venetian Villa although I decided to split them up into 2 separate planters, rather than just one as in the tutorial.
I've been WAY BEHIND on posting but hope to update my blog very soon;
meanwhile it was So Nice to hear from you again! :D
elizabeth
Oh my goodness, this must have taken a very long time, but it turned out to worth it and realistically beautiful! Thanks for another great tutorial with excellent photos. You are amazing ~ Troy
ReplyDeleteHello Troy!
ReplyDeleteIt actually took about a week in total but I worked on it a little every day until I decided to stop.
I had originally intended to display them all together but have since divided them up into 3 separate units for different areas of the Villa.
I'm VERY Glad that you like them and I THANK YOU for your lovely comment; Much Appreciated! :)
elizabeth
Elizabeth
ReplyDeletethey look wonderful, I love your tutorital I have some paper punches that I found at the thrift store but I haven't had time to use so thank you for showing how to use them :) and I will remember to paint them before I use the paper punch.
Hugs
Marisa
Hello Marisa and Welcome Back!!! :D
DeleteSO GLAD to hear from you again AND that you have enjoyed my geranium tutorial.
Like you; I usually find most of my paper punches at the thrift store which has included some really unusual shape that I'm still experimenting with.
So many ideas and so little time! ;)
Meanwhile, I hope that you'll have fun when using your paper punches, and And YES, painting the paper first either with acrylics or felt pens depending upon the type of paper you decide to use; works best!
Have Fun! :D
elizabeth
have you got an idea where I could get a multi punch like the one you used?
ReplyDeleteI tried googling multi punch, etc. but to no avail. I am from Canada
but can order from anywhere??
Hi Sharon! Thanks for your inquiry! :)
DeleteI've purchased many of my used PAPER PUNCHES from the Value Village thrift store, however I would suggest looking at Ebay for them because there are LOTS of them listed and they are always changing.
Try Googling Specific Brands too.
The one I've used in this tutorial is a generic no name brand, but is similar to McGILL. Also check FISKARS, PUNCH BUNCH and KNOCK OUT paper punches. It may take some scrolling through many pages but you never know if and/or when you'll find exactly what you're looking for.! :D
elizabeth