 |
| Late last December I thought I'd better get serious about working on the 3rd floor of Villa Leone. I actually began by enlarging the attic window at the front of the kit, using a couple of left over kit window frames from the lower floors. |
I made the front window Wider and Taller to make it easier to see inside, since I had worked out a floor plan of angles and hidden corners for the bathroom. So using my utility knife, I began hacking out the shape of the frame, and a right mess I made of it too, so there was no going back once I'd started.
Below is the enlarged exterior ATTIC window in its VERY RAW condition.
 |
| I also enlarged the arched opening on the opposite side of the front wall and "squared" it off. The walls are lined with foam board and the sub floor is cardboard. |

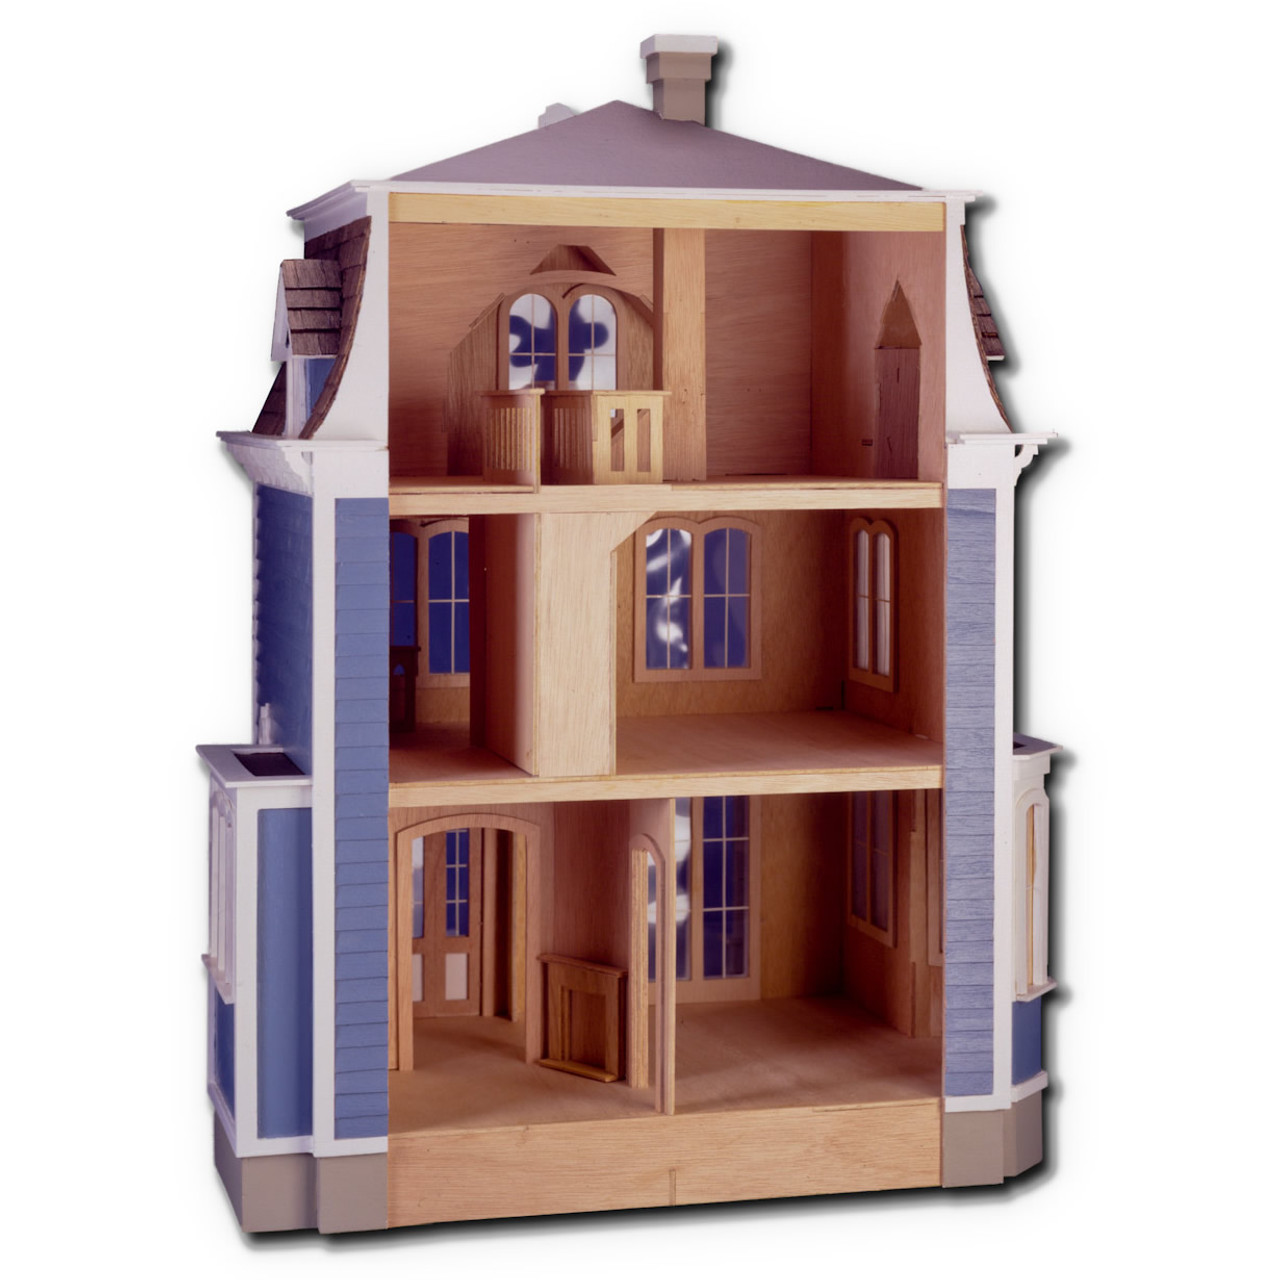 |
| here's what the kit looks like when assembled as per the instructions. You can see that the dormers are a lot smaller than mine and also how the arched opening at the front of the house was squared off and modified. (thanks to Sam for the idea to include a reference photo) |
 |
| These are the renovated dormers in the attic; utilizing and modifying more of the kits lower floor window frames, to accommodate the enlarged alcoves. I wanted to be able to use the alcoves for furniture as well as increase the natural light and views into the rooms. |

 |
| exterior of the left window alcove. Now regarding the bathroom and all my earlier talk about having a fireplace in it; sadly "no can do"😕 |
 |
| I had 3 bathroom fixtures to install and I'd already reduced the available wall space. Therefore, when it came to choosing between having a tub or having a fireplace, The Tub won- hand's down! (Rub a dub dub!) To make a space in the bathroom for the tub to sit, I built an "L"-shaped wall and positioned a split-door at a right angle on the end of it. |
 |
| The placement of the door, decreased the view from the open end of the bathroom to about 4 1/2 inches which is why the bigger front and side window alcoves proved to be a good idea. |
 |
| This is the view looking into the bathroom from the opened end of the villa towards the front. |
 |
| (above: an early Mock Up, of the 3rd floor with the walls pinned and taped into place) Along the way, I've replaced a lot of my original ideas with others. Even so, the basic layout is much the same. On the left side of the 3rd floor, is the Gondolier's Study/Dressing room. An enclosed hall is in the middle with a long window in the wall facing the viewer. The window looks into the narrow end of the bathroom. |
 |
| Once I'd worked out the floor plan, I installed the electrical runs, TESTED EVERYTHING then I glued in the cardboard sub-floor and proceeded with installing a hardwood floor. |
 |
| I had purchased 2 natural wood bamboo placemats from a dollar store and cut them apart and glued the strips to the cardboard base using FABRIC Hi-TAK glue from Wal-mart. |
 |
 |

 |
| The light wood shows you the size and shape of the bathroom which has lots of floor space but little wall space. After the glue had firmly set, I went over the boards with a glue eraser which easily removed all the excess adhesive which had oozed onto the surface. |
 |
| I sanded the floor several times before I wiped it clean with a damp sponge. |
 |
| I stained the wood with a VERY DARK oil based stain, and when it was dry to the touch, I went over the entire floor with a Dry wall patch to fill in between the slightly beveled wood planks. |
 |
| I scooped off the excess compound which in turn, lifted some of the dark stain with it, then I wiped them down again with a damp sponge and a dry paper towel. After the putty had set, I went over the floors a second time with the dark oil based stain. |


 |
| The results were that the floor looked less like a bamboo placemat, and more like a worn and weathered plank wood floor- |
 |
| I painted and aged the bathroom doors, and counter sunk the door thresh-hold into the floorboards to make it flush with the hardwood. For the photos I've pinned it upright to the foamboard wall with blue tac and sewing pins. the photo below shows the tub on other side of the short wall |

As a result, the tub's legs are badly corroded. Nevertheless, I decided that this was A PLUS for the Villa's bathroom. So other than just a little touch-up of gold Pentel poster color, on the legs, I left the majority of the corrosion fully exposed.
I painted the outside of the tub with a golden brown acrylic paint and aged it with a thin black wash of matt acrylic paint and graphite pencil, as you can see in the photo below.
 |
 |
| Storage in the bathroom is minimal as is the opportunity for display, so when I remembered I had this shelf unit from my friend Bettie Smith, the ONLY place it would fit was in front of the tub, and so the only way you can see it, will be from looking through the enlarged window at the front of the Villa. |
 |
| an aerial view of the layout of the attic bathroom The sink that you see below also came out of my Greenleaf Glencroft, and was cobbled together from a pink plastic doll sink found at the thrift store and a cake pillar support. The toilet was part of an unglazed 3 piece ceramic set ( thrift store) which had previously been painted a melon colour. The toilet seat doesn't lift but it was easy enough to repaint to look as if it does. |
 |
| above and below are mock ups without the interior walls so you can see how the fixtures are positioned within the space. The only things glued in are the floor and the wall tiles on the mirror wall everything else is freestanding including the wall panels themselves. Re: the TILES Initially I had planned for more yellow-gold wall tiles. But when they didn't work out, I had to change them to something entirely different. These replacement tiles look rather odd with this wallpaper but until I figure out what to do about it, I can't glue anything into place. The photo below was taken in mid-January and not much has changed since. |
 |
| I had the dollar store green cupboard for AGES and it fit into the alcove as if was custom made. I'll probably fill it with towels and other bathroom necessities. |
 |
| Looking in from outside the alcoved window, towards the little chest in the far corner the bathroom. The photo below is the long view looking straight ahead through the same alcove window, through the bathroom door across the hall landing and into the Gondolier's Study on the opposite side of the Villa. |
 |
| fyi to take the following photographs, I have removed the interior BATHROOM WALLS and the TUB FROM the Dollhouse and onto my work table, rather than try and shoot through the windows |
 |
I began filling the shelves and accessorizing the tub.
To facilitate the view and open up the dark corners,
I made a pair of "iron-look" wall lamps. One for by the sink and the other for over the tub.
|
 |
| I made the orange tree a number of years ago, and Fatima made the floral hydrangea-print pitcher. The gold cherub is an earring, and the potted purple hydrangea is a recent gift, made by the talented Jodi Hippler. I LOVE this grouping although to me, it looks more English than Italian despite the stone seat. Which brings me to my NEXT CHALLENGE. |
 |
| HOW TO MAKE THIS BATHROOM LOOK MORE MEDITERRANEAN? This is proving to be more difficult than I'd thought. I've tried all types of changes and nothing is making me happy. But then Last night I decided to add a mural above the tiles around the tub from a photocopy which I had printed out a few weeks ago for a different project. I sliced the print into 3 sections. The bottom section I glued to the long wall above the tub. The middle section of the print was cut to fit around the shelf unit where majority of the picture would be cut away thereby making the subject itself more obscure. Yet because of the equal values of the colours and tones, it reads like one continuous print even though the corners don't line up at all. |
 |
| The vertical wood trims are temporarily stuck on with blue tac and won't be glued in until ALL the interior walls and the bathroom ceiling are fitted into place. Meanwhile the horizontal trims are still in the process of being amended. |
 |
| The lion rug bath mat is a paper cutout which I shall eventually re-size and re-print onto a suede paper. |
 |


 |
| The Fornasetti wall-plaques are magazine cutouts glued onto punched chipboard rounds; glazed with clear nail varnish. I've blue-tacked them to the wall for the photos, but they'll probably get changed later on, too. |
 |
| All in all, I'm much happier with the mural than I was with the wallpaper, but naturally when you change one thing it affects everything else around it. Sooooo... |
 |
| as of last night, I've made up my mind to change the rest of the wallpaper in the bathroom which I can't show as yet because I am still tentatively feeling my way through each and every stage of this transition and this post is already long enough! And so in summary: what began as full steam ahead in December came to a full stop in January; which is now a slow crawl into February leaving only 8 months until the Show in September! oh the pressure! the pressure! ~ 😳 ~ Rub a dub dub |
 |
.jpg)


Dear Elizabeth, Nobody, but NOBODY, kit bashes the way you do!!! This roller-coaster ride through the attic ups and downs is a prime example of "hold on for the ride Elizabeth Magic"... you will be surprised and Enchanted and Amazed by what you see and learn along the way!!! To begin with... reaming out those tiny windows is understandable.... making an "L-shaped" bathroom with half of it invisible from the open side of the house is a step into the "where is she going?" part of the Magic! It ends up making so much sense and looking so amazing.... through those windows and peeking around doors! But this kit has so much of that... it makes sense after all! And then you work your magic with wood floors aged to perfection.... antique baths and fixtures made from toy store rejects.... lighting created from ...what..?... magical materials you have in your stash.... and then a Mural appears full-spread across those ancient walls.... now we ARE in Venice!!!! I just don't know HOW you do it! But Boy I Love Love LOVE going along for the ride!!!! And Now I have to wait for the next installment....... :):):)
ReplyDeleteGood morning Betsy! :D
DeleteYou have quite accurately described the developments in the bathroom as being a "Roller-coaster ride" and might I add; a non-stop one at that.
But right from the beginning I knew I wanted the side windows to be bigger so that I could see in, and I am soooo glad that now they are and that I can! :)
And Yes! everything must make sense to me as well as make sense to the viewer, however, I constructed the odd angles in the bathroom, primarily to not only maximize the floor space but also to give the tall window in the hall something to do.
It makes me VERY HAPPY that you are not only enjoying the ride Betsy, but also willing to follow where I am headed. The journey may be full of unexpected twists and turns but I'm fairly confident, that IT WILL come out all right in the end.
(keeping my fingers crossed and the soap out of my eyes ;D )
elizabeth
I was so excited to see a blog post from the Studio and Oh Elisabeth.. this is coming along swimmingly! I had to go and find an image of the original kit to understand the window situation and I LOVE what you are doing with it. Looking through dollhouse windows to hidden secret corners is one of the true pleasures of life! :D How wonderful it will be to be able to peek in the front window and see the tub and shelving with all their wonderful accessories displayed. Or through the side window across the hall and into the Gondolier's study. How wonderful that your long neglected tub (I love Bod Hennig minis) has found a home in the villa. It's serendipity that it's neglect has produced the perfect authentic finish for its feet. Your paint effect on the rest of the tub is fabulous. A real eye catcher. As always your homemade artisan lighting is amazing. Do tell what mundane items you transformed to make these! And your floors. What a wonderful idea to fill the bamboo with spackle. It's very effective. I've been looking for bamboo placemats to use for flooring for a while, but we don't seem to have any cheap ones over here in Oz. When I do eventually find some I'll be tucking away this fab tip to do to mine. :D I know the feeling of feeling like you have been stopped by many decisions to be made, but take heart that you are making progress and the answer to these questions will come when you least expect it. Love your work! :D
ReplyDeleteGooday Sam and Thank you for your comment which I thoroughly enjoyed reading and thank you also for the idea of including a reference photo of the original Willowcrest kit so that my changes could be more easily understood! A picture IS worth a thousand words! hahaha ;D
DeleteI have collected a number of wayward 12th scale tubs over the last few years but this one from my mother is still my favourite. Initially I was dismayed about the corroded feet, but after I'd thought about it I realized that it saved me having to do it myself AND it is 100% authentic!
Most bamboo placemats I've seen have either been lacquered or the slats are too thin and/or very crooked. These ones were none of the above but they were bevelled along the lengths which is a common feature of these mats. I didn't think that the bevel would bother me once the floor had been laid, but it did. Hence the application of the spackle. Wood putty would probably have worked better but I wanted to use up what I had and it worked out fine.
I made the light fixture much the same as I did the exterior lamps only smaller. If you search my blog for 'PLANTS, LAMPS, IRON and STONE" I outline the entire process there- so easy! :D
elizabeth
I also love going along for the ride, and I learn so much as I do. I think it already looks wonderful and I love all the views through the doors and the windows. That floor is amazing.
ReplyDeleteSo Glad that you're on board for this harem-scarem adventure through the attic Penelope! :D
DeleteFrankly I have been surprised non-stop by what I thought would be a quick and easy building of the 3rd floor, which is proving to be anything but! Enlarging the windows was the easiest part; the rest is slowing me down and making me feel restless.
However I LOVE the views through the windows! and the peek around the corner in the bathroom so I'm trying not to complain about the other delays too much, and as my reward after the mural, I'm finally moving forward again- Hooray! :D
elizabeth
Incroyable !
ReplyDeleteune longue balade dans cette petite salle de bain, on en oublie presque de respirer tant on est surpris par chaque élément que l'on découvre, un pas en avant, un pas en arrière afin de profiter de chaque détail, de chaque petit changement qui s'avère tellement utile pour agrémenter, pour embellir ... Les mots me manquent, juste te dire ma chère Elizabeth "c'est magnifique" !
Bises. Joce
Delete"A long walk, in this small bathroom"; how Perfectly apropos, Joce! :D
and "A step forward, a step back" sums up my approach to this room to the letter! I am wanting it to be somewhat contemporary while evoking a sense of stepping backwards in time, whether it be it 40 or 400 years in the past- a real slippery slope for me so far but I think that I am seeing my way clear now, so Thank You for your Very Encouraging words which I GREATLY appreciate! :D
elizabeth
What a wonderful idea to use the place mat for your wood floor. It turned out beautifully! Love the addition of the mural, too. It was just the right touch. And I can't believe you made the sink from a plastic toy and a cake pillar! All the little accessories are so pretty, and the last shots look like something from a spa. I just want to fill that tub full of bubbles and get in for a nice long soak!
ReplyDeleteThank You Deborah and let me add that these placemat floors were easy peasy to do! I almost passed the placemats up when I saw them but after I examined them in the dollar store and saw that the slats were unvarnished, straight and of the right depth AND for the right price, I decided to have them on stand-by, just in case I never found them again.
DeleteAnd it's funny about the sink, I originally made it sometime in the late 80's but found the exact same sink again a few years ago also at a thrift store. I shall include the original when I post about the rest of the bathroom in my next post.
It is Amazing what you can find in the second hand shops- even when you are not "officially" looking! ;D
elizabeth
Esto avanza en muiy buena dirección!! me encanta el suelo rústico,la bañera se ve perfecta para ese baño,el fregadero auténtico.....se ve increíble al asomarse por las ventanas y descubrir pequeños detalles y ese mural quedó fantástico!!!
ReplyDeleteBesos.
Hello and Thank You Very Much Pilar! :D
DeleteI am happy with the wood floors as they were easy to install and to stain but 'Rustic is Exactly the Right word to describe them now! :D
The sink and toilet area is what I'll be working on next and I should have an update on them before too much longer. Meanwhile I am So Glad that you approve the mural, as I feel it gives the bathroom more personality than it ever had before.
elizabeth
Keeping everything in style is something everyone interested in dollhouse scenes can learn from you. All the accessories with details of how they became what they are now, are simply stunning. Thank you so much for sharing these wonderful photos.
ReplyDeleteHugs, Drora
Hello and Thank You Drora! :D
DeleteI am all for keeping things consistent but I also like introducing the unexpected here and there, too!;D
Predicable can easily become cliche' and so trying to find a balance between what "hints" and what "proclaims" has been my hamster wheel ride throughout the entire month of January.
I am Delighted that you like the photos and seeing the details. I figured that I better take them now while everything was still loose than to try and squeeze my camera and my big hand in later! ;D
ellizabeth
Buongiorno Donna Elizabetha,
ReplyDeleteWhat a wonderful bathroom. First of all, I think you really maximized the use of the available space and made the room so interesting architecturally. The bigger windows are such a great idea and I love the tiles you chose. The floor is lovely and works well in the space, and the transformation of the tub is fantastic! The aged doors are beautiful and I think the shelves over the tub are, yet again, a great use of space. I also must say I love the chest in the back of the room. Og, I also love the murals above the tiles. Bellissimo lavoro cara amica mia.
Un grande abbraccio,
Don Giacomo
Ti ringrazio tanto Don Giacomo! :D
DeleteThis bathroom still has a long way to go, however I feel that I have worked around my mental road-block and am able to continue moving forward.
The bigger windows in the attic have made the entire room feel more open and livable although the shape of the room is awkward and not fully visible from any angle. Even so, I am liking it more and more now that I'm in motion again.
I know that my mother would be happy with the transformation of the tub too and needless to say that it feels good to me to be able to see it being used again, and more importantly- to remember her by. :D
Un grande abbraccio BACK!
caro amico mio
donna elizabetha
Wow, this is a bathroom I would enjoy myself lol. I love the sense of privacy, the mediterranean flair, and all those beautiful details that create such an amazing atmosphere. I can close my eyes and imagine myself having a long hot bubble bath, with a glass of wine, some candles and music. This bathroom is certainly to be enjoyed.
ReplyDeleteThank You Alexandra for mentioning the "sense of privacy" in this bathroom.
DeleteWhen a bathroom has as many big windows as this one has, it became important to me to be able to make it still feel intimate even when peering in. I really like your suggestion of a candles and a glass of wine next to the tub and I'm seriously thinking about doing it! :D
elizabeth
The bath is as beautiful as the rest of the villa. I understand your need to do and re-do and re-re do until it is perfect. If not satisfied, it will bother you every time you look at it. Thanks for making it so perfect for us to enjoy
ReplyDeleteYou are soooo right Judy! Some things just have to be redone and made right especially when they're located at a crossroad or a focal point where they can't be hidden. If you can see it then other people can too- oh, the blessings and the curse of high resolution photos! hahahha ;D
Deleteelizabeth
It's incredible what you managed to do with this space. A perfect bathroom for this house. I like very much how you put a mediterranean touch to it, with the murals for example. It's true that at the beginning it looked more like a bathroom that could be from England or another northern country.
ReplyDeleteGeneviève
Hello Genevieve and Thank You! :D
DeleteMy biggest grievance with this bathroom is trying to find the right amount of balance between the cliche' and the visually cohesive. I have used several murals in the entry hall of this villa and was trying not to use any more however, I had run out of ideas of how to give the bathroom a better sense of place.
Introducing the mural above the tiles surrounding the tub, worked out well once again and immediately changed the entire atmosphere and the direction of the room from heading north- to heading south again! :D
elizabeth
Hi Elizabeth, it's so good to see you are creating again your famous miniworks. But creating a bathroom, in such a small room, is a true challenge and you are so good in working in small spaces: the bathroom looks amazing!!! Lots of all the accessories have beautiful details, you described so well how you did it all. You enlarged the windows and made a gorgeous floor....well, everything is this bathroom is just awesome!
ReplyDeleteThank you so much for sharing these wonderful pictures, Elizabeth.
Hugs, Ilona
Greetings Ilona and Thank You for your Lovely comment! :D
DeleteI am never going to be a perfectionist when it comes to my projects but I always strive to make them as believable as I can, especially when it comes to the accessories, so I appreciate your mention of them Very Much! :D
elizabeth
Elizabeth, you have created another masterpiece! I love all of your modifications to window and the tub. I am glad that you found a place for the arched shelf unit to be viewed from the window - very clever. You have done a fabulous job (as always) with accessories to make the room looked comfortable and lived in. I will have to try my hand at your bamboo placemat-turned-floor. It really looks great. Great photos too. Thanks for the inspiration - Troy
ReplyDeleteHello Troy and Many Thanks! :D
DeleteI think that making the windows bigger was the only way to go especially with this kit! The Willowcrest has an interesting floorplan to begin with but the tiny 3rd floor windows didn't make much sense to me. It was either eliminate them entirely or make them Bigger!
I am Delighted that you like the bamboo floor; needless to say that it was dirt cheap and the grain of the wood, spot on! :D
elizabeth
El baño se ve increíble, acorde con el resto de la villa. Alucino cuando miras todas las posibles vistas. No dejas ni un detalle al azar. El suelo ha quedado muy bien y del resto que decir... ¡impresionante!
ReplyDeleteThank You Very Much Isabel! :D
DeleteIt makes me Very Happy that you have said the the bathroom looks "in keeping with the rest of the Villa"- HOORAY!!! :D
This has been one of the more elusive challenges right from the beginning however after a few detours and innumerable false starts, I think I am back on track again. :D
elizabeth
It's always exciting to find another blog from you - I love the fact that you include us all in your quest to find just the perfect item and are happy to bash away until things are 'just right'. It's fabulous and I look forward to seeing even more - love the floor - love the tub - love it all.
ReplyDeleteGood morning Robin and Thank You Very Much! :D
DeleteThe convoluted twists and turns that it takes for me to get from point A to B and the "Bashings", are often too much for even me to look at, and so I judiciously edit out some of the more gruesome ones just to keep my readers i.e. hacking out that front window! oh boy- What a MESS! :(
Thankfully wood trims make all things look better than they did, and just as if they were that way all along! ;D
I am Very Glad that you like the floor, as it was a bit of a big mess too, and I almost didn't include the photo of the putty-
but then I did-
keeping it Real :D
elizabeth
Once again you have worked your magic and the bathroom is stunning in it's cosiness and atmosphere. The floor, mural, tub, Betty's shelf - everything is perfect. And I agree, that peeking through the windows is one of the delights of mini-madness, so great work on the windows! Thanks for sharing all your ideas. Can't wait to see Villa Leone in person!
ReplyDeleteHugs, Linda
Gooday Linda and fellow Miniteer Extrodinaire! :D
DeleteI am Delighted that you like the bathroom Linda and that you find it cosy which makes me feel as if I'm getting closer to hitting the mark!
Bettie's shelf was a perfect fit for this room and I'm glad that I remembered it before I went off in a different direction.
Installing the mural has re-ignited my mojo and so I am actually working on the villa rather than staring at it blankly :D
However, I'm WISHING HARD for YOUR blog posts Linda, with an update on Your Conservatory and Pavilion- when- WHEN????
elizabeth
Impresionante, mi admiración por este trabajo tan fantástico, te ha quedado un baño de película.Besos:-)
ReplyDeleteA bathroom from a movie!
DeleteSuch a Beautiful Compliment Rosa-Maria ,Thank You! :D
elizabeth
Hi Elizabeth. Look, for now I can leave a comment! Not sure if it is linking to my profile or what, but beggars can’t be choosers. The floor looks amazing Elizabeth! Love it. And I quite liked the white spackle between the boards before it was stained for a cabin/cottage look. The layout on this floor is so fun as well as realistic. Just as you could expect when a ‘modern’ bathroom was added to a very old house. Love the wallpapers too. I think the yellow pattern could have worked with a little aging and mottled colour maybe from chalky pastels? Anyway, your solution is fantastic regardless and I love the colour of the tub. Best go get ready for the day. Hope the week has been good. Xx
ReplyDeleteYIPEEEE! Hello again Shannon!!! :D
DeleteAlthough there is a link to your profile, there is nothing there other than the basics. i.e. blogger since.... and nothing in "about me", but hopefully that too, will get restored before long. :)
Meanwhile, I am glad to see you out and about and that you approve my floor. It was a breeze to do and very cost effective as well. The spackle was to try and Level The Bevel, but for a cabin it might not even be necessary.
I had thought about aging the existing wallpaper and I might have done it had I used the first wall tiles I had made for it. The problem there was that I didn't have enough of them and I didn't want to order the materials to make more. I replaced them with what I had on hand and the wallpaper wasn't happy about it, therefore bye bye to it too-
and when you gotta go, you gotta go! ;D
elizabeth
Haha! Very true! And have sorted out the Blogger profile stuff and commenting again! Yay! Didn’t have to change anything so being lazy paid off this time. Lucky you had those wall tiles that are a perfect fit! Isn’t it great when you have an option in your stash that just work? Enjoy the end of your week. X
DeleteI love the red aged doors and the gorgeous golden tub. The mural brings some deeper colors into the room and brings the tub and door colors together. I'm looking forward to seeing your solution for the other walls.
ReplyDeleteThank You Cynthia! :D
DeleteI have ALWAYS loved red doors and was glad to include these in the Villa! :D
The golden tub was to go with the old wallpaper but it has worked a treat with the new mural and the existing wall tiles-HOORAY!
Hard at work on the other walls and keeping my fingers crossed that I don't have to change them ever again. :D
elizabeth
Your bathroom is really taking shape. I love the way you keep changing things until it all comes together. As always, I'm in awe of the number of little things you have which add detail to the scene and how you manage to put it together so well!
ReplyDeleteHello Megan! :D
DeleteThank You for your Lovely comment and you are right in that I DO keep changing things although I often I wish I wouldn't. I am trying to re-train my brain to learn to recognize the elusive "enough" as I am always collecting bits and pieces and then forgetting where I've stored them. Organization is not one of my strongest attributes.
Even so, I DO love the details and I never get tires of adding those little things which make up part of all of our lives.:D
elizabeth
Oh Elizabeth, you are a fairy of light and color! The set is as always perfect!
ReplyDeletehugs
Hello Claude and Thank You for such a Magical comment! :D
DeleteI think that we are ALL fairy godmother's within our own miniature worlds, with glue sticks as fairy wands and iron cauldrons bubbling over with the ingredients of our vivid imaginations. :D
elizabeth
Es un trabajo maravilloso.
ReplyDeleteEl rincón de la bañera ha quedado espectacular, me encanta.
Un abrazo
Thank You Very Much Marion! :D
DeleteI am so Glad that you like this corner of the bathroom! I am continuing to work on it and hope to have the rest of the room done before the end of this month.
Keeping my fingers crossed! ;D
elizabeth
I love watching the thought processes and work evolve in your blogs. I confess I often can't imagine what the next step might be, which makes it all the more interesting. Those changes are absolutely always for the better in your processing - not always so for everyone but somehow you nail it. I especially love the way things get aged - this time even with real corrosion!! The mural is absolutely the right move and yes different wallpaper is now needed. Lots of luck with the next steps.... as if you need luck!
ReplyDeleteHello Marilyn! :D
DeleteI couldn't have bettered the realistic aging than what mother nature did to those tub legs and I'm relieved that they weren't so far gone as to require removal. They were impossible to fix in any case so I thought that if you can't change it; embrace it! ;D
I was sorry to have wasted all of that wallpaper but changing it has been such a blessing in disguise. I am off the hamster wheel and actually making Real Progress on this room again and YES! feeling Lucky too! ;D
elizabeth
I admire your ability to transform tiny details into a harmonious whole
ReplyDeleteEverything looks so worn that it seems real!!!
Thank You Very Much Ersilia! :D
DeleteIt always looks easier in the blog than what it actually is, but Harmony of the objects next to each other, and harmony with the fittings as they relate to each other, and harmony of the room with the rest of the house, is what consumes me and keeps me busy!
But it is all worth the work and the worry when the end results look real to me and real to the viewer so MANY Thanks for your Lovely comment! :D
elizabeth
Hello, Elizabeth - What a lot of complex changes you've made in your floor plan, and all to the good; the new plan uses the limited space to utmost advantage. The wonderful bamboo floor and your method of creating it are both unique. I've used drywall patch for many projects, but I've never thought of using it as you did for the floor. The result of that, combined with the use of the dark stain, is a stunning floor that has mellowed with time, along with the rest of this gracious villa. I'm sorry that you had to abandon your hope of a bathroom fireplace; such a cozy dream! But that disappointment surely was partly made up for by the gorgeous bathtub with its beautifully corroded legs! I LOVE that tub. I also love the amazing mural that adds the perfect Mediterranean ambiance to the bathroom; I can't imagine a better choice for the wall covering. All in all, this bathroom is incredibly lovely, and I believe that you're an artistic genius for bringing it into being!
ReplyDeleteMarjorie
Hello Marjorie and Thank You Very Much for your Delightful comment! I really enjoyed reading it! :D
DeleteDrywall patch has become a very useful "friend! " I used a ton of it in the construction of Green Dolphin Street and now the same with the Villa. Wood putty would probably have worked equally as well for filling the bevels between the planks of the floor, but I only had the patch so that's what I went with. The dark stain I've had for over 20 years and sadly, I'm almost at the end of the bottle, so fare thee well old friend! :(
I'm glad that you agree , that the floors look as if they've been there forever and walked on forever too! :D
The sacrifice of the fireplace wasn't as painful as it might have been because so many other challenges have sprung up during the course of construction so not having to find the additional space for a FP was a blessed relief! :))
But as work continues on the rest of the bathroom, the atmosphere keeps evolving and the battle of wills between me and it are becoming more and more heated! Only time will tell what the end product will be- but one thing is for sure; there's never a dull moment! ;D
elizabeth
Hi Elizabeth, Having trouble commenting again. Everything is fab. Love the mural, love the tiles, love the orange tree. I know it is not over yet .... you will make changes for sure!
ReplyDeleteHugs Janine
Hello My Dear friend "Anonymous Janine!" :D
DeleteSorry that your having troubles J but glad to hear from you nonetheless! :D
Re: your comment, I hope that I will be able to have room for the orange tree once the rest of the room is put together. It is quite different when the tub is in the house than when it is sitting on my desk. However, you are so right in in that "it is NOT over yet!" and there are more "changes for sure" ;D
elizabeth
You have never once failed to astonish and delight me with the changes you visualize and make for the space in a dollhouse! I know it is still very much a work in progress, but I love where you're going and I am so excited that I get to see the progression! When you take what you have at your fingertips, you have this magical way to make it so special! Your imagination and ability to see the potential in things is one of the qualities I admirer most about you Elizabeth! It's so fun to watch you create!
ReplyDeleteHello Jodi and Thank You Very Much for your comment :D
DeleteYes this bathroom is STILL a "work in progress" although I must admit that
I too, am in a perpetual state of "astonishment" with the direction this odd little room is taking.
Often what I think is the right way to go, isn't and I have re-traced my steps more often than not with just this one little room! However, patience is not my strongest attribute so what may seem like "magic" is actually a steely determination to keep on trying until it turns out better than it was- and that's the truth!
So seeing what a room eventually becomes, is always as much of a surprise to me, as it is to everyone else. ;D
elizabeth
I am really loving this bathroom! As I kept scrolling it just kept getting better. So what I liked, I liked your changes better :) I love the print for the wall. And the tub---the first time I've ever heard of corrosion being a good thing haha.
ReplyDeleteThank You for your Lovely comment Linda and for liking the changes that you've seen including the corrosion! :D
DeleteI've reached the stage of actually assembling the rest of the space and it has been like playing a game of chess; one move from me, one counter-move from the bathroom! hahahaha
elizabeth
A beautiful and bathroom for this house. The details look perfect. An old atmosphere hovers over this room.
ReplyDeleteOh Thank You Faby! :D
DeleteI LOVE your comment especially the "old atmosphere" part. And I hope it hovers over the entire villa- including the garden when I eventually make it. :D
elizabeth
Tu baño es adorable, me encanta la hornacina y todos los elementos decorativos que la conjuntan, para darle ese estilo decadente que tanto me gusta.
ReplyDeleteThank You Eloisa for your Wonderful comment and especially the your observations on the niche and the style of this bathroom. It DOES indeed have an air of old world "decadence" to it which seems to fit the rest of the rooms in the villa. :D
Deleteelizabeth
I adore how the bathroom has turned out, especially the tub. The paint finish is terrific!
ReplyDeletePainting the tub was such an easy job to do, Brandy so Thank You for liking the way it turned out! :D
DeleteIt always helps when there are a few things within a build which go smoothly and are finished quickly! :D
elizabeth
Elizabeth:, once more you have left me speechless but inspired!! Absolutely beautiful work. Thank you for taking time to fill us in on how you got there. It's so very helpful. I love your decision to add the mural rather than go with the wallpaper. Even aged, it didn't speak to me alongside the beautiful tiles. Now it looks perfect! Also, thank you so much for reassuring me that my "fly by the seat of my pants" approach is a bona fide method for miniaturists. It's so much more fun than the organized, plan everything out first approach. Love it!!! - Marilyn D.
ReplyDeleteHahahhaha! "Flying by the seat of my pants" seems to be the only way I know how to travel, Marilyn! ;D . Nevertheless, I have the greatest admiration for those who are gifted with the ability to plan and prepare ahead of time. I have tried to do the same, but I'm hopeless at it after a certain point, since I have to see right before my eyes, what something looks like before I can tell if it's going to work or not. A lot of waste involved when using the "flying method," which is the reason I always stock up on extras.
DeleteEven so, I am glad that you approve the change of wallpaper to the mural because I like it better with the tiles too! :D
elizabeth
(I am reentering my comment because I am not sure that it posted)
ReplyDeleteThis was such a fun piece to read, learning how you use simple things to create the perfect setting and how you use ordinary things such as a dollar store dresser or an image cut out of a magazine. Everything looks so perfect with the accessories that you have added. Bravo.
Hello and Thank You Ann for trying your comment again! :D
DeleteI really appreciate your observations regarding incorporating the simple things into a scene. I believe that a mix of high and low is always the most interesting in Real Life as well as in minis! :D
I have been saving photos and tear sheets from books and magazines for decades, long before I ever got a printer. I was as I was going through some of my many paper files when I found the Fornassetti prints, so what could be a better project than a villa, to use them in- am I right? ;D
elizabeth
Wow the bathtub is awesome I love it. I love the whole room. You are so inspirational it is amazing what you can do with even the cheapest of items and make them look WOW.
ReplyDeleteHugs Maria
Thank You Maria! :D
DeleteI am Delighted that you like the looks of the tub- Me Too! :D
Personally, I collect whatever looks good to me, sometimes it's a high ticket item and sometimes it's low. My dear friend Janine and I had purchased the inexpensive cabinets sometime back in the 90's. They have such a nice shape and lend themselves to some interesting finishes. But paint can work magic as it is able to upgrade almost anything with just a brush-stroke or two-
or 3 or 4 or .... ;D
elizabeth
It's always so much fun to drop by when you've published a new post because I know in advance there is a lot of beauty, great ideas and Elizabeth genius waiting for me to be discovered. You've worked miracles for this bathroom - and although there's the term of kit bashing I think it would be better to call this in your case kit improving. It's incredible what you're doing with this kit... and I'm always admiring the results whenever you're taking out your paints, stains or whatever. The floor is stunning and the makeover of the bathtub great (and how helpful this bathtub was aging itself for you… must be German politeness *LOL*) But what blew me away was the difference this mural made - excellent choice. And now… take a warm bubble bath and enjoy a glass of prosecco in the beautiful bathroom of Villa Leone - you truly deserve it after all this fantastic work.
ReplyDeleteHugs
Birgit
Greetings Birgit! :D
DeleteI thoroughly enjoyed reading your comment and Thank You for it! :D
I'm Glad to learn that you like the floor and the additional modifications that I am making in this Willowcrest kit. :D
The mural was a game changer for me and changed the course of direction for the rest of the bathroom in a profound way, which I am currently trying to re-figure out AGAIN.
By the way; I had to look up what "Proseco" was and now I have a desire to buy a bottle, because who knows but that it may get my mojo juices flowing again ?! ;D
elizabeth
Haha, this is great - I'm glad I was able to introduce you to Prosecco! For sure the right stuff for your Villa Leone in those special life moments - not champagne. We're very straight about this in Europe, the term champagne is reserved for sparkling wine coming from the Champagne in France. The ones produced in Germany are called "Sekt", in Spain it's "Cava"... and in Italy it's Prosecco. ;O) But whatever it's called and wherever it was cultivated - I'm not so much into this stuff. But who knows what a little glass of prosecco could do to your mojo juices? ;O)
DeleteHugs
Birgit
:D♥️
DeleteOne of the things I absolutely love about your miniatures is that they look as if they have been used, are being used by the inhabitants. I'm always trying to sidestep the clinical look of modern miniatures which you seem to dodge with ease. The tiny details, the weathering of the floor, the tiles. Beautiful work Elizabeth!
ReplyDeletehave tired and tried but I have NEVER been able to leave my work looking new or even newish. I feel compelled to age everything to within an inch of its life, and often I've regretted it.
DeleteWith this Villa I've been deliberately self-policing; trying to make it look old yet not too old to be comfortably lived in.
And so I Thank You Very Much for your comment about the room looking as if it is currently "being used by the inhabitants" which tells me Pepper, that my self-restraint with this entire project, has been the right approach to take! :D
elizabeth
p.s. I am SO GLAD to see you in blogland again- Welcome Back! :D
Une nouvelle pièce qui est encore une merveille. Votre travail Elisabeth est "hors-catégories" à tous les niveau, formes, couleurs, matières, choix des objets et des meubles,.... tout tout tout est au somment.
ReplyDeleteWOW! What a Beautiful Compliment Jean-Claude and I Thank You! :D
DeleteI don't think of my work in those terms at all but it is so Amazing to me that you do.
I'm out of words... ♥️
elizabeth
Your bathroom is turning out just beautifully! I love the tub and the pictures of the pre-finished bathroom with the mural and accessories is sublime. I could spend many long hours in here! Thank you for sharing!
ReplyDeleteHugs,
Teresa
Hello Teresa! :D So nice to see you and I hope that you're feeling better?
DeleteI am still in the process of wresting with this funny little room, but I'm Delighted that you like the mural and the accessories thus far.
Once the walls are permanently back in the villa, it will be difficult to get a decent photo, but in the meantime, Thank You for enjoying it and for your Lovely comment! :D
elizabeth
Hi Elizabeth! What a beautiful bathroom! I know you still want to make some changes but it looks like perfection in your house. And I love getting a look at the original kit, it’s so neat to see all the changes you’ve made along the way! The thing that struck me most was the floors. Wow, the technique of adding that filler and then staining after is so good!! Looks fabulous!! Always look forward to catching up with your build!
ReplyDeleteHello Kristine and Thank You for your Compliment and Comments :D
DeleteI have been very surprised by the favourable response to my bathroom floor!
I almost didn't include those photos of the drywall spackle being applied because I thought people would think I was crazy!
And it looked Gross!
Even so, those slight bevels between the planks, bugged me enough to risk applying the putty, and fortunately for me; it worked! ;D
elizabeth
That was a roller coaster ride, you have so many ideas and are brave enough to try them out, and with a fantastic result! Love your Italian bathroom and wonder what you will do next.
ReplyDeleteThank You and it's Great to see you here again Margaret!:D
DeleteIt was Indeed a "roller coaster ride" and I'm still riding it- Up! ...down, Up! ... down.
Constructing my "Italian" bathroom, has been and is in every way, an adventure into uncharted waters.
just call me "Columbus"! ;D
elizabeth
The floor looks amazing and I absolutely adore what you've done with the tub!! Fantastic, as is EVERYTHING else, or course :)
ReplyDeleteIt's always a Pleasure to see you here Norma and I Thank You for your comment! :D
DeleteI think that my mother would be pleased that her gift has been given a new home and a bit of an up-grade despite the corrosion.
I remember how Excited my mom was when she gave me the tub and how Thrilled I was to receive it. And since she, like you, always enjoyed travelling and seeing the world, having this tub lodged in an Italian Villa, would have pleased her Enormously! :D
elizabeth
los preliminares me encantan, pero el resultado final es del todo increíble! te felicito...
ReplyDeleteThank You SO Much Carmen! :D Although I am far from finished, I am well on my way again and it is such a Relief! :))
DeleteGetting the tub walls worked out was a Giant step forward but now the rest of the bathroom needs some attention too! :D
elizabeth
You had an exellent idea with all the change you made in this kit.
ReplyDeleteI just love both of the bathrooms. They look very Mediterranean to me, I love all the details you added. Orange tree is so beautiful!
Thank You Very Much Kamelia!
DeleteI was and still is a struggle working on this bathroom but I have High Hopes that it will come to look more Mediterranean the more that I work on it.
And I'm glad that you like the little orange tree, I do too! :D
elizabeth
I also used bamboo placemats from "a dollar store “ in my projects but I had never came up for flooring, thanks for the idea, it’s great. I love your wallpapering and the beautiful details everywhere , the atmosphere created is wonderful, as always.I enjoyed each little corner of this bathroom .Congrats, Elisabeth , I admire everything you do.
ReplyDeleteHello Luli! :D
DeleteThank You Very Much for your compliments on my bamboo placemat floor, which I Greatly Appreciate!
I have been back to your blog many times and have been perusing your back posts as well, and have been "Floored" by the innovative transformations you've made and are creating in your Contemporary Victorian dollhouse. And so, as you can tell, "I admire everything YOU do" too! :D
elizabeth
Yikes! I must get off this "busy-go-round"! Totally missed this post. It's AMAZING! All that you have done...accomplished! So much has been said about it and I can't find anything new to add...so my friend! GENIOUS! Can't wait to get back home to see it. Congrats on all the progress!
ReplyDeleteSo NICE to find you here Fatima! :D
DeleteI seem to get a lot done on the Villa, and then nothing! And now I am thinking about you not only because you are far away and I'm missing you, but also I'm remembering the frenzied pace you kept up with regarding VITORIA during the lead up to the Show! It seems like it was only yesterday.
And where did the time go? ;D
elizabeth
Il caminetto sarebbe stato davvero incantevole, ma non si può rinunciare alla vasca per un camino. Non in un bagno! XD
ReplyDeleteCome sempre, le tue stanze sono vive e piene di luce morbida e dettagli bellissimi. Credo che il mio oggetto preferito sia il piccolo albero di arance vicino alla vasca!