 |
| Hello to one and all and Welcome Back! As you can see from the photo above, the staircase handrail has been installed and assent to the 3rd floor is now safely possible. It took me a while to settle on a course of action prior to constructing the handrail, but I must say that I am pretty darned pleased with its final outcome. Even so, you may have to view this post with one eye shut, because I made plenty of mistakes along the way, and although I've disguised most of them I realize that some of them are still obvious. 🙄 In any case my staircase ordeal is over, and I'm ready to move up to the 3rd floor leaving behind only a few minor details to be finished on the second- ❧❧❧❧ I'll begin by explaining how I constructed my iron handrail: |
 |
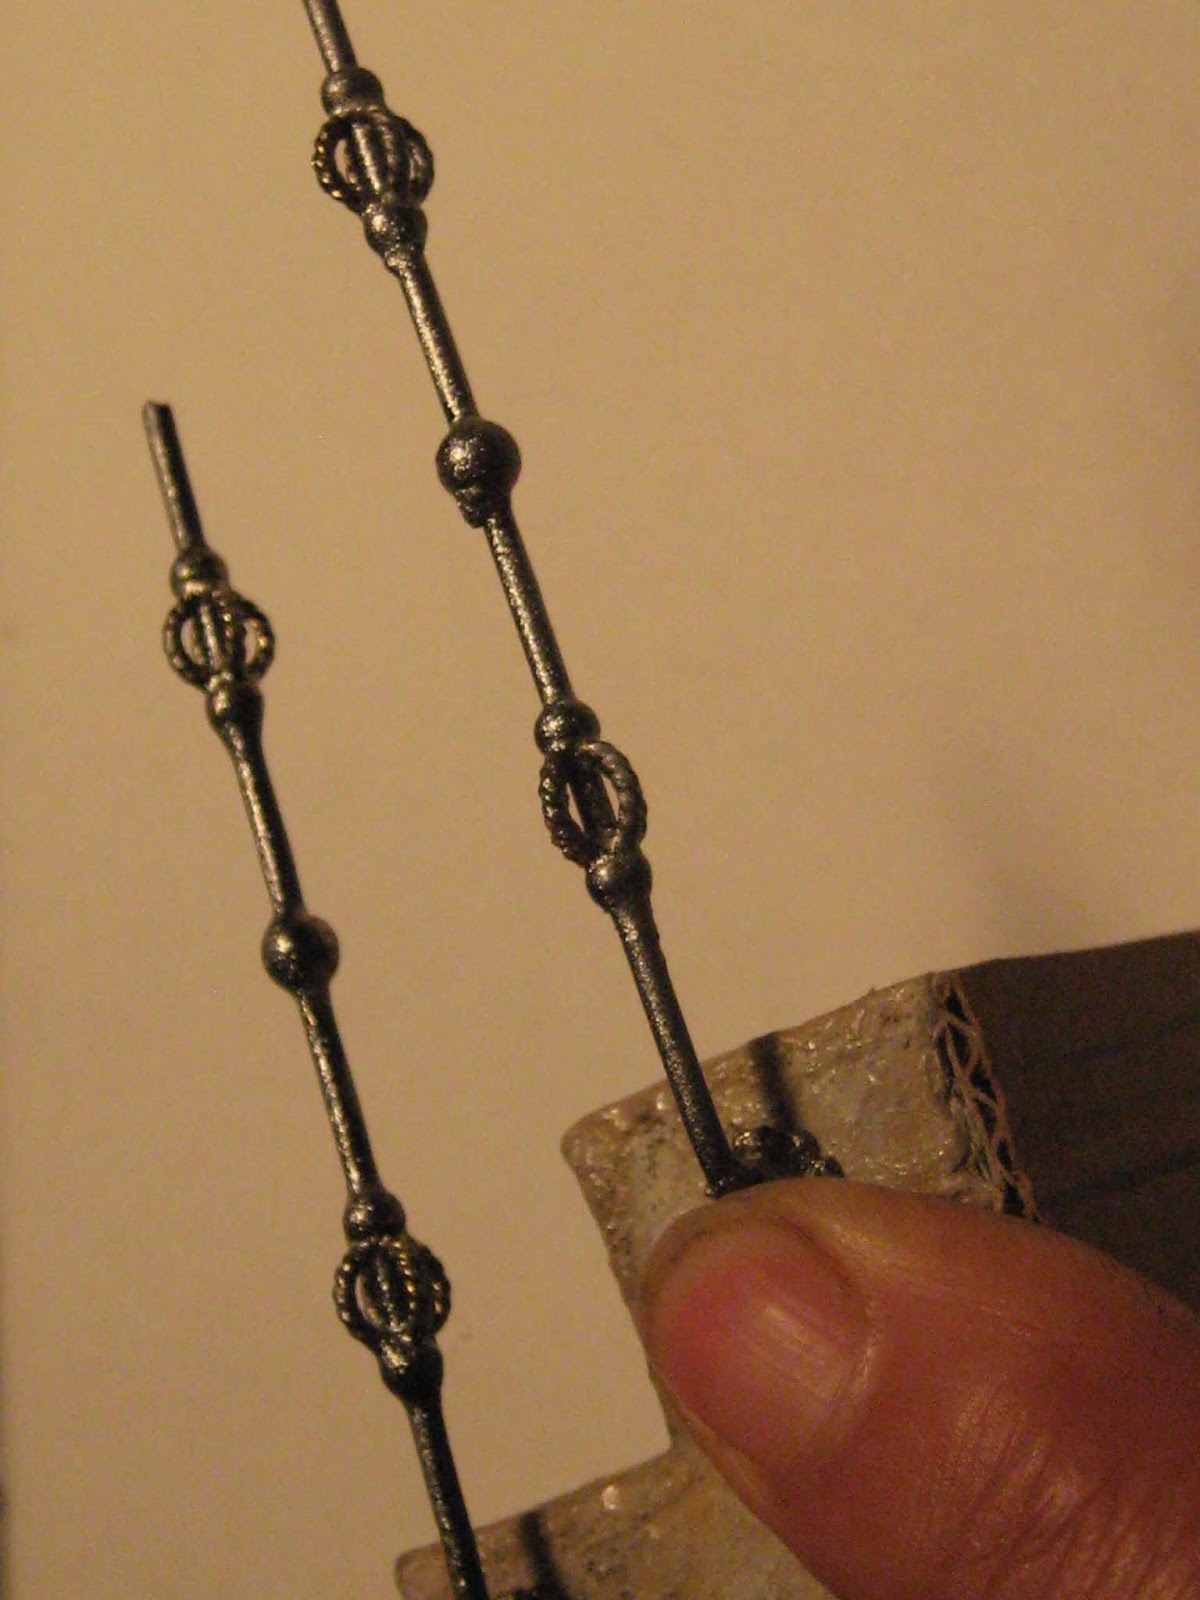
| It's made from 16 gage stem wire which I already had. I chose it because it seemed sturdy enough to support a handrail, and also because it fit through the holes of various beads I'd chosen for it. I referred to the directions in Lea Fisoni's The BIG BOOK of a MINIATURE HOUSE https://atelier-de-lea.blogspot.com/2018/10/le-grand-livre-de-la-maison-miniature.html and cut equal lengths of 7 cm stem wire, as per her instructions. I also found an equal supply of half-round bead spacers in my stash which I glued onto the bent ends of the metal rods. I did this to by-pass drilling individual holes into the side of the staircase, as Lea had done with hers. |
 |
| Once the spacer/supports were secured I then slid more metal beads onto each of the wire stems. |
 |
| I adjusted the beads as needed and then glued them in place with a drop of Zap-a-Gap glue. |
 |
| As you can see below I didn't get the ornamentation lined up properly but was able to correct it before I proceeded to the next step. |

 |
| To even out the colour I was going to spray paint the metal with a black BBQ spray paint. but unfortunately I had run out of it😕 and so I used a hammered metal spray paint as a base coat instead. To affix the posts to the staircase, I used a combination of white glue and super glue however, the connection was brittle and unstable and the posts kept snapping off of the staircase with very little provocation. sooooo I ended up using E600 Glue to tightly bond the spindles to the staircase and IT worked beautifully! |
 |
 |
| once the glue had set I was able to paint the rods with flat black acrylic paint. |
 |
| For the handrail I found a length of wood-channel in my stash which was narrow enough to stabilize the rods as well as substantial enough to support the visual weight of the staircase. |
 |
| I painted the wood with a metallic black acrylic paint then lightly sanded down the hard edges along its length to give it some additional wear. |
 |
E6000 glue was added to the tops of each rod before the handrail was positioned over them and into place.  |


 |
| I aged everything with several layers of thin, brown transparent washes. |
 |
| Finally I glued the staircase and rail unit into place. Any gaps between the wall and the stringer were filled in with drywall patch and when that was dry; the hall wall was also aged. Now that I have reviewed this photo below, I may have to add a ball finial to the end of the rail- what do you think? |
 |
Once the stairs were permanently installed, I finished the backside of them with the baroque Music Room wallpaper as outlined in a previous post. I blocked up the area under the stairs, then impulsively decided to wrap the paper around the side and- YUK! I DIDN'T LIKE IT AT ALL! |
 |
| SOooooo to fix it- I applied a thick layer of dry-wall patch with my finger and a pallet knife and completely obliterated the offending paper. |
 |
| To fill the void and to add some textural interest, I cut some scrolly sections, from an old plastic doily and imbedded them into the wet putty. When everything was dry, I re-painted the entire side section of the staircase to make it look cohesive with its new bottom. The painting of it proved to be challenging since I was working in a very tight space, and struggling to match it with the existing stone on the opposite side of the hall. All I'll say is that I did my best and since you can only see one side of the hall at a time... it IS, what IT is. |

 |
| After I'd had a look at the photo above I touched up each of the rods with more flat black acrylic paint to tidy them up. |
 |
| above are the end results of the finished staircase; top, side and bottom. And once again, I see something I'll need to correct ie. the end of the stub wall should be more defined. *sigh* ❧❧❧❧❧❧ Even though the wallpaper in the Music Room had already been sprayed with Matte Acrylic Sealer, I sprayed it again with Stiffen Stuff fabric stiffener, which I quickly dried down with a heat gun. I did this to hopefully protect the colour from fading and to give the paper itself, some added resilience. My remaining "big" task was to construct an inside window frame for the Music Room. However, I wanted something romantically Italian hmmmm?... what should I do?... 🤔 I KNOW! How about SOMETHING MADE OF STONE?!😩 Well, why not? I've already had LOTS of practice! 🤪 and since I had plenty of unused pieces from the Willowcrest kit, I decided to make the interior window frame by modifying one of its door frames. I cut through the centre section, and removed about 1/4 inch from the curve, shortened it, then re-glued the two sections back together to fit the width of the window opening. below is the raw wood door frame |
 |
| Once the frame was textured and painted to look like stone, I repeated the same colours on the insert so that it matched the finish of the inside frame and sill. below is the finished Music Room window with casing  ❧❧❧ For the ceiling of the Music Room I deliberately peeled, patched, painted, stained and roughed up the yellow ceiling paper to try and make it look more old world. The main reason I did this was to disguise an obvious join between the ceiling paper in the hall and the ceiling paper in the Music Room. hmmm? I may have to try this out on the bedroom ceiling too and I thought that I was "FINISHED!" 😤 |
 |
| The overhead light fixture was made from an ethnic necklace found at my local thrift store. It is studded all around with tiny pink pearls and is very ornate. I glued the light to a ceiling medallion (formerly a backplate of a dresser drawer-pull.) |
 |
For Pepper's little table I found a small rug printed on suede paper, rescued from another project of mine. I added some fringe to one end, and draped the rug to fall over half of the tabletop. I sprayed the rug with the Siffen Stuff to seal the colour, then I lightly aged it some more by with coloured chalks blending them in with my fingers. I Really Like the softness and warmth which the rug adds to the room. |


 |
| Another Change was with the accessories on top of the chest of drawers. Although I liked the original arrangement, I thought that some of my coloured glassware should be on display to represent Venice and it's world famous Murano glassworks. The new table-scape is simpler and more formal. and Thanks to Drora's delighfully easy cookie tutorial http://drorasminimundo.blogspot.com/2018/11/a-very-easy-no-clay-cookies-and-serving.html I made some tiny sandwich cookies arranged on the glass plate then I filled a cranberry glass compote with mandarin oranges and pears. Just a little something for the music teacher and/or her students to enjoy after practice. |
 |
| wouldja look at that waxy buildup - how in the world did I miss cleaning that up? |
 |

 |
 |
 On the opposite side of the room under the staircase, I decided to remove the long lidded chest. I pushed the draped table against the wall under the mirror and installed a second chair next to it. |
 |
| This new more practical arrangement gave me a little more floor space and visually unified both sides of the room. |
 |
 |
I LOVE the depth of field in the photo above-  The Music Room was an interesting room to construct. And despite it's odd size and obvious limitations, (namely "ME") I feel that it has managed to turn out pretty good! |
 |
So that's a wrap!
Villa Leone's second floor is "done"
Villa Leone's second floor is "done"
and
I'm not sorry to be leaving it behind.
I feel I have been stuck between floors,
for far too long.
 |
| "Time to say goodbye" to the stairs and to the Music Room and so- goodbye!😎 |
 |
elizabeth https://www.youtube.com/watch?v=4L_yCwFD6Jo |
.jpg)


It’s lovely Elizabeth, so warm and inviting. I especially like that you have two chairs in the music room. It makes it so much more comfortable for two musicians. The stairway to the next level is fabulous/perfect/well executed etc etc!! Yes something on the end would be appropriate.
ReplyDeleteI prefer the stone treatment under the stairs as it seems weighty.
All in all fantastic progress. I look forward to admiring it in person one day.
very dark, wet and windy outside ... off to book club this evening. I hope I won’t get blown off the road.
Talk soon.
Hugs Janine
Thank You Janine!:D
DeleteFor a time I resisted removing the chest but now that I have, you are right in that the second chair Does makes it easier and more comfortable for 2 musicians to play! :))
And I have taken your advise, and have added a knob to the end of the railing. It is still setting up but I'll try and get it finished sometime today.
No sooner was the paper under the stairs on; that I wanted to take it off-yet Too Late! Making the solid stone finish under the stairs to look "weighty" was my only other option and I'm so RELIEVED that it worked!
Now that December is just around the corner, I am anticipating a NEW POSTING from MINWORKS Real Soon!
it is at the Top of my Wish List ;D
will be in touch soon
elizabeth
I absolutely love your spindles and that staircase is gorgeous! I think you're right, something to finish the end of the railing will make it perfect. A newel post? Or something else metal to go with the spindles?
ReplyDeleteThank You Sheila! :D
DeleteThe stair spindles turned out Better than I'd expected and it was all due to having enough of those fancy beads already on hand.
I had thought about adding a newel post but I didn't know how to incorporate one in with the existing railing design, however I've now added a new squashed knob to the end of the railing, and it has already made a significant difference! :D
elizabeth
Once again you've done it! Fabulous stairs and I especially love the stair rails/rods. I agree that it might need a newel post of some sort or maybe a thicker rod at the bottom. And you make the window casement treatment sound so easy - "just make it look like stone". It all looks amazing! Can't wait to see it one day!
ReplyDeleteHi Linda and Thank You!:D
DeleteAfter reading you comment and Sheila's I give a thicker rod as a newel post some more thought although I am loathe to try and re-adjust it at this point.
I had to squeeze my big hand in through the window to add the finial to the rail and that in itself was enough of a challenge!
Meanwhile, I hope you like seeing your VL cushion and your Leone slippers again! :D
The rose ones you stitched are now residing in the bedroom as you'd suggested, but the black ones Really LOVE their new home in the Music Room! ❤️
elizabeth
Lo has logrado!!! esa barandilla de la escalera,es espectacular,te ha quedado genial,es hermosa!! La integración de la pasta de textrura con el relieve en el trozo de pared,queda muy interesante a la vista y todos los nuevos cambios y adiciones que le has hecho a la sala de música,le dan más interés y profundidad!
ReplyDeleteEres mágica Elizabeth!
Besos.
DeleteThank You Very Much for your Very Kind words Pilar! :D
I am very happy about how the stair rail turned out and also that I was able to correct that paper disaster under the staircase too.
Now it's Onward and Upwards! :D
elizabeth
One word....BRAVO!
ReplyDeleteThe handrail is genius. The mood, yes, very Vila...very Italian.
So happy to see you move on. Spectacular!
Thank You Fatima! :D
DeleteYou know that I'm all about "the mood" so I really appreciate your compliment!
And I am glad to be moving on too since I have a specific Deadline staring back at me. ;D
elizabeth
Ah yes...I know that specific deadliine!
DeleteAnd I know you can do it.
:D
DeleteC'est toujours un plaisir de suivre vos aventures de constructions, l'escalier est superbe, les montants en métal également et oui, il faut terminer la rampe. je sais que je vous le dit chaque fois Elizabet, chacune de vos photos est comme un tableau de grand maître, je ne me lasse pas de les regarder longtemps et plusieurs fois.
ReplyDeleteHello Jean-Claude and I Thank You Very Much for your comment! :D
DeleteFor me it is always an adventure and often taken by the LONGEST way around. It's never easy for me but ALWAYS interesting and it gives me Great Pleasure to know that you find my adventures interesting too! :D
I thank you again for enjoying my photographs. My aim is to make each picture as interesting and/or informative as I can. And although I have no real skill in taking pictures, I love my little camera and I LOVE playing with the light.
elizabeth
Love, love, love each tiny detail!!! A couple of weeks ago, I was in Venice and Villa Leone perfectly reflects the Venetian style.
ReplyDeleteBravissima!!!
Ersilia You have MADE my day! :D
DeleteAs you know, I am building Villa Leone mostly by gut and by guesswork and so your approval and confirmation means the World to me! :D
elizabeth
I love what you have done. It is so warm and comforting. What's Next?
ReplyDeleteThank You Jette! :D
DeleteFor me, the warmth comes from the busyness of the wallpaper and the rug on the table, but as to "What's Next?".... even I don't know That! ;D
elizabeth
What a fabulous and remarkable work, Elizabeth! for me everything is perfect and the whole is harmonious. The colors, the light create a warm universe and the accessories are perfectly studied (the Murano glasses for example). Oh I would like to live in this dream villa! It's awesome
ReplyDeleteThank You Very Much Claude! :D
DeleteI am so glad that the Music Room feels "harmonious" because there is nothing more annoying to me than discord.
Often I can't identify a problem in my work until I take a photo of it which is how this this room evolved into what it is now. :)
Initially I wasn't going to include a working overhead light but once I turned it on, it gave the space an even warmer look than it had before and it makes a nice segue from the stark coolness of the hall.
The Murano glassware was a last minute thought. I remembered buying different pieces for this Villa, but until now I hadn't any good place to display them. I think that they add to the general ambience, so I'm glad to have had the opportunity to include them and I'm Delighted that you are enjoying the final results! ❤️
elizabeth
Buongiorno Donna Elisabetha,
ReplyDeleteWhat a wonderful second floor you have created. The railings are magnificent and I think the handrail you chose is perfect. I love the finish on it. I think adding a ball finial might be a very nice touch. Also, good call on the wall underneath the staircase. the stone finish feel right. The window in the music room is just right and the ceiling fixture is beautiful.
You always manage to add perfect little Italian touches to Villa Leone, but I must mention how terrific the rug over the table is. It is perfectly venetian!
Big hug
Giac
Buona notte Don Giacomo! :D
DeleteYour compliments and approval give me Great Pleasure Don G. and you were Spot On about the ball finial and I am correcting it as we speak. :D
Under the stairs was a fiasco and I am glad that it turned out as well as it has so Thank You again! :))
I think what makes me the Most Satisfied however was being able to utilize the rug for the table.
It is made of stiff paper so trying to get it to fold and fall naturally was a struggle but once it was on, it looked as if it had ALWAYS been that way! I am overjoyed with how it has immediatly transformed the room and it makes me Very Happy that you think it looks "perfectly Venetian" *sigh* ❤️
Big Hugs Back!
Donna Elisabetha ;D
Как я люблю ваше творчество! Каждая фотография это живопись. Ковер на столе это очень живописно! Это наслаждение следовать за вами от одной фотографии к другой. Я не пишу на английском потому, что я не уверена, что могу грамотно показать пульс моей души. Мне нраятся перилла вашей лестницы. Они делают каменную лестницу легкой и ажурной. Вы правы, что убрали сундук. Теперь комната наполнена прохладным воздухом, теплым светом и нежной музыкой. Я люблю вид из комнаты в следующую комнату. Это как продолжение мысли. Жизнь проникает плавно, следом за светом.
ReplyDeleteЯ люблю ваше венецианское стекло. Это удивительное сокровище.
Хорошей недели, дорогая Элизабет!
Татьяна
DeleteWhenever I read your comments, I am transported by the sheer poetry of your words! You have music pulsing through your veins, Tatiana and I Thank You for sharing your Beautiful thoughts in such a complimentary and eloquent way. "Life penetrates smoothly, following the light." -
♥️!!! :D
elizabeth
The wrought iron spindles seem like the perfect choice because they are both beautifully decorative and allow the space to be open and light! I love the adaptation of using the flat side of the beads to attach to the stringer! The scroll embedded into the plaster was the perfect "fix", too. Who cares if the stone doesn't match perfectly. Only new stone does...
ReplyDeleteThe music room is absolutely gorgeous, and the photos portray a timeless elegance. While your choice of accessories is likely to keep evolving, I love every iteration! The rug as a tablecloth and the light fixture serve to enhance the richness of the space. It's really beautiful, Elizabeth!
I am so happy for you that you're finally able to begin the third floor and the bathroom that you've been dreaming about for so long! I know it's going to be an amazing space filled with inspired and inspirational ideas, and I know you'll be able to enjoy the process beyond measure!
Congratulations on turning so many of Villa Leone's "problems" into opportunities for creating an absolutely stunning second floor! Bravissimo!
Thank You Very Much Jodi! :D
DeleteUsing the flat side of the spacer beads saved me some time as it also visually widened the staircase by a fraction and I am VERY GLAD that it and the scrolly-bits under the stringer, worked out for me. :D
Regarding the general atmosphere; I tried to make the room look like an inspiring environment for anyone practicing classical music for long periods of time as I know how important it is to be able to become emotionally involved if you want to excel. The music teacher and her students will benefit from working in a pretty space with a view. ;D
Since publishing this post, I have tweaked a few of the things I'd mentioned from the photos which still bugged me, i.e. adding the finial to the handrail, beefing up the supporting post at the end of the stub wall as well as aging the ceiling in the bedroom to look consistent with the music room, so as of now, I really think that I am finally finished with the entire second floor of the villa; accessories and all! :D
elizabeth
As I recall Jodi, you said: "your choice of accessories is likely to keep evolving"
DeleteAnd I said I thought I was finished
Well it seems that I was wrong again and YOU Jodi, were right- cause I'm Still Tweaking! 😳
The iron railing is fantastic, perfect for this staircase.
ReplyDeleteThe music room is stunning; I like the atmosphere that emanates. So elegant and sophisticated.
Hello Faby and Thank You Very Much for your comment and compliment! :D
DeleteI place a lot of emphasis on getting the atmosphere right and tried to make a space that I would like to be in IF I was the mini Music Teacher! ;D
elizabeth
Elizabeth, this music room is beautiful! Admire your skill!
ReplyDeleteThank You for your Kind Compliment Ludmila! :D
DeleteI avoided then wrestled with the hall, stairs and Music room for such a long time that it feels almost unbelievable to me that all of them are actually finished, so it makes me Very Happy that you Like what I've done! :D
elizabeth
How really beautiful! thank you for sharing. I love the Venetian feel to the project. very talented !
ReplyDeleteThank You Very Much Mrs. M! :D
DeleteI often feel as if I've bitten off more than I can chew with this villa as I know next to nothing about Venice other than what I've seen in travel shows, movies and books, however I am learning as I go and striving for more of an emotional connection rather than an exact representation.
p.s. I LOVE your work and the Excellent Gustavian Style minis you are making!
elizabeth
I understand that to you it's a relief being able to concentrate on new wonders… but I really regret having to say goodbye to the stairs and the music room. You've worked your Elizabeth miracles again… looking at the finished stairs with the railway and the renewed (and in my opinion improved) stone-like looking stair wall it's hard to believe how you've done it. It's amazing how a bit of wire pieces and embellishments can look like an old iron handrail in the end. Btw - here in Germany "Time to say goodbye" was a very successful song… It was the event song of boxer Henry Maske's last fight… unlike him you're the true winner of this special fight against all the difficulties the building process of these parts brought along. And I need to tell you that your carpet on the table made me smile… I've just seen a tv documentation about a local noble family, the counts of Rantzau, living in castle Breitenburg in my home state Schleswig-Holstein. The young countess who is at the moment taking over the family business from her father-in-law showed the tv team around and talked about things she wanted to keep in the rooms and things she would like to change… but one thing she absolutely wanted to keep was the tradition to cover the tables of castle Breitenburg with old carpets. She said she had not seen this anywhere else… well, she doesn't seem to know a special Venetian Villa... ;O)
ReplyDeleteHugs
Birgit
Thank You Birgit! :D
DeleteI thoroughly enjoyed reading your comment and I think that the wonder of miniatures is how the flotsam and everyday bits and pieces of life, has the potential to be transformed into something else! All it takes is a little bit of imagination and information, and thanks to the excellent instructions in Lea's Incredible Book, I was able to swallow my fears and try building a handrail.
But I think the key word for the young countess is "Young"!
Covering a table with a carpet is a VERY OLD European practice. You can see them in many paintings especially by the Dutch Masters; either hanging on the walls and/or draped over tables. According to Google, carpets were not regularly used on the floor until the 15th century.
I chose to add one for the villa precisely because of those old world still life compositions :)
Meanwhile, I shall see if I can find the t.v. program you mentioned on youtube. It will be interesting to see the young countesses walking tour of her castle Breitenburg-
one can only imagine!!! :D
elizabeth
Young - and noble by marriage! *LOL* But to save her "honor"... the remarkable thing is that they've saved this tradition through the generations and through renovations. I've searched the channel's archives for you, you find the part that matched your post so well at about 11:45: https://www.ndr.de/fernsehen/sendungen/typisch/Generationswechsel-auf-Schloss-Breitenburg,typisch1396.html
DeleteI just finished watching the entire program which was Very interesting and enjoyable! The count and countess have a huge enterprise to look after and it appears that they are doing a Great job of managing the forests, golf course club and castle. I got a chuckle seeing the various personal collections of ducks, stuffies and caps on display; just like Regular folks have! :D
DeleteThanks for sharing these wonderful photos and showing how you overcame and found solutions for obstacles on the way to make a stunning second floor to the villa. I love the stair railings. Thanks for the tutorial. Glad you could do the easy cookies. By the way, you can make all sorts and shapes if you have a suitable punch.
ReplyDeleteHugs, Drora
Hi Drora! :D
DeleteI am Delighted that you have enjoyed the handrail tutorial and the photos, Thank You! :D
I found Your cookie tutorial so much fun that I made SCADS of them! The ones in this post were punched from an 1/8th inch hole punch but I also used a regular size circle punch too! At your suggestion I think that I shall try a flower punch next time- I found that once I got started punching out cookies, it was hard to stop! ;D
elizabeth
I could write pages about this wonderful blog and the perfection and detail of your work, and agree with all the previous comments - but I think I'll just say 'thank you!
ReplyDeleteRx
How Very Sweet Robin!:D
DeleteAs you know, making miniatures is personally satisfying many levels, however the other Great Pleasure is when others speak encouraging words and expressly enjoy ones efforts so-I, Thank YOU! ❤️
elizabeth
Yes, it turned out beautiful! That rug draped perfectly :) Everything is so inspiring--
ReplyDeleteHello Linda! :D
DeleteAs with any heavy paper, the rug was resistant and put up a good fight, however I finally managed to wrestle it into complete submission, with the help of both tin foil and tape! :D
The table rug made such an enormous change to the entire room that it Inspired Me to dig in and get everything else on the second floor, finished-
maybe it's a magic carpet!?
elizabeth :D
WOW ! je suis toujours entre le charme et l'amusement, Elizabeth ta façon de nous expliquer les problèmes et leurs solutions est un pur régal ;)
ReplyDeleteLe garde-corps est superbe, encore une fois le décor de cette salle de musique est parfait, vivant, tellement réel que la question est : miniature ou réalité !
Je suis impressionnée par ton travail de création et de recherche pour obtenir un tel résultat, ta ténacité face aux différents problèmes rencontrés.Nous sommes bien dans villa vénitienne !
A bientôt, encore une fois c'est Magnifique ! Bises. Joce
Thank You Joce for your Beautiful Comment! :D
DeleteAs you know, I like to share my travails as I go so that others may be encouraged not to give up and/or throw in the towel because If I can mini myself out of a tight corner, then so can everyone else! hahhaha
Even so, I am Delighted that you Appreciate and Approve my mini endeavours and of my striving to make Villa Leone as Venetian as I possibly can! :D
elizabeth
BRAVO, Elizabeth wow!!! Your staircase is gorgeous, I think you're right, something to finish the end of the railing will make it perfect.
ReplyDeleteThe mood in this room and the rest of your house is very very Italian. I absolutely LOVE your pictures, very atmospheriacal and the musi room is very elegant, especially now you added a second chair!
I'm so happy for you to see you move on, can't wait to see what will come next now ;O!!
Hugs, Ilona
Thank You Very Much Ilona!:D
DeleteYour compliment regarding the Music Room looking "Italian" was Music to my ears! :D
Adding the second chair made more sense to me and immediately united both halves of the room far better than the long chest did. At the very least, the cellist now has more room to play! :D
elizabeth
Me encanta como has creado la escalera y la manera en que sale de la pared. Por supuesto que la pared ha quedado mucho mejor así que con el papel. También me gusta más como queda la mesa y la silla que el arcón. Fantástica toda la decoración.Un gran trabajo.
ReplyDeleteThank You Very Much Isabel! :D
DeleteI too, am happier with the new arrangement of the Music Room AND I am relieved that the staircase and guardrail turned out as well as they did! :D
Lea's book helped get me started in the right direction and I am sooooo glad that I had it for reference, otherwise I might still be stuck in limbo on the second floor! ;D
elizabeth
Hello, Elizabeth - I've waited impatiently (not that I wanted you to rush) for this stairwell to be finished, and it surpasses all my imaginings! I love the handrails; your work is so impressive, especially when I remember the handrail for my villa and how I struggled to keep the posts straight and evenly spaced as I installed them - and yours look perfectly aligned. The whole thing is exquisite and exactly right for Villa Leone. The "scrolly" pieces on the stair wall are beautiful, as your stonework always is, and add lovely interest to that short wall. The music room table with its gorgeous rug tablecloth and the added chair are an ideal finish to the stair wall, adding such a mellow elegance to the scene. Your new tablescape featuring the "Murano" glass is beautiful in this setting, and the bowl of oranges and pears adds a vivid spark of color. I think the stairs and the music room are a success in every way, and I congratulate you on the creation of this comfortable, livable, and perfectly wonderful space. I'm in love!
ReplyDeleteMarjorie
Awwww shucks Marjorie, You're an Angel! ❤️
DeleteWhen you were constructing your staircase and handrail for your Villa, I was in total AWE and green with envy!
It has taken me months to get up the courage to build a simple straight run and yet yours with its more complex construction, went together with such Beauty and Ease! :D
Re: keeping the spindles aligned:
it was perhaps the easiest part, the real difficulty was keeping them ON!
Oh the woes of using the wrong glue for the wrong job; everything took 2wice as long as it should have, but once I switched to using the E6000, progress with the spindles went along smoothly.
Even so, yesterday I was trying to glue a ball finial to the end of the handrail; working blind with my hand jammed through a window. It took me over an hour to get it on AND to get it right. It was such a little thing by comparison and yet totally frustrating!
Nonetheless, It makes me Very Happy that you've pronounced the Music Room and the staircase a "success" Marjorie and I Thank You sincerely for the Generosity of your Beautiful compliments! :D
elizabeth
Dear Elizabeth, the entire room is like an Old Masters Painting.... a perfect still-life with lighting and mood and nuanced arrangements of accessories, all combining to produce a sense of peace and luxury and antiquity.... it is beyond compare!!! I love to watch your process.... so fearlessly attaching and then changing your mind and then covering everything in plaster and paint and then wiping it off and starting again! Your results are like a Lifetime or two or five of remodelers having their way with the building.... ending up with the perfectly aged "antiquity" we so love to see! :):) I think the stair rail you built is awesome... I've seen Lea's book and admired her houses and I know your version is as authentic as can be! And the removing of the beautiful long chest, while sad that it needs to go.... the placement of two chairs is just perfect for the space and the role of music teacher's classroom! The addition of the sparkling glassware... so true to Venice... and so brilliant a touch!!! I am always so impressed when you "make stone" out of the ordinary pieces of wood we find in these kits....! You are a genius with the layering of materials... and no, we can't tell that one surface doesn't match the others.... but in real life they probably wouldn't match either! Time and use and generations of re-painting would guarantee that! LOL!
ReplyDeleteAnd lastly, Dear Elizabeth.... Please never put "good-bye" in your title ever again!!! It struck panic in my heart! LOL! I hope it is only good-bye music room and hello attic that you are intending!!! Please say it is so!!! :):):)
Hello Dear Betsy! :D
ReplyDeleteFirst off, set your mind at ease as it was only a "good-bye to the second level! I couldn't quit now! How could I think of depriving my reader of all the Studio E trauma and drama yet to come??? :D
Seriously though, I am Thrilled by your comment and Very Flattered by all of your Praise Betsy and Thank You Very Much for both! ❤️
I know that with your extensive background in Art, you would connect the room to an Old Masters still-life and to antiquity which I Love! And although I have tried to balance the old and new with throughout the villa, each room seems to lean more one way than the other.
The Music Room with its collision of patterns has surprised me.
All of the other rooms are practical and functional but the Music Room is artsy and romantic and by including the collection of Venetian glassware, it not only helped to promote the story, but it looks as if it has always been there, so I know it was the right move! :D
I am a Big Fan of Lea's entire body of work, and I'm always inspired by everything she does. Her book allowed me to break down the steps of how to build the guardrail, and so I hope she will feel complimented by the end results of mine. :D
elizabeth
What patience you had to make the iron handrail and the result is fantastic. The way you manage to turn things round always amazes me like with the backside of the staircase, the effect is wonderful. I love the rug on the table and everything is great in this house. You took wonderful photos of it.
ReplyDeleteGeneviève
Thank You VERY Much Genevieve! :D
DeleteMaking the iron guardrail was a whole lot easier than I thought it would be. Lea's instructions were truly a God-send because I didn't know what to do or how to start. The only real difficulty was getting the rods to stay stuck, but when I switched to the E6000, the handrail went on without a hitch. :D
Correcting my Big Mistake under the stringer was maddening, and so although I'm not always good at Avoiding Problems; I've become well-experienced at Fixing Them! ;D
Moving the table, and chair up against wall opened up the space and made it workable, by connecting both sides of the room.
But I am Delighted that you like the series of photos as it's a stage of the mini adventure which I Truly Enjoy.
Because any Big Mis-takes with my camera, are easily corrected by a quick "click "of the delete button! ;D
elizabeth
Dear Elizabeth, I so love the music room, it is breathtaking! The mind just reels to see what is around every nook and cranny! Thank you not only for your beautiful work, but for your beautiful blog and the way you share. I ABSOLUTELY loved the Youtube link--uhoh--I have a new addiction! I'm going to try to find a cd of this gorgeous music.
ReplyDeleteHi Michelle! :D
DeleteI think that they sing together better NOW than when they first performed it decades ago; and it still gives me shivers!
I'm glad to learn that you've enjoyed it as much as I have! :D
And Thank you for your Lovely comment and compliments regarding the Music Room, Michelle!
One of the unique features of the Greenleaf Willowcrest kit, is that it hides direct site-lines which compells one to peek at around corners and into "every nook and cranny"; all I've done is to simply added More of them! ;D
elizabeth
The banister is great! everything looks warm and cozy.
ReplyDeleteThank You Very Much Gonda! :D
DeleteThe Music Room was a bit of a struggle and a definitely a challenge, however it all turned out alright in the end-
Thank You God! :D
elizabeth
La barandilla ha quedado espectacular, y la sala de música es preciosa.
ReplyDeleteMe encanta el aspecto decadente de toda la casa !!!
DeleteHello Eloisa! :D
I LOVE your word "Decadent" to describe the house and the Music Room as it really says it all- Thank You!!! :D
elizabeth
Fantastic banister it looks wonderful. Thanks for the tutorial. I love your music room it is very cozy I would spend lots of time sitting there.
ReplyDeleteHugs Maria
Thank You Very Much Maria! :D
DeleteI can see myself sitting and spending a lot of time in the Music Room too! I would read a book in the chair by the window and periodically gaze out at the canal: eating many cookies and drinking lots of tea. ;D
elizabeth
You have shown us how to create a very warm and romantic room. The stairs are a very doable project for a novice, too. And I like how you repurpose pieces, too. We all have odds and ends in our stash that we don't often know what to do with. I like that.
ReplyDeleteHi Ann! :D
DeleteI have a tendency to save my mistakes, because they often spark an idea of how to do something better the next time, but also because ( as you say) the opportunity to do something with them later is also a possibility. :D
And you are so right about the stairs being a "doable project for a novice" because that is exactly what I was prior to building the guardrail, and if I could do it; then anyone can! :D
elizabeth
All good things take time... and so, I have enjoyed, no actually loved, slowly meandering through final touches, changes and touch-ups, Elizabeth.
ReplyDeleteThe handrail for the stairs are fabulous. I had seen them in Leah's book but adding the beads to the uprights is just clever and fabulously decorative. The 'carved' stone below the stairs (good move not to go with the paper, I think) is a delight. One day I will attempt to 'make' stone. But my overall favourite would have to be the carped draped over the table. At the same time dramatic and elegant - is there even such a thing? Anyway, that Stiffen Stuff sounds like a wonder spray. Must find out if we can get it in Australia and if not, what the equivalent is called here. Thank you so much for yet another delightful look into this fabulous house of yours. Can't wait to see what the 3rd floor has in store.
Anna
Hello Anna! :D
ReplyDeleteThank You Very Much for your comment and compliments! :D
After I'd initially printed the rug, I gave it a spray of acrylic Matt Sealer, to set the colour, so the secondary spray of Stiffen Stuff was for "insurance" and was done after it was on the taped down and draped.
The Stiffen Stuff by Beacon; is the equivalent to ScenArama Model railroad landscaping adhesive; which is basically a loose mix of Mod Podge and water. There are tutorials on how to mix your own on Youtube Model Railroad channels if you are unable to find a ready-mix at a craft or hobby store. :D
Cheers!
elizabeth
I am in awe of your stair railing. It is so pretty and elegant. Good job. I have the book by Lea Fisoni and was intimidated by the rails. You have truly inspired me to give it a go.
ReplyDeleteHi Carrie! :D
DeleteThank you for your Lovely comment, Very Much Appreciated! :D
Initially I was intimidated by building a railing, but even so I encourage you to give it a try because it really was dead easy and I am generally Horrible at following instructions! ;D
elizabeth
Another totally inspiring and entertaining post!! As always, I loved all the details, especially the staircase, but most of all following your thought process and how you resolve issues - you are braver than me when you share your "mistakes" and then show how you overcame them. I only show the end result which is far less interesting.
ReplyDeleteI'm so happy for you that both floors are now complete - have you got any plans for a new project???
Much love
Simon ❤️
Thank You Very Much Simon!!! :D
DeleteHowever many people mistake my Desperation as Bravery when I am resolving issues.
But truly it IS desperation!
New plans are to next build the bathroom on the third floor along with the roof. Not looking forward to the roof -so Even More desperation on the horizon! ;D
elizabeth
That staircase railing is amazing! What a beautiful job. I would never have thought of making my own from wire and bead spacers, but it just turned out incredibly well. I also love how you fixed the area under the stairs.
ReplyDeleteThank You Very Much Deborah! :D
ReplyDeletePapering the area under the stairs was a bad idea and I knew it just as soon as I'd done it. I couldn't bear to leave it and perhaps get used to it because I knew that I wouldn't and it would bug me FOREVER.
Which is why wall patch has become my new Best Friend. ;D
elizabeth
Your posts are so inspiring and you have such brilliant ideas! The result of your latest efforts are stunning and so gloriously realistic. Am looking forward to seeing what you do with the next floor. Celia
ReplyDeleteThank You Very Much Celia! :D
ReplyDeleteMy ideas are always evolving so projects never end in they way in which I think they will, however, I am getting better at going with the flow and of following in the direction they lead. ;D
It makes me Very Happy that you have enjoyed the Stairs and the Music Room yet it will be a surprise for both of us as to what the bathroom on the 3rd floor might eventually become as well! :D
elizabeth
Wow, wow, wow! I love the spindles and railing. I did have a look at Lea's stairs for my Willowcrest but drilling all those little holes put me off. I love your solution for that problem!
ReplyDeleteAs always I adore your stone work, your lighting, your colours, your aging techniques, your accessoires etc... you create a magical world in which I would love to lose myself.
It's hard to imagine I am working on the same house. It couldn't be more different.
Hugs,
Véronique
Thank You for your Very Kind words Veronique and you are so right in that each of our interpretations of our respective Willowcrest Kits are as different as night and day. Yet this is precisely why dollhouse kits are popular in that one kit can be assembled, modified or deconstructed in countless ways! :D
DeleteSo thank you for liking the short-cut I chose regarding the spindles because it does give you a bit more wiggle room regarding their spacing without having to re-fill or re-drill the holes if you happen to get it wrong ( as I did and do! ) :D
elizabeth
WoW! I love the spindles and the railing - it's so beautiful. And it helps to have your explanation for how to do it. You always explain things so clearly. It's a beautifully evocative room now - I just love it.
ReplyDeleteHI Penelope! :D
DeleteThank You Very Much for your Lovely comment! :D
And I am GLAD that you have been able to clearly understand my explanations of the process. My desire is that anyone who follows my tutorials, will get the same results, which is one reason why my posts are usually sooooo long. ;D
elizabeth
I love the new look with the stair railing. That was a good call to make. It looked so time consuming.
ReplyDeleteAlso love what you have done with the music room! Changing things around is great once you get an idea of what you are looking for.
It has all turned out fantastic!!!
Mini huggs,
Conny
Thank You Very Much Connie and you are so right in that changing things around by adjusting some of the accessories, got me closer to the mood I was hoping for in the Music Room.
ReplyDeleteAnd even the stair rods which I thought were going to be the Most Work turned out to be the MOST FUN- all due to the clear instructions found in Lea's Fabulous book! :D
elizabeth
Very lovely details!
ReplyDeleteThank You Very Much Brandy! :D
ReplyDeleteI always enjoy adding extra details to my rooms and it makes me Happy that you've enjoyed seeing them too! :D
elizabeth
Elizabeth hello, my turn ! this is great ! I decided not to include a starcase in the house I am starting then five minutes later thought that no way could I not make one ! so now before starting the structure I must make the staircase and landing for the heights !
ReplyDeleteHello again Mrs. M! :D
DeleteI am Delighted to learn that you are going to install a set of stairs in your dollhouse because not only do you do Top Quality work but also how in the world would your little people gain access to the second floor if you don't!? ;D
so I'll be eagerly watching your progress!
elizabeth
Yup, those railings are inspired and this room is a triumph Elisabeth. When I look at that picture with a view up the staircase, I absolutely cannot tell it is a miniature. Those are the very best ones of course. The ones that trick your eye and make you take a second and third and fourth.. etc.. look. :D I agree the stone wall is much better than the paper.. especially when you are making the stone. Your use of paint effects and texture really is masterful.. how you turn everyday objects, plastic ones even into perfectly aged stone is wonderful and very inspiring. The new layout witht the table and chair moved to the stair side of the room really does open it up. All of your changes to your accessories are wonderful additions. The glassware is lovely and the ambience you have created with your lighting the instruments and right down to those wonderful slippers is delightful. And now as a prize for creating this fabulous room you get to move upstairs. Onwards and upwards!
ReplyDeleteHi Sam! :D
ReplyDeleteThank you Very Much for your comment and for enjoying the photo of the staircase too! I was scared to death about how to attack the handrail until I remembered Lea's book and took courage from there. It proved to be more satisfying than I had ever imagined and I am Very Happy with the final results! :D
I have been tweaking the Music Room a bit further as Jodi knew I would, while waiting for some materials I've ordered to arrive. Then I shall climb those stairs and tackle the 3rd floor and then the roof, and then ...THE GARDEN.
elizabeth
I read this post a while ago, but wanted to take time to drool over the pictures again before I posted a comment.
ReplyDeleteYour staircase is STUNNING! I'm so glad the ordeal is over for you and happy to report that mine is progressing. Not nearly as fancy, but I'm happy with it.
I love the stonework, wallpaper, and floors in your rooms, not to mention the endless details.
Thank You So Much Megan!:D
ReplyDeleteI am also glad that "the ordeal" is over! hahahha ;D
I have a natural propensity to worry and stress about whatever task lies before me and then when I actually turn and face the beast, it often proves to be less of an "ordeal" than I'd first imagined. The kicker is that I never seem to learn the lesson of "feel the fear and DO IT anyway" until well AFTER the fact; go figure? :/
But I'm Delighted that you have returned to enjoyed the Music Room and stairs once more and I'm Very Glad to hear that you are working on the staircase in your Del Prado again- How Exciting! -
I'll be right over :D
elizabeth
I am just now finding time to read some posts- Yours is nothing short of inspiring (as always!) The metal-work for the stairs turned out beautifully. The photos and step by step tutorial are great. Thanks!
ReplyDeleteSo Glad that you stopped by Troy and Thank You for your comment and for your compliments on the staircase and railing! :D .
ReplyDeleteI was chuffed at how easy it proved to be and at how well it turned out in the end, and so I Greatly Appreciate your giving it your Thumbs Up of approval too! :D
elizabeth
Wow, Elizabeth.... this is stunning. It has an ambience that I find amazing. Either you are a GREAT photographer, or you created something special. I am thinking it is the latter.
ReplyDeleteYou are brave. I don't know if I could "mess up" what I had created the way you have here, and I truly love the result...so I may have to find it within me to commit to destroying a few surfaces. :)
I am missing posts... I am not sure yet why. I lost my "blog skills" I guess. Thanks, by the way, for sharing how you went about creating the balustrade... I love that idea... and the result is magical. Putting that in the back of my head and cogitating on it...
Great job!
Doug S
Welcome Back Doug!,and Thank You for honing your blog skills again, here at the Villa! :D
DeleteThis room and the staircase were both connected at the hip and I couldn't do one without doing the other, and so I put off doing nothing for either of them for a very long time until I had to do something!!! .
But my construction skills are never very good so as I take pictures of my work in progress, a lot of my mistakes become more obvious to the unforgiving eye of the camera and I have no choice but to fix up the mess, which often requires my "destroying a few surfaces" intentionally.
I am Very Happy that you like the end results Doug but keep in mind that good lighting goes a long way to making anything look good! ;D
Best Wishes in this Holiday Season!
elizabeth
Oh my gosh Elizabeth! You are a master at creating such lovely, inspiring scenes! I adore the handrail you made . . . it's spectacular! The whole room came together so beautifully. Your eye for detail is amazing and I so enjoy visiting your villa. Thank you for sharing!
ReplyDeleteHugs,
Teresa
I'm so Glad you've stopped by the Music Room Teresa and Thank you for your Lovely comment! D
DeleteAfter months of stalling and uncertainty it all came together quicker than I would have supposed even though I found myself re-thinking then re-doing what I had previously considered as done.
This hesitancy on my part is the fear that "I Can't" - but when everything hinges on meeting a deadline, then diving in becomes the only viable option.
Also reading Lea's clear instructions regarding the stairs helped me Enormously! :D
elizabeth
I was reading this post and getting more and more fascinated. You did an amazing job. I'm delighted with how the staircase looks. It's just perfect! I can't agree with you that here is something to improve. It looks truly perfect.
ReplyDeleteAnd the Music Room is incredible. Every detail you chose fits perfectly. I love the rug. And the wallpaper. And the arrangment too.
I will visit your blog, for sure!
I'm So Glad that you have enjoyed this post about my Villa's staircase Kamelia, Thank You! :D
DeleteI am always looking for ways and means of improving what I've already done and both the staircase and the Music Room are still being tweaked even as I work on the 3rd floor. I should have a new update before the end of January so Please Stay Tuned! :D
elizabeth
Hello Elizabeth, my turn ! I am been looking at your staircase thinking if the one I have to begin ! daunting ! but you have made such a good job of it and you have made it look like its always been there, antique but not cold, really lived in and loved. I can't believe I didn't click 'follow', I went back and forth looking at your blog wondering why I didn't get updates, talk about mad ! best wishes Mrs M
ReplyDeleteWelcome Back Mrs. M, it is always a Pleasure to see you! :D
DeleteThank You for your Very Kind words regarding the staircase! :D
It was a project I'd postponed until I could no longer ignore it and then lo and behold it went together very easily so don't let the thought of building yours hold you back. ;)
elizabeth
WOUAH I don't know why I deed not see this post It's beautiful I love ambiance ,warm color of you room with the stair .������
ReplyDeleteBRAVO
Thank You Very Much Catherine! :D
ReplyDeleteI was Very Glad that the staircase rails turned out as well as they did thanks to Lea's Great Book instructions. And I am also pleased with the way the wall paper looks in the Music Room which is what gives it, it's "warm ambiance" :D
elizabeth
Elizabeth: I've been away from the blog world for so long now but now that I'm back, your is the first blog I am trying to catch up with. And what do I find??? Absolute magic! You are so incredibly talented and your ability to come up with such gorgeous vision, and then carry it out impeccably, is amazing. Love, love , love the staircase rail in particular but there is so much to love everywhere in your build. I'm simply stunned! - Marilyn D.
ReplyDeleteWelcome Back Marilyn and Thank You for your Wonderful comment! :D
DeleteI was so relieved to have been able to FINALLY complete the second floor and have it turn out different yet Better than what I had originally envisioned. I had been avoiding the stairs then avoiding the handrail for what seemed like forever but when I did get busy on it, it went faster and smoother than the music room did.
I am now firmly ensconced on the 3rd floor, and wrestling with it every step of the way- as usual. Hope to have something worth showing before the end of this month so stay tuned, and once again Thank You! :D
elizabeth