Sunday, 10 February 2013

"Measure for Measure"

Hello everyone!  Yes it is once again a tutorial, on something from nothing!  A short while back I made some measuring spoons from some crimp pearls that are used on necklaces to hold the knotted end of the string.  I am always reluctant to throw anything out until I have explored some additional usages for it.  This is what I did with these.

This package came from Michael's craft supply store but I am positive they are available at the dollar stores if you checked around.  These cost about $5 per pack.
 
This is them out of the package, they are squiggly-looking 

I used at least 5; one to ruin, one to loose and 3 to make it to the 3rd round!

You need to open up the cup end of the pearl 

Then you are going to remove the end cup by clipping it off with snips or scissors

Here are the 2 pieces and the piece you removed you can discard unless you want to save it for something else....you just NEVER know?  

The piece of pearl with the handle attached is what you will need  to smooth out with a metal file.  File the bowl smooth and try to keep it rounded.

This is a jump ring that I removed from another necklace.  Use a ring that is not too big in diameter.  It has to be big enough to hold 3 spoons but not too big so that the spoons look out of scale to the ring.

The spoon is hooked onto the ring with the hook allowing for the spoon to slide around the ring.  In other words don't mash the hook down onto the ring.

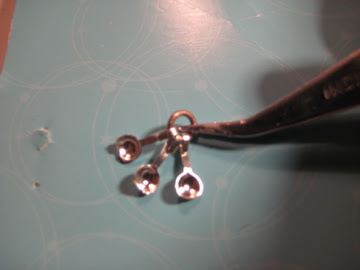
Here are the 3 spoons on the ring ready for your mini kitchen.  Aren't they adorable!??

These are the 2 sets that I've made so far and I plan on making some more for the West Coast Miniature Show and Sale in June.  The gold tone ones are the 1st ones that I made using vintage necklace pearls; the silver "stainless steel" set are the ones I made for this tutorial.  

I probably purchased this vintage flour sifter in the States at the Seattle Show.  It is sooo cool!
I just noticed that the gold spoons have the hook under and the silver have the hook over. I think I like the "under"style better and so the next sets will be like the gold ones.

And so dear readers, we come to the end of this tutorial with a look of the spoons amid the flour and baking powder.  Pretty cute, I think.  I hope that this has "measured up" to your expectations! hee hee

 elizabeth


Saturday, 9 February 2013

THE BLOG/AUDIENCE

It is getting more and more interesting doing this blog even though I stumble and fall my through it.  Most of what makes it so worth doing, in the first place, is that I get an opportunity to interact with the "blogaudience" out there in blogland ( as Lucille so aptly called it).  I want to thank each new member that has decided to follow this blog as regulars and also those who are doing what I did for many months, just stopping by for the fun of it.  It gives me a 'warm fuzzy' feeling thinking about other people tuning in and then taking the time and trouble to leave a message.  Thank you one and all!  The new followers are :  MARJA, GRANDPAS DOLLHOUSE, ELIANA, TROY, KUNDRY'S MINI WORLD, MS FIERCE 7 (cool name) , MARA, and MICKEY.  Welcome to Studio E and enjoy!

Thursday, 7 February 2013

"To Market, to Market...."


"TO MARKET, TO  MARKET, TO BUY A FAT PIG!  HOME AGAIN, HOME AGAIN,  JIGIDY JIG....TO MARKET , TO MARKET TO BUY A FAT HOG, HOME AGAIN HOME AGAIN JIGIDY JOG"
So when I was thinking about a title for this post, it was almost called GETTIN 'JIGIDY' WID IT (then thought NOoo, maybe not).....  So by now I am sure you've guessed that I am doing a post about market baskets not pigs or hogs.  My little piggie "Arnold" is just waiting for the scraps from the market basket to make up his afternoon snack.  If the baskets are left on the floor  too long, Arnold might also be able to eat his dinner at the same time as his lunch!
(rats! another fuzzy photo)

I've made up 3 market baskets so far.  I am trying to use the items that  I have been making and make the itty bitties look more substantial.  An example is the bunch of green onions that are on the table top.  Not much to look at on its own, but snuggled into the basket it becomes...... A CONTENDER! (cue theme from "Rocky")

For whatever reason, the grapes did not photograph very well?  I looked at this pic and then at the actual basket and there is a big discrepancy!  You'll have to believe me when I tell you that they do look like grapes in the basket.  Moving on, I shall tell you what is also inside. I've already told you that I made the green onions.  I made them from fake flower stamens that you get from the craft store. I had planned to do a tutorial on them but they took too long! and I started to bore myself charting the procedure so you will just have to buy some 'stamens' and find the 'stamina' to try it on your own.  hahah  I made the breads from air dry clay and you can see how many I made by referring to my blog #2" Nights before Christmas.  There you will see just how many of these loaves I've made and why it is so important to find something to do with them.  Who wants just bread??? (Oh boy, I better get on with it) I made the jar of honey with the blue cap from a cut up glue stick and glass paint.  The 'Edam' cheese is air dry clay coated multiple times (with a red nail polish) to look like red wax on the outside.  I used a cheese label that had a picture of Napoleon on it but it reduced to nothingness by the time I had scaled it down.  It is a pretty color though.  The radishes are tiny foam balls that were  berries picked off of some fake christmas tree and they reminded me of radishes so I found some old railway landscaping stuff and glue the balls to the foliage;  results Radishes!   The tulips are dried grape hyacinth pods and the leaves are plastic from Fat's Finds at the dollar store.   I included a garlic bulb( seed pod) and some dill ( plastic flower stamens)
And here is basket #2 .  It is a summer basket ( the first was spring with the tulips)  this has pink roses  which began life as dried flowers which I've had for decades. I touched them up with some glass paint to liven them up a bit.  I put some mild blue cheese in this basket and also some of the countless nectarine/peaches that are also in blog #2( if you want the full impact.)

Another view, showing the "roses"

There is close, and then there is TOO CLOSE!  

Here is Basket #3, also a spring time arrangement.  Tulips, radishes, honey. green beans (plastic flower leaves) a wheel of Brie cheese that I wrapped in cellophane and wedged into the centre, too bad you can't see it better because it really looked like Brie!

Verging on blurry:  The radishes are front and center and the honey to the left side.  The breads and the tulips ( see blog #2 Nights before Christmas, to see ALL the potted tulips!) 

And here is the back side of the basket.  You can see the tulips better  from this angle.  I think that no one does a better job of mini anything than God and so I am always happy to let Him do the hard work for me in making the flower heads, that I in turn, can just dry and paint up and take ALL the credit for! hahahah.?????... ( I'm Just kidding, God.)

Now this is a Market Basket!!!!

This beauty was made by none other than my dear friend and comrade in arms, JANINE!   She hand sculpted this whole basket of veggies from Fimo and gave this to me as a gift, back in the late 90's, ( I believe, she'll phone and correct me if I'm wrong) The contents are all sooo real and as Janine is an avid gardener with a food production from it that allows her and her family to Eat Fresh all summer  long and then into the fall.  Fatima and I enjoyed some delicious home-made soup there last November, with the veggies picked directly from the garden.  Yum.  Knowing how exacting Janine is, you will appreciate the details of the basket.  Leeks, potatoes,  green peppers, tomatoes, still on the vine and some tiny green beans tucked under the spuds.

Now I think that this is a melon( or a squash?) Anyway, I think it  IS a melon ( winter melon?) and look at the way it is colored and mottled!!! I could NEVER do this kind of work!  My efforts in Fimo are....let's just say."NOT GOOD".  Janine has some carrots to the right of the melon and it all sits in her remade basket that she cut down to the size she wanted and then re-inserted the bottom into.  It is perfect and the cloth draped over the edge is in harmony with all the colors of the arrangement.  It is wonderful and she should make some more.  Right now she and Bruce are working still on the garden of her french doll's house.  Soon you'll see her mini veggie garden where all this produce came from, right Janine? (now she'll phone me to tell me that not everything will be in the garden, I know her soo well, hahah) You will all just Have to go and have a peek over at MINWORKS to see what Janine has in store.  Meanwhile, here is the pig again!   To market, to market, Good- Bye, you fat pig.....  ( errrr,... no offense)


elizabeth


STUDIO 'MESS'- EEEEEE!!!!!

Okay, I decided to face the music and admit that I have a serious problem!   And here it is;.... My work space.  It has been like this  for days only this is now how it looks now after I, half- heartedly, straightened it up.  OH woe is me.  This IS serious!

See that messy desk/table?  This is where it all happens and out of all the unavailable work space,  I work right on the edge of the table that I sit at,  on approximately 10 inches of surface.  Sheeesh? I do wish everyone to know that I am NOT a lousy housekeeper.  This is NOT the norm in every other room  of the house, with one exception that is, My teenage daughter's room!  NOW, THERE is a SERIOUS problem!

In My living room; ' serenity now'
elizabeth

Monday, 4 February 2013

"GRAPES" (they're a shoe- in!)

How many of you have packets of DESICCANT SILICA GEL  sitting in your shoe boxes just waiting to become grapes!!!!!???  Well now's the time.!

FUTURE GRAPES!

Pour silica beads onto WAX PAPER and remove the super- sized ones.

I'm using a very old Kelly's Brown Glass Paint but I also tried out some Delta Transparent Glass Paint in Amber and it worked just as well.

  STEP 1:   Mix the silica beads into the brown paint.  The Brown will provide a base color for the red grapes and will also take the monotony of a single color out and make the grapes more authentic looking.

The grapes are now coated with the brown.  They will lighten up quite a bit as they dry down.


  STEP 2:   This is the second color that I'm using.  Gallery Glass is available at Michael's craft supply and probably most craft stores.  I'm using Magenta Royal.  It is like a soft wine color when dry.  When I first tried this out it was sooo freaky because I didn't know if it would do what I hoped it would.  I had another option, Gallery Glass Berry Red, but I went with the Magenta and it worked out beautifully.


On the same paper squeeze out a good sized blob of Magenta  Royal paint and mix all of the brown beads into it...  and this is what you get.  But these are way to glossy and red grapes are more "frosty" looking so we add STEP 3.... White Chalk


Scrape out some white chalk onto the same wax paper that you have been using.  You will need to add more Magenta Royal Paint and mix the beads into the paint chalk mixture.  It  will look like what you see below.

Try not worry.  They look awful but they dry down really nicely...

SEE!!??

STEP 4:  This is a piece of dried flower that I believe is  called "Statice",  and I  clipped off a twig that I thought would make a good shape for the grapes to be glued to.

STEP 5:  Clip off the dried flowers so that just the stem is left.

And Yes, I DID try the Quick Grip but it was not good.  I had to try several types of glues and this worked the best.  You have to coat the stem with the white TACKY GLUE and let it set up and tacky dry on the stem so that the glue from the paint will stick to it.  This is the part that takes patience because of the fight against gravity.  The beads will go on and then fall off..... it is better to let a small cluster set up onto the stem rather than try to get them all on at one time as I tried to do.  

The stem withe the glue on it.


These are the red Grapes on the vine and ready to be served.  These would look even better with a bit of greenery a grape leaf maybe.?  I plan on doing a small market basket with these and the multitude of peaches and breads that I showed in my first blog post "Nights before Christmas".  I made some market baskets back in 1993 and I just found one that I had tucked away.  So once I get one together, I'll show you how it turned out.  Till we meet again, have fun making Grapes; your shoes will thank You for it !

elizabeth

THE WELCOME MAT

I have taken too long about mentioning the "Newbies" to this blog, so without further ado I'm putting out the WELCOME MAT" to thank JOCELYN, PAULINE, JAZ, KIM R, JEAN DAY, JANE SMITH, DALE FLUTY, and ASCENSION, to this Studio E blog.  I  am VERY GLAD that YOU are here and I hope that we can all become better acquainted and good friends as time goes by.  I am grateful for all you comments and encouraging words.   God Bless you all!

elizabeth

HISTORY IN A NUTSHELL


Well, I finally got the last of the miniature furniture and associated accessories, OUT of the garage, and into the work room.  It is a wonderful feeling to know that all my tiny stuff is surrounding me and yet I am sad too that there is NO SPACE inside to accommodate all the Magazines on Miniatures that I have been collecting for the past 30+ years!  They are still mouldering away in the garage.  Whaaaa!  I love my mini mags and although I am hooked on this piece of electronic equipment, I still want my Paper!  Those magazines (mostly Nutshell News and the Miniature Collector), represent a great deal of my early experiences with minis and so there is the nostalgic connection that endears them to me.  The mini
shakers and movers and the ones that paved the way for those that have followed are printed on the pages of those countless magazines that I periodically go though and still enjoy.  Names that probably mean little to many now, were Catherine B. Mclaren,  Sybli Harp, Geraldine Willems, Dee Snyder, Bonnie Bennett, Noel and Pat Thomas, Dougless Strickland Bitler , Deb Stenholm, Anne Ceasar, Joann Swanson (she has a great blog; DIY Miniatures), Anne Day Smith, Brooke Tucker, Karen Markland, Eugene Kupjack, Judee Williamson and Nicolle Warton Marbel, Susan Sirkis,.... editors, contributors, reserchers, mini food makers, scrap crafters,  doll dressers and doll house makers, furniture upholsters, painters, stylists, etc. etc., the list goes on and on....   I Adored them all!!!   Every month, I would be in the miniature store picking up my copies and then wait until I was alone and then quickly scan them and then re-trace my way through them with a highlighting pen, flagging pages and  making notes as to what I liked and wanted to try.  There were dreams in those magazines and what we do today is based on what they did yesterday.  So, now as I go through my boxes of collected pieces that originated from those times and remind me of my early beginnings in this craft, I am grateful for the "education" from so many of these early pioneers and the enduring  power of the printed word.  They and many others, elevated the hobby to an art form.  They took it from kids play, to adult appreciation,  from chunky, to refined and they informed and reminded me that 'only through sharing can we truly enjoy this hobby'.

elizabeth


DO OVERS! a Glencroft Living room redecoration

    Back in April of 2022, I made up a storyline for my Glencroft renovations, which went something like this...   "After due considera...