 |
| One day last week, I was wandering aimlessly through the land of Pinterest, looking for items for my future Italian Kitchen and happened upon this Japanese tutorial on how to make a miniature FRENCH PRESS coffee pot. Actually I was specifically looking for a tutorial on how to make an Italian Moka coffee pot when I came across this Pinterest site, even so, I decided to have a go at making the FRENCH PRESS instead. I thought it would be quick and easy; and, as usual, I was WRONG! The first pot took me HOURS to do and undo. In the process, I got glue all over my hands and all over the pot and had paper towel stuck to everything everywhere else. After I had wasted an entire day I gave up and went to bed. I was back at it again early the next morning. However, not much noticable progress or improvement so I tried making the FRENCH PRESS again for the 3rd time.... and then again.... and finally by day FOUR, after my 6th attempt, a pot turned out to be acceptable. Here is the French Press which originally inspired me: |
This Japanese site used a glass pitcher as the base for the coffee pot. Since I didn't have one, I substituted a pencil cap from a Chanel lip liner, which had been gathering dust inside an old forgotten makeup bag. I used the clear plastic end caps because they not only appeared to be the right circumference for this project, but also they were very easy to cut with a razor saw, and each pencil cap was long enough to produce 2 coffee pots.
 |
| I cut the pencil cap into 3 sections and saved the center section for a different project. |
 |
| I sanded the raw edges with a metal file and then smoothed with an emery board. The container on the left slightly tapers towards the base, but the tube on the right is the same width from top to bottom and is the easier one to construct. So I will be demonstrating this tutorial using the tube on the right. I used a slightly different construction for each coffee pot so you may see some variations as you go through the photos but what I have written is how I made my FINAL FRENCH PRESS Please feel free to modify any of these instructions to suit yourself. |
 |
| I glued a small clear piece of plastic cut from a "Pringles potato chip" lid, to the base using QUICK GRIP GLUE. I had also tried E6000 and CRAZY GLUE but the Quick Grip was the easiest (for me) to use on this project. After the glue has set, |
 |
| trim away the excess plastic from the tube and sand the edges smooth. FYI Initially, I tried to make a spout for the coffee pot by cutting one out and gluing it onto the surface. I made the first 3 pots that way BUT THEN I found the tutorial listed below through Pinterest, and I scrapped what I had been doing in favor of this new procedure- https://www.youtube.com/watch?v=R-r-eabikHY Much easier!!!! |

So as per the video; I heated up my glue gun WITHOUT the GLUE STICK, and using the hot nozzle, I lightly applied even pressure to the rim of the plastic tube, drawing it upwards and down.
I removed the gun, then quickly shaped the spout with my fingers if it was uneven.
by the way,
practice this method on a throwaway piece first so that you can gage how much pressure to apply and how fast the plastic will melt.
 |

 |
| and TA DA!!!...This is the result (HAPPY HAPPY DANCING! :D) **** For my 1st, and 2nd French Press, I used the tea light metal to construct the outside cage for the coffee pot. |

 |
| I smoothed it out using a large ball stylus, and then cut thin strips using the longest, sharpest scissors I own. For the 3rd and 4th French Press pots, I substituted the metal wrap saved from a wine bottle. It was heavier than the candle aluminum and I liked the results much better. I applied the metal strips starting directly under the spout, guiding it across the bottom, then up to the opposite side of the tube. I used the Quick Grip sparingly, (or as "sparingly" as I was able considering how this product gushes like a garden hose! ) However, the excess glue can be picked off with tweezers after the metal has been positioned. (needless to say, I spent a lot of time picking off the excess glue from every single pot I made.) {:( |
 |
| above and below shows the wine bottle metal as strapping and also the angled tweezers I used to remove the overflow of rubbery glue. |
 |
| I added a long cross-strip of metal to the side, underside and up to the opposite side of the container. A top band was glued horizontally to overlap the top ends of the side bands, then I trimmed the excess metal using a straight edge razor blade. I lightly burnished the metal with a ball stylus to ensure that the bands were affixed to the "glass". |

 |
| When the bottom band was on, then it is time to make the handle. I used two different methods. The first three pots have handles made of sections of those plastic sock "thingamabobs", which I cut down to size and glued onto the coffee pots. |
 |
 |
| Since I know that "thingamabobs" might not be readily available in your area, I found an alternate solution. I doubled up some plastic stitch count markers, (dollar store) glued 2 plastic circles together and then cut the rings in half and trimmed them down again to fit the contours of the pot. |


 |
| I found 2 tiny gold seed beads that were of equal size and glued them to the plastic handle then onto the pot. I glued 4 gold beads onto the bottom of the container for the feet. This was a whole lot easier than making the strip metal feet which I'd done with my first 2 attempts. Later, I touched up the handle with black nail polish, followed by a finish coat of clear matte nail varnish. |

 |
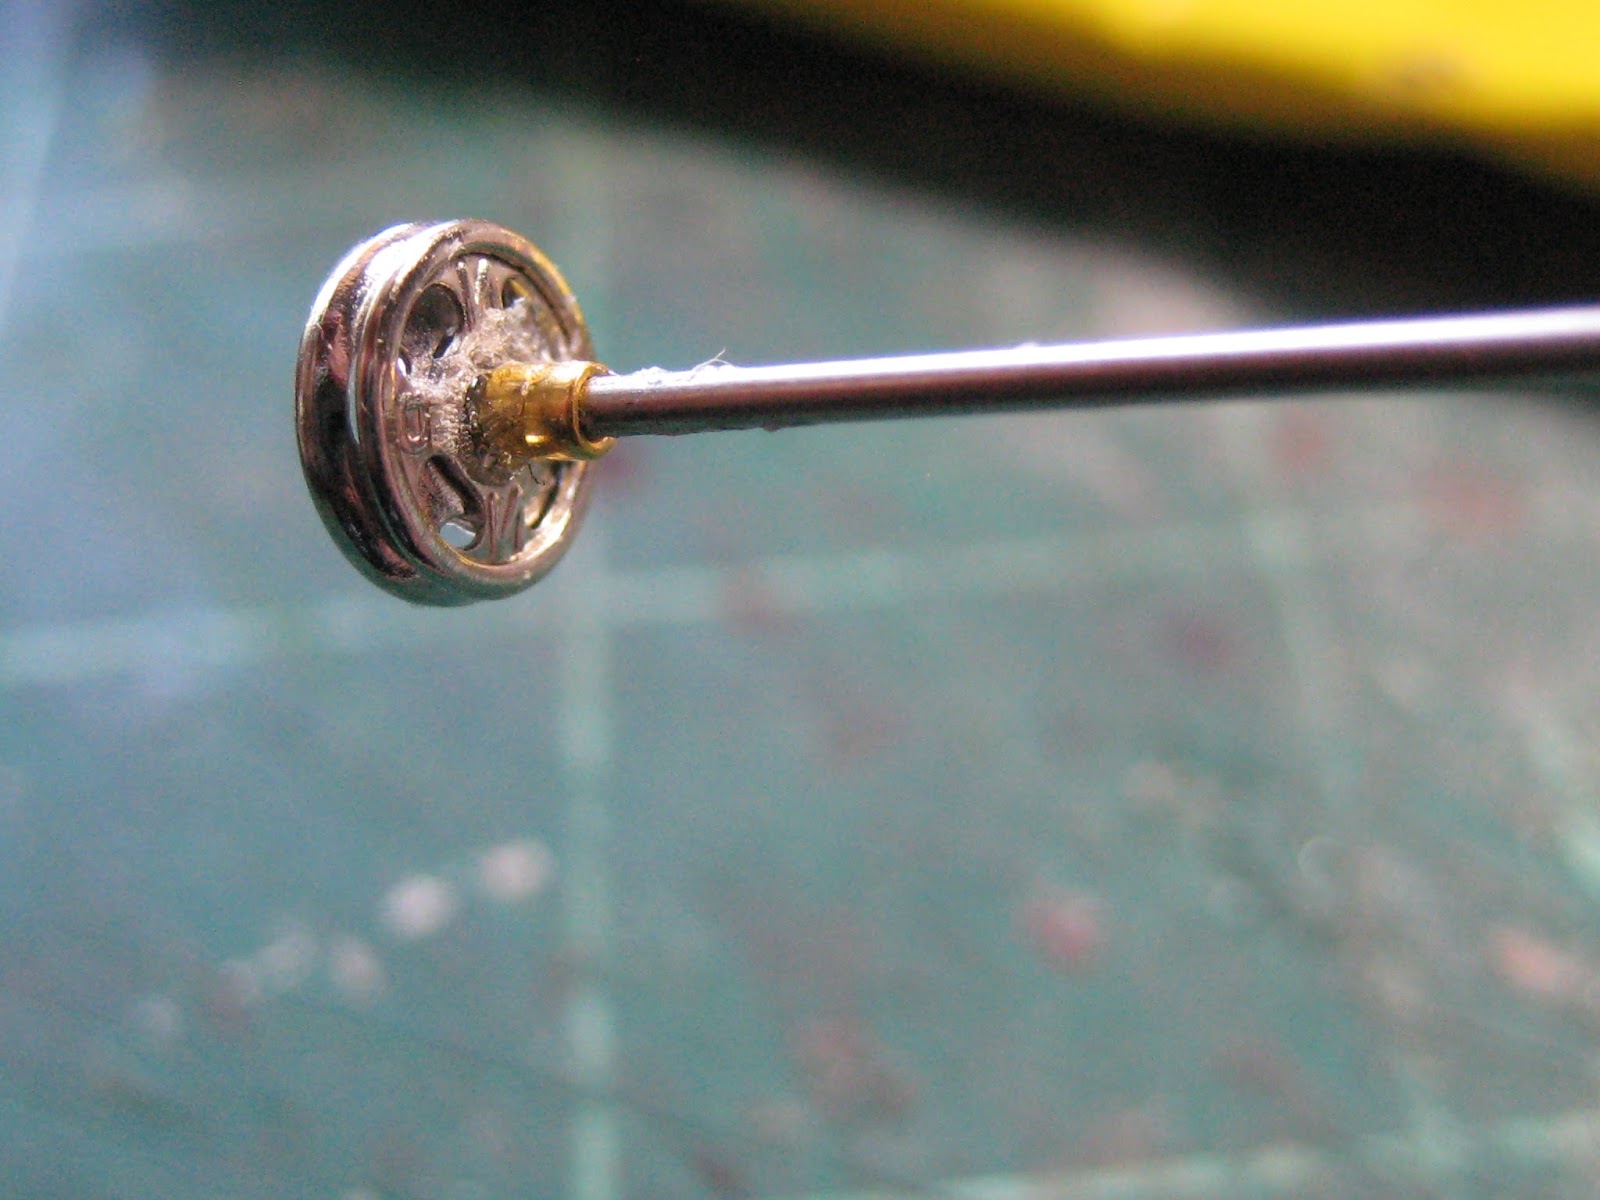
| Once the body of the FRENCH PRESS had been completed, then it is onto the making of the lid and the mechanical plunge filter. For the filter, I used 2 small metal snaps which were able to slide inside the interior of the coffee pot without getting stuck! OH, BY THE WAY I need to mention this too, that when making the plunger for the tapered coffee pot (the one with the tapered end), you will probably have to use a smaller set of snaps otherwise your filter will only go down part of the way before it gets stuck. So adjust the size of your snaps accordingly, so that the filter will slide all the way to the bottom of your container. |
 |
| I used both the top and the bottom of the small snaps as the filter. |

 |
| I clipped off a long length of a large silver paper clip or you could use a (section of florists wire) whatever will allow the wire to fit snug and secure inside the center depression of the press fastener. I glued a small crimp bead to the end of the wire first and then I glued the snap fastener to the end of the wire. When it was dry, I picked off the excess glue which had of course, oozed out. |
 |
| Then I slid the length of the plunge filter into the coffee pot. *** The elements for the lid of the French Press are pictured below. I am showing an uncut Super-sized paper clip only to illustrate the order of the beads as they are strung onto the plunger. IMPORTANT! The lid is assembled and glued together off of the wire, then it is slipped onto the plunger while it is standing upright inside the pot. This way you are able to gage the correct length for the plunger, before you cut off the excess however, Remember to leave enough wire at the top for the bead handle to be glued to. Below is the combination of jewelery findings I used for the CAP. Keep in mind that the photo is not yet showing the plunger snaps on the bottom end. |
 |
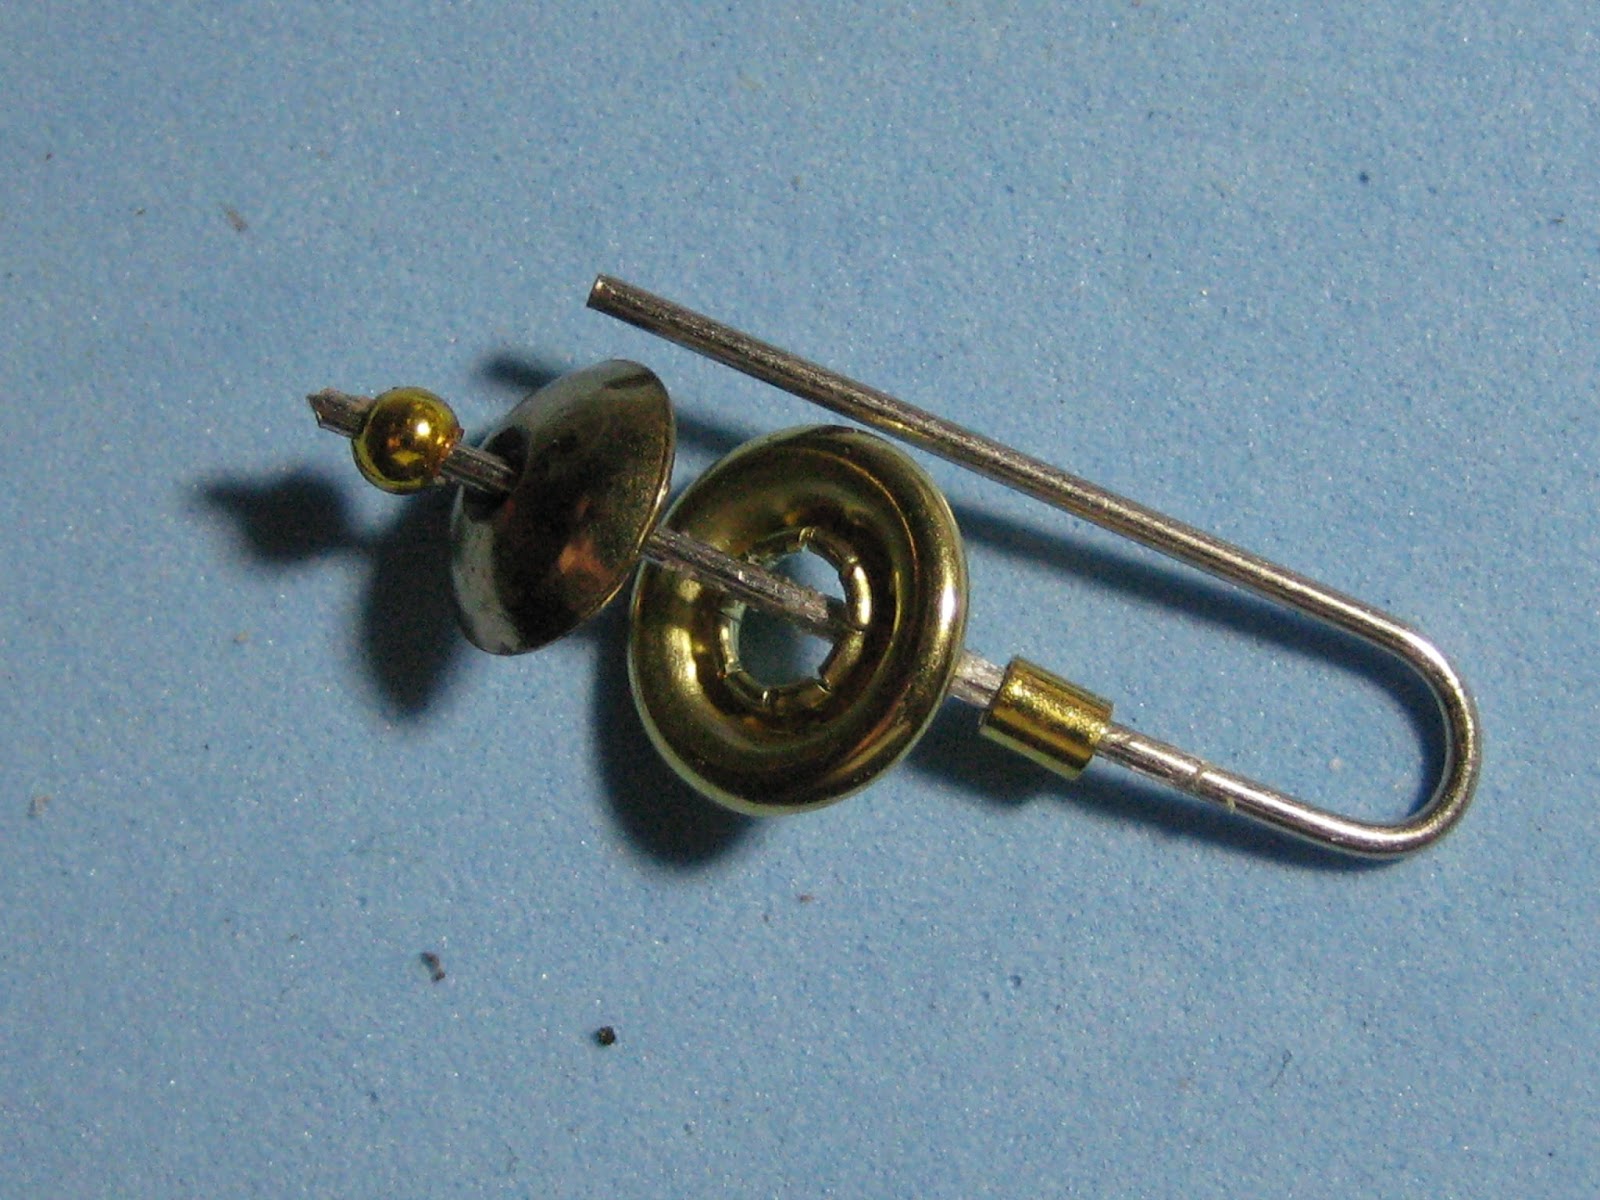 |
| The large crimp bead is glued inside the larger hole of the bottom half of a large gold SNAP. The crimp bead keeps the plunger aligned and will allows the plunger to slide up and down inside the lid. The snap forms the lip of the lid, a bell cap provides the dome. A round bead becomes the knob handle. IMPORTANT! glue the lid components together, but DO NOT glue the Stem Wire directly onto the CRIMP BEAD inside the cap! the plunger stem needs to be able to slide up and down through the crimp bead the only portion that is glued directly onto the wire is the knob handle. |

 |
| I painted the knob with black nail polish and when it was dry, I used a clear MATT sealer coat on it. I clear coated the exterior of the pot with clear nail varnish, which clarifies the plastic so it reads more like "glass". Then when it was completely dry, I used an eye dropper to squirt real coffee into the FRENCH PRESS, and then into a tiny cup! ahhhhhh now THAT'S WHAT I'M TALKIN ABOUT! |
 |
| tastes like coffee but looks like tea? |
 |
| time to eat! |

 |
| a line up of the usual suspects *** My first attempt at a French Press, is on the far right and my last French Press is on the far left. I made 6 pots altogether with a total of 4 survivors. I made plenty of mistakes on each coffee pot however, by the time I got to #4 I was finally satisfied enough to be able to call it quits so I could move on, because I still want to make an ITALIAN MOKA COFFEE POT which I'd mentioned to you earlier. and So it's arrivederci FRENCH PRESS... and it's PINTEREST- HERE I COME! ciao ciao elizabeth |
.jpg)


PHEW! Congratulations on your persistence! It sure paid off. Your coffee pots look wonderful! Your ingenuity never ceases to amaze me. And to think I used to admire MacGyver! Remember that 1980 TV show? He could have gotten to the moon with a can of hair spray and a bobby pin. ;-)
ReplyDeleteThank You Catherine! Of the 4 only ONE coffee pot looks decent up close, however all 4 of them look really good from a great distance! I'll have to plant one far back into the corner of the kitchen when the time comes so that I don't continually get mad at it! hahaha
DeleteAnd YES I do remember MacGyver! In fact I think that "MacGyvering something" is now considered as part of our regular slang vocabulary since that show was on the air.
I also believe that just about every crafting miniaturist has to have a wee bit MacGyver in them to fully appreciate this small world within a world of ours.
We were reducing, reusing and recycling LONG before MacGyver thought about going to the moon with a can of hairspray and a bobby pin! :D
elizabeth
Oh my! You did it again. You never cease to amaze me with what you can do with bits and bobs. But at least I know that I'm not the only one to save those plastic sock things!
ReplyDeleteHi Kat! You know what? I have been saving those sock thingies for AGES! I knew that they would come in handy for something; some year- hahahaha!
DeleteI am glad that you have enjoyed this tutorial. Now that it is behind me I think that I might have actually enjoyed it too! :D
elizabeth
WOW!!! Elizabeth, you are the Champion of "Have plastic/metal/paper/cloth/wire/glue/paint/-will make whatever you can imagine" !!! You never fail to astonish me with your resourcefulness and Fearlessness with materials! and you don't give up until you are satisfied which is the most important part of all!!! I LOVE the "snaps" used for the plunger strainer!!! And the "sock thingies" sure do look good as a mini handle... guess it is time for me to get some new socks! LOL!!! And it is so good of you to make the detailed Tutorials with all the explanations of the methods you tried as well as which one worked best! I know the Glue issue is always a tough one.... which kind of glue for which kind of task... your tips are invaluable!!! And to top it all off... you filled the pot with real coffee and invited us all over! LOL! You are Awesome!!! And I am so glad you are here in blogland sharing your wisdom! :)
ReplyDeleteHi Betsy! Thank You but I don't think of myself as "Fearless" just cheap! Shapes always intrigue me and so when I see interesting shapes in materials I gravitate towards them like a compass needle towards true north. As a result, I am habitually surrounded by lots of stuff!
DeleteIt was when I was trying to organize some of my metal shapes that I kept running into those plastic sock thingies that were there in the mix, and that is how I came to use them for this project. I only had 2 so I might be looking to buy more socks this winter too! ;P
But once I was DONE with this project, I just had to see if the pot could actually hold the coffee. When I sucked up the dregs from my coffee cup I made sure to include the grounds that had settled to the bottom. When I inserted the plunge filter I was actually GIDDY with GLEE! That quickly wore off though when at last I had to syphon the coffee back out and then had to clean the grounds from out the pot with a Q-tip.
real life dirty dishes albeit mini ones.
A woman's work is never done! :/
elizabeth:D
You make me laugh! I'm glad you stuck with it, I am going to use your mistakes to prevent my own, because I have to try this.
ReplyDeleteHi Keli! I could not give up until I felt I had conquered this task!
DeleteThe reward comes not only in working out the bugs along the way but when someone decides to give the tutorial a tryout for themselves!!! So Thank You Very Much for that compliment, and I hope that you find a way to improve and make your FRENCH PRESS- EVEN BETTER!!! :D
elizabeth
Oh Elizabeth, - Simply Brilliant! You always make me smile with your stories. Your French Press looks absolutely fabulous. (The first few attempts are really good too!) Great tutorial, might just have to try this one day.
ReplyDeleteKeep up your awesomeness, it is so fun to read your posts!
Hugs,
Sam
Hi Sam!!! Welcome back to blogland again and Thank You for your comments regarding this tutorial! :))
DeleteIt is always Very Gratifying to have other people enjoy my posts which encourages me and keeps me from becoming too lazy.
And it was rewarding to experiment and get this French Press under my belt, because once I got it in my head to do, there was no real rest until it was finally done!
elizabeth
Isn't inspiration awesome? When you go off to bed and can't wait to wake up and get back at it :) Well it paid off, your coffee pot(s) are wonderful and the process is so interesting, thanks for posting it---
ReplyDeleteHi Linda! I DID feel inspired and once I got the idea to try and make one I just HAD to do it!
DeleteYou must feel that same kinda way when you are involved in making your Incredible Cats, especially when a personality begins to form from under your fingers. I would imagine that the desire to know who that cat will become must feel pretty insistent.
But I'm glad that I got this out of my system, and although I'm still on the prowl for an Italian moka pot, the hunt can be just as exciting as making the thing!
go figure?
elizabeth:D
Good for you for sticking with it! I have a feeling I need to try my hand with this...at some point.
ReplyDeleteAll fun projects are on hold until my book work is done. Deadline is October.. aaaaaccckkkk!
Thanks Susanna! I hope that you WILL INDEED try out this tutorial, and it makes me very happy that you are considering it because I think that PIPI might enjoy a hot cup of coffee to wash down all of those pancakes she so very fond of! :D
DeleteAnd Congratulations on getting your book put together!
I am Very Excited for you, but you must HAPPY DANCING Up and Down the halls about it!
How Wonderful!!!! :D
elizabeth
WOW !
ReplyDeleteLa dernière tentative fut donc la bonne !!!
Quelle patience et surtout qu'elle détermination, ce qui me manque énormément en ce moment, je vais me contenter d'admirer ta création Elizabeth et non de la reproduire ;)
Bonne semaine ! Bises. Joce
Thank You Joce for enjoying this French Press tutorial! :))
DeleteI agree with you that Pot #4 is by far the best of the lot. Nevertheless, I am grateful to have had the opportunity to learn from each of them, because although my first poor pot received the most attention, it was only after I had glued on the lid that I thought about making the plunge filter operational. :O
hey, you live and learn!
elizabeth :D
Es genial,te han quedado absolutamente reales!!!!
ReplyDeleteBesos.
Awww Thank You Very Much Pilar! :D
DeleteI was Very Happy with the way the final French Press turned out and it is Gratifying that you think that it looks Real!- YaHOOOOOO!!!! :D
elizabeth
Hi Elizabeth,
ReplyDeletePicked up your email this morning and was so hoping u had posted. As usual your determination to conquer is fierce! Great job and funny post. I can just hear your voice.
Janine
Thank You Janine!
DeleteI just sent you another email this morning in response to yours.
Now when you say 'FIERCE' are you referencing the spiders???? or is that applicable to this coffee pot too? Either way- I take it as true because I was outside AGAIN this morning attacking them vigorously ( and viscously) with my trusty broom! Then back inside again to fiddle with the coffee pots even though I thought I was already done with them!
Ah me......
elizabeth
I Might just have to come back and have a (mini) coffee with you. Your coffee pots are wonderful and I do love it when you are GIDDy with GLEE!! Thanks for such a detailed tutorial, Ms. Ingenuity!
ReplyDeleteOh, PLEASE DO, come back and have a cup of coffee Linda! :D
DeleteI'll have to find a way to serve the coffee hot, although THAT might prove to be Beyond my crafting capabilities!
so I guess that we'll just have to pretend! ;P
elizabeth
p.s. I LOVED THE PHOTOS of PAPILLON!!! Get Norma to help you get them onto your blog so the rest of the world can get to see them too!
Hi Elizabeth, gosh you are one determined lady - I could feel the frustration and perseverance in your post! And what a lovely result, finally a fantastic pot (or four)! Thanks for all the tips as well, it's really good having someone tackle things and identify the problems first... I shall raid my makeup bag for pencil lids now! And I can't wait to see your moka progress... I've been wanting one for a while, so I'll be aiing with baited breath!
ReplyDelete** waiting
DeleteHi Jonquil!! :D
DeleteI am so glad that you have enjoyed this tutorial and I isn't it nice (not to mention convenient ) to be able to shop at home and through your makeup bag!?
It was thrilling to be able to find a good use for a product that otherwise, I no longer had a good use for.
But the next time that I go to buy makeup, this will be a part of the new criteria;- yes I like the color....
but can I use the packaging too?
elizabeth :D
Hi Elizabeth, it may have taken you 6 attempts with only 4 survivors but boy was it worth it. They look amazing! And even better: your tutorial makes it look like I could actually try it. Thank you for persevering and making all the mistakes so we won't need to :-)
ReplyDeleteHugs,
Veronique
Hi Veronique!
DeleteThank you for your compliment and also for forwarding the link on how to make an Italian Moka pot! That was very considerate and kind of you and I greatly appreciated it! :D
Because I know how frustrating not having all of the needed information can be, I gave as many of the steps as I was able, so that anyone who wanted to try this- Could.
Hopefully, in the doing other shortcuts and/or improvements will be discovered and the results will be even Better!
as per the old saying " 2 heads are better than one! " :D
elizabeth
Wow, Elizabeth, I think that you have so much patience: 6 attempts for getting your French press, coffee maker!! Your perseverance has won and it was worth it, that's for sure :D! I've often said it before: I LOVE your humour in the way of explaining things to us, writing wonderful and clear tutorials and generously sharing them. You've even have thought of us who don't live in the USA and who can't get this sort of materials, thank you so much :D!
ReplyDeleteI hope to see soon a new adventure of your miniature skills on your blog ;)!
Hugs, Ilona
Greetings Ilona! By the time I made the pot for the 6th time it went together a lot faster and a lot cleaner so "Practice makes Perfect" or you could even say that "Experience IS the Best Teacher! " ;P
DeleteAnd regarding my overseas readers, I know that there are many crafting materials that are unavailable to you but I think that substitutes can often prove to be just as good if not better so I hope that "Necessity will still be the mother of Invention" wherever one might happen to live :D
elizabeth
Hello Lady Elizabeth,
ReplyDeleteGenius! Pure GENIUS! The French Press is terrific. I was impressed from the first seeing what you used to create it, but when I saw you use the snap and the items to make the lid, that was awesome! It loos very realistic and is such a great item to have in a miniature house. you never disappoint and you always impress!
Big hug
Giac
Hello Sir Giac! :D
DeleteI am Delighted that you are im-PRESSED by my French Press! hahaha
I was hoping that it would be a Snap! to put together however even though it wasn't, it did get easier by the time I made the last one. Whew!
Thank you for saying that it looks realistic Giac because that is always my end goal- along with trying to remove old glue residue! {:/
Big Hugs Back!
elizabeth :D
Hi Elizabeth, what a brilliant tutorial! I love it. Hugs,
ReplyDeleteThank You Sirkka! I appreciate you saying that and I hope that you will also give it a try one day soon. Although it is fiddly, it is not hard and the personal satisfaction is well worth it! :D
Deleteelizabeth
Amazing and so realistic! You get the gold medal for persistence and ingenuity!
ReplyDeletexo
Claudia
Hi Claudia! Thank you for your compliments! I may have to settle for a gold snap rather than a gold metal! hahahha
DeleteThe best thing about this entire process is that I didn't have to buy any additional materials- everything was already here; it was just a matter of finding it! ;P
elizabeth
Ingenious! Thanks for the tutorial.
ReplyDeleteHi Faby! Thank You Very Much, and you are Most Welcomed for the tutorial, and I hope that you will be able to put it to good use sometime soon! :D
Deleteelizabeth
I loved every second of mentally making that along side you as I read the post - knowing full well I will never do it .... the excuse is I don't have the bits and bobs the truth is I would kill someone before pot one was finished. Such patience and endurance - Bravo - wonderful result to reward you. Full of admiration on all levels. Marilyn
ReplyDeleteYou crack me up Marilyn!!! :D You know that each one of us are specialists in the things that we like to do, but easily slip into becoming the cheering squad for the things that we like to see others do.
DeleteWhen you laid each tiny brick on the facade of Dalton House I was oooing and awwwing and cheering you on but not about to try it myself- I just don't have THAT kind of patience or endurance! So to each their own. And Ditto- I am full of Admiration for You on all levels Too! :D
elizabeth
a spectacular result ! thank you for the explanations
ReplyDeletehave a nice day
Good Morning Claude! I am so glad that you like this tutorial and I Thank You for your lovely compliment! :D
Deleteelizabeth
Un tutorial genial, quedan perfectos. Muchas gracias por compartirlo.
ReplyDeleteYou are Most Welcomed and Thank You Very Much Eloisa! I am Very Happy that you have enjoyed this tutorial! :D
Deleteelizabeth
Im so impressed with your coffee maker... I love my mr coffee maker because I love my coffee quickly, if I dont get it Im a real monster. maybe I should switch to decaf?
ReplyDeleteHugs
Marisa
Delightful to see you on the blogs again Marisa!
DeleteI love my coffee too, but I prefer it percolated- the old fashioned vintage way, however a percolator would be more difficult to construct and attempting to do so would probably bring out "the monster" in me! :(
elizabeth :D
Ingenious work dear Elizabeth !!! Chapeau !!!
ReplyDeleteThank You for your compliment Pipi!
DeleteI Appreciate it Very Much!:D
elizabeth
Very clever and as always persistence really pays off! I kind of like peeling off the little glue globs - in a weird way it is very relaxing! Nice work Elizabeth!
ReplyDeleteHi Jodi! :D
DeleteIt is so funny that you should happen to mention how that peeling off the little glue globs "relaxing"- I am chuckling right now because although I didn't find it relaxing per se, I did in fact find it rather gratifying!
and yes- In a weird way :D
elizabeth
El resultado es estupendo. Has puesto mucha imaginación e ingenio.
ReplyDeleteThank You Isabel for your Lovely Compliment!:D
DeleteIt certainly was a challenge to finally figure out how to make these but the best part is that almost all of the components are readily available and/or they can be easily substituted for parts you may already have on hand.
I hope that one day you will give this a try. :D
elizabeth
Вы победитель!
ReplyDeleteЯ всегда завариваю чашечку кофе, когда читаю ваш пост. Удовольствие плюс удовольствие! Крышка чайника привела меня в восторг! Она работает! Вы так удачно использовали кнопку!!! Мы все делаем первый чайник, потом второй и так далее! Я всегда испытываю такое счастье, когда идея становится реальностью.
Я скажу вам шопотом, что у меня очень много разных трубочек, проволочек, разных запчастей! Я, наверное, сумасшедшая белка! :) :) :)
Хороших выходных, Элизабет!
Татьяна
DeleteHello my dear Tatiana! :D I am Delighted to hear that you pour yourself a cup of coffee prior to reading my posts, however I hope that your coffee pot is BIGGER than the ones that you are now reading about! hahaha :D
As you have just read, there was a lot of doubling back over old ground before I was satisfied with pot # 4 but you are right in that That is usually the way it goes with just about any new project.
But you did not have to tell me that you have Lots of tubes, wires and different parts collected, because I already knew that you and I are like a pair of "Crazy Squirrels" - hoarders of all things cast off but which might prove to be useful one day! ;P
Enjoy your weekend! :D
elizabeth
Thank you for this wonderful tutorial - but even more for not giving up and for drowning in glue... I really admire your perseverance, it made me think of this wonderful quote about courage sometimes not being the load roar but instead the silent voice whispering "tomorrow I'll try again". You really tried and as usual you managed to find just the right pieces in your stash to achieve stunning results. The row of the usual suspects looks so great - the four survivors can be proud of their looks... ;O)
ReplyDeleteHugs
Birgit
Greetings and Thank You for the Quote and for your Very Sweet Compliment Birgit! :D
DeleteSpeaking about not giving up, you've reminded me of Scarlet O'Hara's famous line at the end of Gone With the Wind- "after all, tomorrow IS another day!"
Now That's what I'd call perseverance! :D
elizabeth
I love this!
ReplyDeleteA big mini hugs!❤️
Hi Monica; Thank You!!! :D
DeleteI know how much you enjoy mini baking as well as mini kitchens, so I hope that the next time you need a pot of coffee for one of your mini scenes that you will consider making this French Press for it.
Enjoy your weekend! :D
elizabeth
Es genial! Te ha quedado perfecto! Un beso
ReplyDeleteThank You Maria! :D It makes me Very Happy that you have enjoyed reviewing this tutorial and that you also like the results! :D
Deleteelizabeth
Your patience was rewarded, your French presses are wonderful and just look like the real thing. Congratulations!!!
ReplyDeleteGeneviève
Hello and Thank You Genevieve! :D I was Very Happy that I had my Real Life French Press to scrutinize and compare to when making my mini versions. That helped me out considerably towards constructing the coffee pot to look as close to the real thing as I was able. What I find interesting though, is that the Real Coffee inside it, didn't look like coffee at all!!!
DeleteNow that's Weird- wouldn't you agree? :/
elizabeth :D
Hello Elizabeth! Thank you for this wonderful tutorial.<3
ReplyDeleteYou are Most Welcomed Gulay, and I Thank You also for your Lovely compliment! :D
Deleteelizabeth
Your coffee pots are awesome they look so real. Thank you so much for the wonderful tutorial.
ReplyDeleteHugs Maria
Thank You Very Much Maria! I was trying to make them look as Real as I could, and I am Very Glad that you think that I have. :D
Deleteelizabeth
Great tutorial Elizabeth. I love the way your mind works!! Perhaps a little scary at times but I think that's why I appreciate it so much! LOL The French press looks great and I'll definitely be trying it out. - Marilyn D., Oromocto, NB, Canada
ReplyDeleteThanks Marilyn! It certainly can be scary the way my mind works but I'm getting used to it! ;P
DeleteI am Delighted that you have enjoyed the French Press tutorial and I really hope that you WILL try it out!
That would make my mind feel even Happier! :D
elizabeth
This is amazing Elizabeth! The coffee pot looks like the real thing. :) Thanks for walking us through how you achieved that!
ReplyDeleteThank You Very Much Pei Li! :D
ReplyDeleteOnce I was able to refine the process making the 4th French Press the process went all whole lot faster than the first 3 coffee pots did.
I am very pleased to be able to forward the information so that others will be able to give this a try too! :D
elizabeth
Hello, Elizabeth - I am so late commenting on your wonderful French Press tutorial that you may never see this note. We've been out of town with no internet access. (Oh NO!)
ReplyDeleteBut I wanted to express my deepest admiration for your creativity and your perseverance. You are amazing in just not EVER giving up! That coffee pot looked so hard to make - I know that I would have quit before I'd begun! But how nice that you forged on; you did such a great job with all those bits and pieces. And you did it all FOUR (or SIX) times! All the coffee pots look good - but your last effort was indeed an outstanding success. Congratulations on this major accomplishment!
Marjorie
Hello Marjorie! I would imagine that you were experiencing some Web Withdrawal while you were out of town because the internet can become quite the addiction; I'm speaking from experience! :((
ReplyDeleteEven so, I am so Very Glad that you have taken the time to comment and that you have enjoyed this tutorial, Thank YOU!:D
Although I said that I wasn't going to make any more of them, I actually have and now that I have been able to make them cleaner and faster, they have made me a lot happier than they did at the beginning of this adventure.
I also found that cheap make up pencils from the dollar store are just as good a source for clear caps- just in case you were looking for them. :))
With every new endeavor it is the practice that makes perfect and so my more recent pots have turned out even better than pot #4 in the photo, which just goes to show that you 'CAN teach an old dog, new tricks" ;P
elizabeth
p.s. I ALWAYS read and respond to comments. If someone takes the time to leave one, then I feel that it is courteous to respond, AND ALSO I enjoy doing it! :D
Applause! This is probably one of the best mini makes I have seen. I do so admire your ability to see the "mini" in such little everyday objects and to recreate them into wonderful mini makes. I just love this!
ReplyDeleteThank You for your comment and for your compliment Irene, I appreciate it Very Much!!! :D
ReplyDeleteAlthough this tutorial proved to be a challenge primarily because of the way the glue stuck (or would not stick) when applied, I didn't really enjoy doing it. It was not until later when I had found a more efficient way to modify the entire procedure and struggle less with the glue that I actually began to like it.
So only NOW am I able to Truthfully say that it WAS FUN and since publishing this How To, I have gone on to make several more of them, faster, cleaner and Better! HIP HIP HOORAY!!! :D
elizabeth
Elisabeth, I bow... you are the Queen of imagination, playing around end ending up the most gorgeous way, I have ever seen.
ReplyDeleteI will be your follower - a very thankful one, because you share your skills with other people.
Hugs from Méa :)
Hello Mea and Welcome to my blog!:D I am Delighted that you have enjoyed this tutorial and it Pleases me immensely when they are received with enthusiasm! :)
DeleteI am always happy to share my "experiments" with everyone and so I say in response " Thank You! " for both your comment and for your compliments!
elizabeth :D
I keep coming back to this post and reading... I swear I am going to try to make one of these for my house. French Press for a New Orleans house...seems appropriate.
ReplyDeleteHi Sheila! To me a French Press and New Orleans are as inseparable as Beignet's and Powdered Sugar!
DeleteHave Fun with this! :D
elizabeth
They're really fantastic Elizabeth!I've a lot of thingamabob thingys too, but all mine are different from your ones :D I've missed quite a few of your posts, and everyone elses too. Also have been meaning to thank you for a lovely comment you left on my blog a good few many months ago, I was very touched by it.
ReplyDeleteSarah x
Hi Sarah! I was just visiting your blog!!! :D
ReplyDeleteI am VERY happy that you have enjoyed this post Sarah, and I think that although "thingamabob thingys" may vary from place to place, substitutes are always Welcomed! :D
and although I am not sure which past comment of mine you're referencing, I am very happy that you found it personally meaningful, and I Thank You for letting me know! :))
elizabeth