The scene is set with a party of three gritty scavengers, one man (the undertaker), and two grubby women; one's an old laundress and the other the bold, brassy former housekeeper of the Late Mr. Ebenezer Scrooge. They are pawning the items they stole upon his recent death. The undertaker and the laundress, have already been speedily short-changed by Joe, the crafty and knowing pawn broker and it only awaits the house keeper's turn to show him what she has been excitedly saving in her stash ....
"Now open MY bundle, Joe!"
"Come on, what is it?"
"BED CURTAINS!"
"bed curtains??"
"Ah hah, BED CURTAINS!"
"But you.... you mean to say, that you took these down, rings and all, and with him, ... lyin there?!!! "
"Yes I do! Why Not!!?
"You were born to make a fortune ma'm, and you Certainly Will.....! ...
*****
Now you may just be wondering why I opened with that bit of dialogue from the movie, " Scrooge"( A Christmas Carol) written by Charles Dickens in 1843 and staring Alastair Sim in 1951,
( whom I consider to be the Very Best Mr. Scrooge- EVER!) Well, when I was thinking of a title for this post, I was going to just call it "How I made the curtains"....Then, one thing led to another and it was all finally condensed down to just 'Bed Curtains', and then
( don'tcha know) the movie sorta popped into my head ( because that is how my mind works). Now I shall show you how I got busy and got to work making them.
So without further ado, I present to you....

"BED CURTAINS"
 |
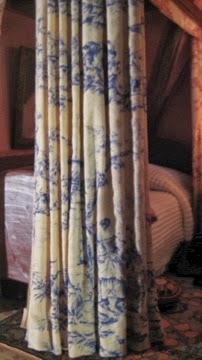
| This is the fabric I made the bed curtains from It is a 100% cotton quilting fabric that has a toile print. |
 |
| For these curtains I wanted to lightly stain the fabric so I wet it down with water |
 |
| I squeezed out the excess |
 |
| I put in a microwaveable dish with some old coffee |
 |
| I made sure that it was all coffeed up and cooked it for about a minute in the microwave |
 |
 |
| I rinsed it with clear water and squeezed it out again really well If it is not dark enough then you can repeat the process as many times as necessary until the desired amount of stain is achieved but make sure you have enough coffee in the dish to cover the wet fabric. |
 |
| I opened the fabric out and added gel glue! |

 |
| I have used this glue on other similar fabric projects and I love it because it is so easy to distribute throughout the wet fabric. I have not tried this with any other glue so I couldn't say how they would work, but this stuff is available almost everywhere and it is cheap and easy! |
 |
| I made another panel for this tutorial, so that I would have enough photos ( a la' Susan) so that is why this fabric is a different color. I used about a teaspoon of the gel glue but it would depend on the amount fabric that you were using. I mushed the glue all through the damp fabric so that it was evenly distributed. It is sticky but not gummy! If you think that you have too much then rinse it out and try again. |
 |
| Mix and mush and mix and mush... etc. ect. ect. |
 |
| Now smooth the fabric out face down and cut off the loose threads |
 |
| Fold up a hem. The fabric should fold and stick to itself easily but if it doesn't want to stay, then lightly apply a tiny bit of gel glue to the hem and smooth it out with your finger! and then finger press the hem to get a sharp crease. ( Good to have some wet wipes handy ) |
 |
| This is the damp, gluey cloth with the hem turned up, {note to self: } There is more water than glue in this fabric. What you see above is a damp wet cloth lightly saturated with glue. |

|
| Turn you fabric over to face up |
 |
| TOOLS OF THE TRADE *** This is a PRETTY PLEATER that I have had for nearly 20 years! Pleaters are made of a dense rubber and they make Very Rigid and UNnatural Pleats IF you use it the way that most people do. The package orginally came with a tiny plastic credit card-sized 'doom-a-hicky' but it is a waste of time to use as it is way too small for the length of most drapes. That is why you see the long plastic ruler but Anything Non Stick that you can hold and lift, and that is narrow enough to insert between the grooves, will do! It has to be long enough to hold down the entire length of the fabric that you will be pleating |
 |
| Make sure that your fabric is facing upward and lay evenly over the surface of the pleater. Now some of you may be use to pinning your pleats and I suppose that this wet cotton and glue solution could work for that too, but I am showing what I did to get the results that I photographed for my curtained bed, SO, do with this tutorial, what you will. :) *** Anyhoo, to continue.... I used the long plastic ruler to inset the first fold into the grooves of the pleater and I held it there and used the shorter metal ruler to push the second pleat in, by sliding the ruler down the length of the fabric till I got to the end. |
 |
| Close ups |
 |

 |
| Every time I moved the longer ruler over it is to hold the fabric in the grove while the smaller ruler slides into the groove beside it. Because the fabric is lightly saturated with the water and the gel glue, it cooperates and stays put. DO NOT USE EVERY SINGLE GROOVE FOR THE PLEATS! if you want them to look natural, then vary the spacings ie. a few narrow ones, wide then narrow, then go over for 2 etc. and mix it up! as you can see from the photo above. |

 |
| This is the curtain panel all done. You can see how the pleats are both wide and narrow in both the top photo and the one below. If the hem is crooked then STRAIGHTEN IT UP I used the small ruler to push the hem up on the fabric pictured below that is why it is wrinkled at the hem, make adjustments by manipulating until it looks the way that you want it to look when dry. What you see becomes what you will get. |

 |
| Next is the blow dryer's turn! I set it for 'HIGH' and hold the fabric down with the ruler |

 |
| BEFORE they are totally set and whilst still a bit damp, you will need to begin to manipulate the hem. To make them look like they are falling naturally, gently lift the bottom hem of the drape up and away from the rubber mat. It will give the hem a more natural look as it dries! |
 |
| I make slight adjustments as I apply the heat. Make sure that you have anchored the top of the curtain as you dry it or it could become a FLYING CARPET! Soften the folds from the bottom hem as they are setting up. The gel glue makes this easy and fun to do! |
 |
| These look pretty wrinkled but they are actually look perfectly fine once they are hung. Trust me on this. This fabric relaxed at bit once it was lifted off of the rubber pleater. |
 |
| To make the Bed Curtains Heavier, I just folded the ends in towards the middle and saw how much needed to be shaved off the ends to clean them up, removed any loose threads, to get the width that I required. |
 |
| Then I trimmed the pleats off to where I needed. If I wanted to make TWO PANELS, then I would trim the edge of the fabric as straight as I could with a fold turning inward. THEN I WOULD CUT THE FABIC PANEL INTO TWO EQUAL PARTS LEAVING ENOUGH WIDTH IN WHICH TO MAKE A long HEM for BOTH SIDES OF EACH LENGTH which you would secure with a tacky or fabric glue. (that was how I made the window curtains for the bedroom ) Trims could also be added to the inside edge but I wanted these plain so I didn't do that, instead I doubled the fabric over towards the centre and secured with a tacky glue to keep the folds in place. Tacky glue should be used sparingly The fabric is stiff but still pliable and soft in both appearance and to the touch. Very easy to work with! Below you can see an example of a narrow edge hem along the length of the drape or you can make a heavier drape by doubling the curtain up YOUR CHOICE |

 |
| The finished panel |
 |
| You see they do not look stiff or wrinkly at all! The drop of the drape looks very soft and real |
 |
| HOLD ON.. ..."Now open my bundle, Joe!' "Come on ,what's in it? "A SHOWER CURTAIN!" |
 |
| "A shower curtain???" Swweeeet! (to be continued) ***** |
elizabeth


.jpg)

