What a difference LIGHTS can make!
Yesterday, to avoid having to work on the stairs, I thought I would tackle the lighting.
I have had the wires installed for some time, I just hadn't hooked them up yet.
As with EVERYTHING with this doll's house, it proved to be a frustrating and challenging endeavor.
Here is what happened....
 |
It all began with wanting to get this little table lamp hooked up.
As with everything in a doll's house, in order to get one thing done, other things have to be accomplished first.
To get the lights going in the parlor, I had to have a power source and since I was going to hook it up for one light I may as well get it done for all! As usual Murphy's Law was in full force and everything that could go wrong,
DID |
 |
I used the tape wire system and then to reenforce it I used the
TEENY TINY BRASS BRADS THAT WERE THE BANE OF MY EXISTENCE!
If any of you have ever tried to use these miniscule nails and had them spring free from the needle nosed pliers just as you are about to pin them, then you know how difficult it is to remain cool, calm and collected, as you are trying to get what SHOULD BE a simple job, done.
I lost about HALF of those tiny brads to my camouflaging carpet.
When they went AIRBORNE, I didn't even bother turning my head to watch them fly. I knew I would never find them again. I just picked up another and tried again.
Everywhere you see a piece of blue tape is where I had to install TWO tiny pins. I then used solder on the joins to MAKE SURE that those pins don't wiggle their way out and cause the power to cut out.
(I had that happen many years ago and trying to fix it was NOT FUN!)
I have a number of pretty fixtures that I would like to install but
I know that I will probably NOT use most of the available power but I wanted to err on the side of caution. I am not entirely sure about the room arrangements for the bed and bath yet so I wanted power available for whatever room configuration I decide on later.
I plan on making a template and installing a floor on top of the existing floor.
Giac, just redid his 2 floors in his
LATE VICTORIAN ENGISH MANOR DOLLHOUSE
check out his post
"A Tale of Two Libraries"
You will see how He did his floor with a template and then the most Marvelous wood parquet that you ever saw!
Mine won't be Marvelous, it will be old and worn out looking
"Cause that's the way, unhuh unhuh, I like it "
(a 70's "K.C and the Sunshine Band" disco song)
I digress....
Okay, I got the tape installed and checked it all along the way and then as expected, NOTHING!!!
It took me all of Last Night to get it power up and running.
In the process, I blew a transformer because I hooked up a nine volt instead of a 12 volt and so
"pop"
no power.
I then spent another 30 minutes undoing everything I had done only to find that I was testing a power line that was not even connected. No wonder there wasn't any juice. Tearing my hair out all for nothing! After reconnecting everything again, I found that I didn't give myself enough Lead Wire to allow the lamps to sit properly on the furniture.
(Undo, everything all over again)
I was at this until 3 a.m. this morning!
Well, now it is done and the power works so I am going to give you the tour of the Parlor all over again. I am sure that you all have this room Memorized by now. I just keep showing it over and over.... ! Trust me it looks different now with the lights on!
So here it is (once again), for your viewing pleasure |


The, ' Now Working' desk lamp on the writing table.
I have added a chair by William Clinger that I have had for a long long time. It looks right at home pushed up to the desk and fits well under the table top. I think it has a nautical feel to it as well.
 |
The fireplace wall sconces are hooked up to a separate 6 volt transformer. The lights are dimmer and softer and don't compete with the table lamps which are a lot brighter. I like the variations in the
quality of lights. The fireplace lights are operating on 3 AA batteries and I am going to experiment and see if I can hook them up to a 3 or 6 volt transformer. I have an extra set of this string of LED'S
so I will try them out before I try the ones in the fireplace.
I have replaced the batteries probably four times already and I am tired of getting new ones. But it just looks so cosy with the fire roaring in the fireplace. I tend to have them on a Lot. Wasted energy, equals more money, and batteries are not cheap and cheap batteries don't last. |
 |
| I love this photo! |
 |
| I took this shot by holding the camera in the kitchen and pointing it towards the fireplace and hoping for the best! I couldn't really see what the picture was until I reviewed it. I like it because it looks like someone is actually standing in the house. |
 |
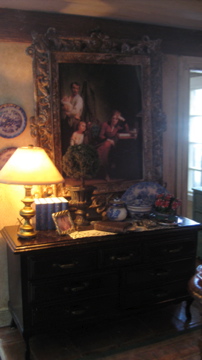
THE TABLE LAMP THAT WOULDN'T SIT ON THE TABLE
Over the years, and due to my abusive and careless way of handling fragile objects, I had managed to waste at least an inch of one of the lead wire for this lamp. This meant that after it was hooked up one side of the lamp was being pulled down and wouldn't sit flat on the dresser. I had to undo the very careful connection and let out more length to accommodate. Then do it all back up again, only to find that I still did not have enough wire AND the hole in the floor was visible! I was grinding my teeth. I had to Undo it All Again and plug the existing hole and drill another one more discreetly hidden and re-feed the wire through the hole reconnect and reseal and then .....
Ahhhhhhhhhhh, ... power at last!
***
You know the lesson to be learned here (which I NEVER seem to learn), is to check it first. I cause myself more grief just because I am so impatient to get it DONE and then look how many times I DO end up DOING it!? |
 |
It works!
Quick!, take the picture! take the picture! |
 |
| Here is an overview of the Parlor with all the lights on |
 |
| A shot from the window outside |
 |
| Here the sun is streaming through the kitchen window! Love this! |
 |
| I found this fixture when I was looking for something else. I don't know how long I have had it , but I must have tried to use it before because there was only about 1 and 1/2 inches of wire left on it! I had to carefully thread it through the kitchen ceiling and keep my fingers crossed, that I didn't break off any more. The wires were very fragile. This is on a 6 volt transformer, the same as the fireplace lights but I am going to have to transfer it to a 12 volt before I finish all the lighting. It will make the kitchen a little brighter and that will be important later on when the other fixtures and fittings are installed. |
 |
| Now you can see everything that is up and running |
 |
| And let's not forget the exterior. I love these two coach lamps! |
 |
| Now that the lighting is told I shall show you some of the details that have taken place since your last visit. I am pretty sure that I saw the iron key in a door lock initially in a cottage done by Caroline from "Cinderella Moments". I also opted to add some iron keys in the door lock. They were from a pair of earrings at Claire's that sell a lot of 'tweeny- age' accessories to young girls. These were bright shiny metallic colors and now they are just plain black. I am sure that the fashion savvy 12 year olds would be heart-broken if they knew! |
 |
| Fatima's wonderful knitting bag that I bought from her at the club show this past June. I just love what she has done and this bag is made to stand upright due to the weights that she has placed inside. I have this sitting next to the arm chair. Fats has included some knitting in progress and some glasses and scissors etc. She had a few different styles to chose from but this one seemed the best fit with the style of the Parlor. |

 |
I decided to use my favorite tea cup and saucer by Teresa Welch of "The China Closet" shown here with the Ken Chellis silver service
This china when I purchased it was pricey 14 years ago. I recently saw the duplicate 3 piece set that I would have LOVED to have had. It was featured through "SWAN HOUSE MINIATURES" on-line store and my eyes bugged out at what it SOLD for. All of Teresa Welch's china is eggshell thin and very delicate and hand-painted which is why it is so treasured and her tea pots are soooo very pretty. I understand that she had retired from the business and that made me want to jump on her china even more, But I couldn't talk myself into being that frivolous and besides it was already sold. Everything of hers was sold! So I am very pleased to have This at least, and grateful that I haven't lost it or broken it in all the years that I have had it stored away. |
 |
| This is the matching plate |
 |
The tea table with the silver and the tea goodies, some that I have made and the Battenburg cakes and strawberries that were a gift from Fats are in the silver serving basket that was another purchase from the West Coast Miniature Show.
( I am discovering that I really like silver; UhOh....! ?) |
 |
| Here is yet another Bill Clinger writing chair. The arm rest that has the table top has a small drawer underneath it for storage and so does the seat. I made a loose needlepoint seat cushion for the chair from an old change purse that was hanging around and then placed Pam Grant's petit point cushion on it. |
 |
| The other Bill Clinger chair that is now in the Parlor |
 |
| Nate the Great, is still sitting by the fire with a paw on the slipper. |
 |
| I was so excited when I found the little glass seagull at the thrift store not long ago. There were two sitting on a large piece of driftwood and a sea shell. They both came off so easily. I put one here in the parlor as an ornament. He just fits! |
 |
I think that this is a good picture. The warm glow from the lamp makes the contents atop the desk really shine and the effect is very welcoming. Through the window you will see a house. I changed the backdrop thanks to Marisa of Stienworks. She had pointed out a Miss Marpole Mystery from a BBC production that had a stone cottage with a low stone wall, that was shown in part of the intro. Marisa told me that she associated the music from the Miss Marple mystery, with this Parlor. I liked the village street scene that was filmed and so I found a couple of pictures of village stone houses that I switch up to show that this cottage is in town. When the owner wants to go on holidays, I shall simply change the backdrop and "Presto", they will be there! How's that for cheap travel?
( Even Better than having a pair of Ruby Slippers! ) |
 |
| Another tiny framed photo on the wall behind the potted Marguerites. |
 |
So that is it! I have gotten you up to speed and there is nothing now that you haven't seen . Susan, my dear, I hope that you are satisfied with the QUANTITY of pictures this time around? I tried to give you more.
Wait!,
looks like someone is coming in,
the LIGHTS ARE ON.....
Yes!
I'M HOME |
elizabeth


.jpg)

