 |
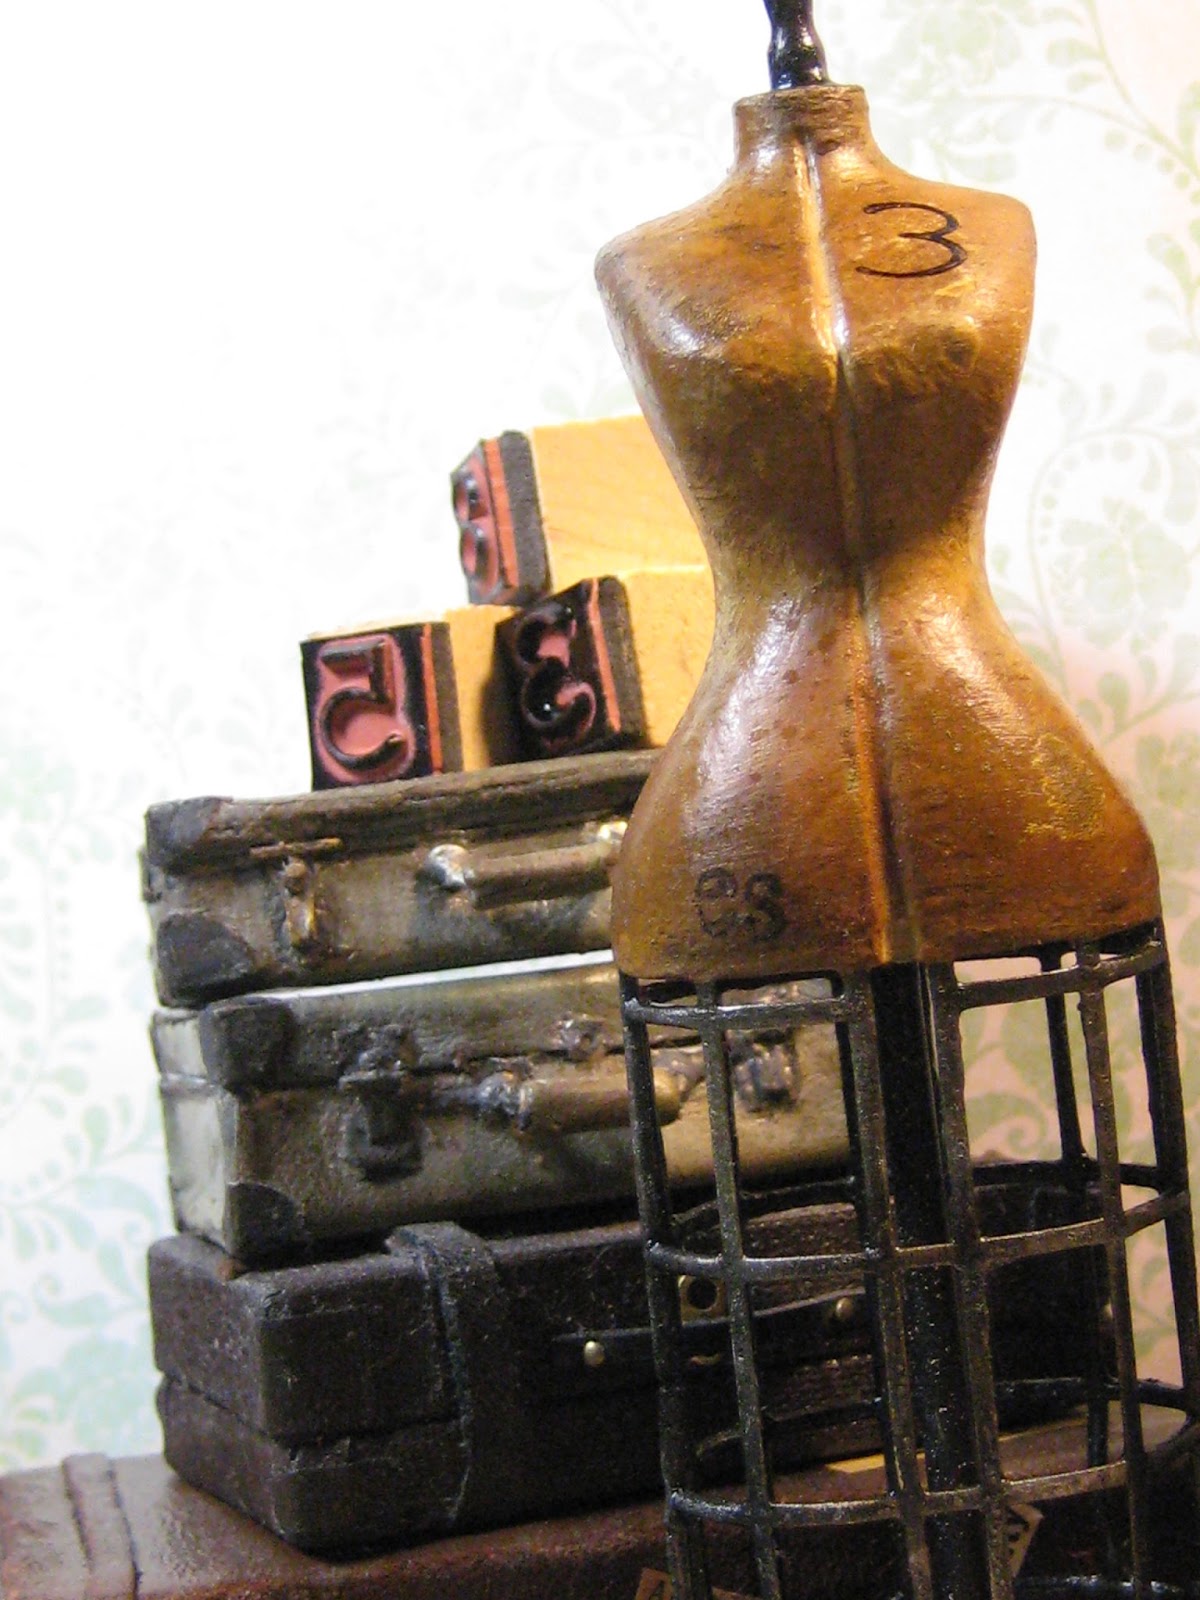
I'd been working steadily on Villa Leone for nearly 3 weeks straight before I grew weary, and ran out of gas. I needed to do something different before I jumped into the next phase of that build; which brings me to the beginning of this story:✈ My friend Bettie is downsizing her miniature collection and has given me some of her miniatures to play with. Among the items she has placed at my disposal, were a number of Chrysnbon dressmaker forms which had seen better days. They had already been spray painted with a white enamel paint which had reacted badly with the plastic forms and had bubbled and melted them certain places. Some of the plastic cages on the lower halves were broken in places as well. In short- they were all in pretty rough shape. I was looking at them not knowing exactly what to do with them, when I decided that it might be fun to mess around a with them, and see if I could perhaps give them A NEW LEASE ON LIFE. "Nothing ventured Nothing Gained" I'd think of the time, as a bit of a vacation break from work on the villa ✈ ☀ The photo below is to show you what the dress forms actually look like in the raw although the metal cage on this one, is also somewhat mangled. The 5 which I used had bubbled where the plastic had melted, both in the front at the bust, and on the back and on the bum. Unfortunately I didn't bother taking the before photo of the them although I should have, but I'm sure that you get the idea. ☹ |
 |
| The dress form still on the sprue, comes with a stand The first thing I did was to try and smooth the most damaged and lumpy places by paring them down with a craft knife, then I sanded any remaining sharp edges. Following that, I painted both sides of the metal cage along with the carved 'wood' top, with black acrylic metal paint. |
 |
| When it had dried I glued the two halves of the dress forms together and secured them with large spring loaded clamps until the glue had completely set. I had to use the clamps because there was so much paint along the edges of the form that I wouldn't get a tight fit otherwise.
The bodies of the dress forms were then painted using a brush with my LIQUID STONE mix.
( gesso, water based acrylic sealer, drywall patch, water) I used this mix primarily to fill in and to try and correct some of the most corroded areas on the dress forms. The mix was painted onto the forms in an even coat. |
 |
| My Liquid Stone Mix the wet stuff is on the bottom of the container |
 |
| After that had cured, I painted the torsos with Natural Tan acrylic paint. When it was dry, I sanded the forms again using a fine grit sanding sponge which really ground the tan paint into the underlying plaster. Some spots were sanded through and exposed the black plastic underneath |
 |
| The torso was then stained with some browns & a black ink using a make up sponge. The silver ink was applied sparingly to the black metal cage. When the inks had dried then I sprayed them lightly with "STIFFEN STUFF" {sidebar} I bought this spray with the idea of using it for fabrics but it didn't work for me, so I have been using it for setting the color on paper, and to set chalks as well as ink and it is Wonderful! It's a lot cheaper to purchase than the SceneARama scenic spray glue which I was buying before. |
 |
| Anyway, when the Stiffen Stuff was sprayed onto the inks, it did just as I'd expected- the wet colors ran. I used a makeup sponge to lightly DAB at the wettest puddles as they quickly dried down, trying not to disturb certain areas which I wanted to remain as is. The blend of colors gave a real leathery look to the painted surface. I repeated this process onto the metal cages, then sprayed and lightly stippled them with a brown Iron Oxide acrylic paint, to add a little rust. To tone down some of the shine, I went over the body rather randomly with Revlon Clear Matt Nail Varnish. |


 |
 |
Lookin' Good Ladies! |
 |
| hey! I think I'm done |
NOPE- NOT YET!
 |
| After re-examining an inspiration photo of some VINTAGE FRENCH MANNEQUINS, I decided to add one LAST detail and make the metal attachments at the shoulders. I chose some suitable press studs from my stash and flattened them a bit with a pair of pliers; stuck them onto some masking tape and painted them with the black acrylic metal paint. |
 |
| When they were dry I glued them onto the dress forms using Jeweler's glue. |

 |
| I touched up any missing paint and sealed them with CLEAR MATT NAIL VARNISH okay NOW THEY ARE DONE! ✄ |


 |
| EVERYONE WAVE GOOD-BYE ! and it's back to the Villa I go ✈ elizabeth |
.jpg)


Not going to believe it ...but I just stopped in to see what you did for the gas meter...and I got the post notice....HOOORAY, hooray I say!...I love it! They are so good. I feel an attic, dress shop, antigue shop...oh yes! Lots of possibilities here. I normally do not like these little forms but you have given them substance and they look Spectacular! Yes yes!
ReplyDeleteHey Fats! I am GLAD that you came a-calling for one post, but found another :D
DeleteI am Very Happy with these dress forms too, and so THANKS for saying that they now look to have "Substance" because that is Exactly what I I had been shooting for! :D ♡
See you SOON
elizabeth
These turned out wonderfully vintage! Love the addition of the shoulder attachments! A great detail. :)
ReplyDeleteI am Glad that you see and agree with the 'Vintage" look Sam ♡
DeleteThis was the first time I had tried altering this particular kit and with the damage already done to the forms, going with Vintage would turn the underlying damage into a plus +
And adding the shoulder attachments at the end, made such a great difference that it even surprised me, so Thank You for enjoying that detail too! :D
elizabeth
Can I get you to do mine too?? they look fantastic. See you next Wednesday!!
ReplyDeletecheers, Linda
Thank You Very Much LInda and the answer to your question is-
DeleteYou Betcha ;D
See you SOON too! ♡
elizabeth
Love the patina on the dress forms! The snaps are brilliant!
ReplyDeleteThank You Nancy! I had such fun coloring these mannequins and by using the inks, the layers of color stayed transparent and gave them the depth they needed to look more interesting.
DeleteI know that YOU know all about this from working with your flower kits, but this is all fairly new to me.
as to the idea for the snaps (albeit an after-thought), it showed up right on time. ;D
elizabeth
They are looking very nice now.
ReplyDeleteThank You Very Much Merja! :)) I was really wanting the dress forms to look different than what they look like straight out the box. I am Happy that you like the way they look now too :D
Deleteelizabeth
Me encanta el tono antiguo que tienen ahora y la adición de los automáticos queda genial,buen trabajo!!!
ReplyDeleteBesos.
Thank You for enjoying the "Old Tones" of these dress forms Pilar! :)) This was an interesting and rewarding project for me to do, since I LOVE making things look Old and Antique and giving them a History :D
ReplyDeleteelizabeth
Hi Elizabeth, I'm home and my internet is up and running ... hurrah! Now I can enjoy your post. Love the numbers and your signature on the forms that add such history to the texture.
ReplyDeleteTalk soon.
Janine
✈ WELCOME HOME Janine!!! You've been greatly missed! :D
DeleteThanks for mentioning the numbers and my initials on the mannequins. I think that they add a sense of history too.
The nice thing about including them was that if it messed up on the stamp, then I could easily erase the numerals, and repeat them until I got it right. Now that they are permanently sealed, they don't budge.
This was an interesting mental break away from the villa and It makes me Very Happy that you like the results! ♡
Looking forward to our time of catching up next week-
See You then! :D
elizabeth
A perfect makeover! Thank you Elizabeth for your secrets of manufacture which always incite to tests!
ReplyDeleteThank You Very Much Claude! ♡
DeleteI wasn't sure how this makeover was going to turn out, although I did intend that these ladies would look better than what they had looked like before, and
"All's well that end's well!" ;D
elizabeth
Hello Elizabeth,
ReplyDeleteWow! what a transformation. When I saw the first picture I thought it was leather or some kind of treated fabric. You did a fantastic job on these. they look simply amazing and realistic and the addition of the arm joints really is a most amazing touch. Well done my unbelievably talented friend.
Big hug
Giac
Hello Sir Giac! :D
DeleteThank You Very Much for your Kind and Generous words!
In searching through images of Vintage Dress Forms, they seem to run the gamut of cloth, wood,metal, paper etc. and there was a couple of photos in which the torsos appeared to be 'leathery"; very mottled and discolored.
I used that image for my inspiration.
A subsequent visit to double check the Images against what I had done, showed me a form with metal arm joints and this is what gave my dummies-
their final "closure" ;D
Big Hug Back! ♡
elizabeth
Wow, what a transformation!
ReplyDeleteI'm Very Glad you like them Keli! :D
DeleteI wasn't certain about what they would come to look like once they were all finished, but I am Really Pleased with their final transformations too! :))
elizabeth
Ok, I need one of these. :D hahaha As a miniaturist and a seamstress, these speak to me. Well done!
ReplyDeleteThank You for your Lovely Compliment Brae! :D
DeleteI am not a seamstress AT ALL but I have no end of admiration for those who can skillfully wield a needle, either by hand and/or machine since I can do neither.
So (sew) it makes me Very Happy that my lineup of little ladies "have spoken" to you
as a Real Seamstress. ♡
elizabeth
That's amazing. I would never guess from looking at them that they started out as plastic.
ReplyDeleteWhat a Great Compliment Sheila, Thank You! :D
DeleteThe idea was to take them from looking like what they Were, and morphing them to look like what they actually Were Not, so it is good to hear, that you consider my experiments successful :D
elizabeth
¡Fantásticos! gracias por el proceso de elaboración.Feliz fin de semana:-)
ReplyDeleteI'm Very Glad that you have enjoyed the explanation of The Process Rosa- Maria! :D
ReplyDeleteFor me, it was a Fun and Enjoyable way to spend a few days away from work on the villa, and I wish you a Great Weekend too! :D
elizabeth
Gorgeoussssssss !!!
ReplyDeleteHugs
Pipi
Thank You Very Much Pipi ♡
ReplyDeleteIt was a Fun and a Refreshing project to be able to complete :D
elizabeth
I've just stolen your idea with the press stubs. It is such a wonderful addition ! Hope you don't mind dear Elizabeth ♡
DeleteMini hugs from Pipi
I am Very Happy that you've liked the idea enough to adopt it for yourself, Pipi
DeleteSo Enjoy :D
These mannequins are singing with joy! You have not only saved them from the rubbish bin, you have turned them into every miniaturists dream and now we all want them! Your ability to know just what the doctor ordered to make them sensational is truly a rare talent! On top of that, you imagine and achieve a whole level beyond by adding the simplest but most impactful details! The look and texture of the bodice? make me think of something rare and special. You added the perfect amount of metallic paint to the cages. The arm attachers are nothing less than brilliant. The numbers lend authenticity. And your initials make them truly priceless. Another job hit out of the park, Elizabeth! You should get distracted more often! :O)
ReplyDeleteAwww Shucks Jodi.... you do say the Nicest things !♡
DeleteI am Glad to say that this little 'distraction' proved to be a very enjoyable one for me, and even with all of the steps involved, it still went rather quickly.
Re:the texture on the bodice- it varies slightly on each of them yet they all look cohesive which really makes me Happy. :)
And as to adding my initials and the numbers to the pieces (since I don't as a rule), that was a little touch of Vanity which I just couldn't resist! ;D
elizabeth
Han quedado genial, me encanta el resultado !!!!!
ReplyDeleteThank You Very Much for your Sweet Compliment Eloisa and it is Very Gratifying to me to know that you really like the final results of these Vintage dress forms. :D
Deleteelizabeth
Oh well done! They are just wonderful now. I love the addition of that metal bit so arms can be added. you have the best imagination!
ReplyDeleteThank You Very Much Catherine! :D
DeleteIt was a personal challenge for me to see if I could do something different, which I hadn't tried before.
And although this kit has been around for quite a long time, I don't recall assembling the Chrysnbon dress form kit prior these.
Which means that now I can cross this off of my mini Bucket List! ;D
elizabeth
These turned out exquisite! I have a couple of these and I will have to try something like this. Great photographs too. Thanks for the dose of inspiration. Keep up the good work - Troy
ReplyDeleteThank You Very Much Troy! :D
DeleteI AM pretty proud of this troop of dummies, but what makes me feel even Happier is when you tell me that you might try this out too! ♡
Even thought this involves a number of painting step and plenty of sanding, the assembly line approach moved the process along quite quickly, especially since everything dries and/or sets up really fast.
So I hope that you have as much fun making yours, as I did in making mine :D
elizabeth
Oh! I nearly forgot to say Thank You Troy for your compliment re: the photos, because setting up the shots and seeing the different results, is for me- the extra cherry on top! :D
DeleteHi, Elizabeth - I love the leathery vintage look of these dress forms; it's hard to believe that they were originally plastic (and a bit melted, at that!) I can't get enough of reading about your amazing aging techniques and the widely varied assortment of materials that you use to work your miraculous transformations. The metal arm pieces, along with the numbers and initials, add the crowning touches to the dress forms - and also add a bit of history to the mix. Such an interesting post!
ReplyDeleteMarjorie
Thank You Marjorie for your Lovely Compliments! :D
DeleteI know this may sound simplistic, but these only took 2 days to finish all five so all of the steps outlined, went really fast.
Adding my initials was because of my ego, but the numbers were because I thought it made them look more interesting, as if they had originated in a warehouse at the turn of the century, so I am glad that you and Janine agree that they've " added history" ♡
This was a Fun project to do and I might make a few more while I am at it- before I forget how I did it!
Which by the way, is one of the reasons that i blog- so that [ I ] can remember ;D
elizabeth
La transformación ha sido impresionante. Los corchetes todo un detalle!!!
ReplyDeleteThank You Very Much Isabel!!! :D I am So Glad that you have enjoyed the transformations of these Chrysnbon dress forms.
DeleteI LOVED layering the colors and I LOVED adding the extra arm attachment details, but what I LOVE most, is that they All turned out Better than I'd expected! ;D
elizabeth
Great work Elizabeth! I adore the Chrysnbon kits, and all the different ways people finish them. These look particularly great and vintage, especially with the adjustment knobs added. I am going to try out your magical paint potion, maybe even tomorrow. On walls though! Enjoy your weekend. Xx S
ReplyDeleteThank You Very Much Shannon! :D I haven't made up a Chrsynbon Kit for Ages and I don't remember ever assembling the dress-maker's dummy, however back in the 80's and 90's there were 2 booklets entitled CHRYSNBON CUT-UPS volumes 1 pub. 1982 by Boynton & Associates Inc. and volume ll 1992 published by Dee's Delights Inc. which showed how some of Judy Berman's kits could be radically modified into something quite different than what was pictured on the box covers.
DeleteA couple of good examples of these radical modification are: turning the glass fronted china cabinet into a Victorian bed, and using a combination of the pieces from the Organ, Icebox and Kitchen hutch to make an authentic Victorian highboy dresser.
Talk about thinking outside the box!....
Anyway, good luck with my "Magical Paint" it does most of the work so you don't have to. ;D
elizabeth
Very nice effect! You have the coolest ideas, thanks for sharing :)
ReplyDeleteThank You Most Kindly Linda! :D The finishes of these dress-maker forms, developed as I was in the process of doing them and unfortunately they didn't spring forth as a complete idea until they were all done, since I am "a make it up as I go" -girl.
DeleteIt is good for me to share the process and the results because I often can't remember my "cool idea" shortly after I have done them. I used to write them down in a notebook; but instructions coupled with pictures it is always better! :D
elizabeth
WOW Elizabeth, ces formes sont superbes !
ReplyDeleteLa transformation est plus que réussie.On a l'impression que des couturiers (ières) les ont utilisées maintes et maintes fois. Vintages, signées par l'artiste leur valeur est inestimable ;)
Bon week-end !
Yes INDEED Joce! Many mini "fashion designers HAVE used them for years"-
Deleteand it makes me Very Happy that you know this to be True! ;D
Many Many Thank You's and hope that your weekend is a Good One too!
elizabeth
You are amazing!
ReplyDeleteWhat a Lovely thing to say Megan- Thank You Very Much! ♡ however, I just consider it as Having Fun! :)
Deleteelizabeth
The dress forms look amazing after your makeover. It's difficult to believe they started up as plastic. Thank you again for explaining and sharing these very useful tips.
ReplyDeleteDrora
I am Delighted that you are enjoying the dress forms Drora. It may look more complex than it is, however this process of transforming the plastic was really simple, since it doesn't rely on precision just water-based paints, inks and glues, so if you make a "mistake" they clean up so quickly that you can begin again right away. :D
Deleteelizabeth
You did a fantastic job, managing to transform them in true to life vintage mannequins. The kind of mannequin people put as decoration in a bedroom.
ReplyDeleteGeneviève
Thank You Very Much Genevieve! :D I had a blast making over these mini mannequins! And you are quite RIGHT about them being found as decorations in Real Life bedrooms, since the majority of images which I saw on Pinterest had them prominently displayed there.
Deleteelizabeth
They have become wonderful and the idea with the buttons is great!
ReplyDeleteHave a Nice Weekend!
Thank You for your Wonderful compliment Sigrid! and I am Delighted that you like the press-stud button idea too! :D
DeleteIt was a happy coincidence that the press buttons are naturally associated with the dress-maker forms so in other words- together they made a Perfect Fit ;D
elizabeth
Ah, Elizabeth, as I have said before... you are so fearless with materials! I would be thinking "does this stuff mix with that stuff, or am I making a chemical mess...?" But you go right ahead and layer it on and mix like crazy and voila... it works like magic! The "bodies" look so real... (I had an antique form for many years but it was always in the way and not being MY shape.... was a bit useless as a dress form!)... I expect to see an entire street of modiste shops opening in the near future! I too love the addition of the arm sockets! And no-one would ever think these are miniature plastic kits!!! Now that you have had such a productive break from the Villa.... I hope your next steps will be as Magical.... but somehow I am confident we will be bowled over no matter what you show! :)
ReplyDeleteSpeaking of dress shops Betsy: Linda Park recently finished a tidy little French Boutique with a sewing and fitting room included and Fatima has a street of shops in mind for the future, and although I'm not into making a shop for myself, I can see any of these dress forms in or as a window display perhaps in an antique emporium, or dusty and neglected in an attic.
DeleteI have a mannequin torso in my RL living room which I consider sculpture, but seeing this ensemble in a bedroom holding scarves, wearing jewelry or sporting lace collars, are the images which keep revolving in my mind.
I am Delighted that you like the results of these my most recent endeavors Betsy Dear but never fear, the Villa will not continue as abandoned for long. ;D
elizabeth
What a makeover! The result is stunning - and nobody would ever suspect these vintage, used, leathery looking ladies to have a plastic core. As always I admire your fearless use of materials, a little layer of this paint and a little drop of this mix followed by a touch of whatever leads up to something stunning.
ReplyDeleteHugs
Birgit (who waves back to the group of pretty ladies)
Thank You Birgit! :D
DeleteSince I couldn't think of anything else to do to rid the forms of all of the melted plastic or adequately fix the broken cages, the only other option was to work those flaws into the over-all design.
I am Really Glad that it worked out as well as it did and since blogging this post, I have already made 3 more, trying to perfect "OLD" even better :D
now the ladies are blowing you kisses! :D
elizabeth
Wonderful transformation, as per usual! Love the vintage-y feel with the aged, warm colors. The arm pieces add the perfect industrial touch! Now you need to create a storefront!
ReplyDeleteHi Lindsey! I'd never thought of INDUSTRIAL but I can see that that is also a viable possibility, so Thank You for that idea! :D
DeleteI am Very Glad that you like the results, since they were fun for me to do and a quick distraction from my Villa, and although I don't think that I shall be doing a storefront anytime soon, my friend Fatima has several in mind, so perhaps she will need some of these old gals. ;D
elizabeth
My goodness they so are so not plastic kits any more... Your are a finishing wizard. There is something beautiful but creepy about them, not sure I want to find them in my attic....wonderful in an old dressmaker's room though. Marilyn
ReplyDeleteHi EM! I think that anything headless is automatically a bit "creepy" but rest assured that these particular ladies are h-armless! heehee ;D
ReplyDeleteelizabeth
These are just perfect!
ReplyDeleteThank You for your Lovely Compliment Minna! :D
DeleteI am pretty proud of all of these little gals too ;D
elizabeth
Another fascinating makeover! But the "Wave goodbye, everyone" just about made me snort my coffee!! So wrong but soo funny.
ReplyDeleteHi Cynthia! ;D
DeleteI am still chuckling about that ending too, but the truth is that, how to end my posts has ALWAYS been the hardest part of blogging for me. I never know if it will sound Right and /or fall Flat.
Nevertheless, I am GLAD that you enjoyed it, AND I Thank You Very Much for your comment and compliments- both are Most Appreciated :D
elizabeth
These gorgeous vintage 'leather' dress forms were created out of what most people would consider 'trash' and deposited in the nearest garbage bin....Elizabeth you are a miracle worker who can salvage junk and make it a true treasure! The process by which you create is always amazing to witness and serves as such an inspiration for my rather feeble attempts to create a realistic scene. Love the numbering of each of these pieces and the fact that you claimed them as your own by adding your initials! This post was perfectly timed as a sewing room is in the works for the 1888 house under construction...the mannequin I have is linen fabric with a wood base but now it looks 'flat' in comparison to these armless wonders! I have enjoyed your break from the villa as much as you did...now I too wave goodbye until your next marvellous post! Cheers, Alayne
ReplyDeleteGood morning Alane! :D
ReplyDeleteIt is the Wonderful comments like yours which help keep me feeling challenged as well as motivated,( even when I don't feel like it), so Thank You Very Much!!! ♡
Your 1888 sewing room sounds like an Interesting project and no doubt it has involved a lot of research and gathering of accessories and material to suit that time frame. Your fabric covered mannequin, certainly sounds like it would fit right in.
When I look at all of the collection I've done, the story which comes to mind is that these were rescued from an abandoned warehouse from the turn of the century.
When I googled images of mannequins on the internet I was astonished at how many different varieties and finishes these forms have been made in, and all are simply Fascinating!
Enjoy the rest of your summer- It's Very Hot and Dry here on the west coast and has been for weeks, although TODAY is definitely a little cooler-
Thank you GOD! :D
elizabeth
I genuinely thought the first photo was your reference photo at first! They look spectacular!
ReplyDeleteWOW- Thank You Very Much Christine; I am Very Happy that you like them!!! :D
DeleteWhen I found the original images for the Dress Forms on Pinterest I didn't bother to bookmark it. Then later I went back to search for it to include it in this post, but I couldn't find it.
That's the trouble with having thousands of pictures to sort through. When it all became too tedious and time consuming, I had to Let it go, let it go..... and just used my own. :)
elizabeth
Your mannequins look great and very vintage, love the way you did these ♥
ReplyDelete* marlies
Thank You Very Much Marlies and I must say that we must both have been on the same wave length, because I've visited your blog and I've seen that You have made some mannequins too-
DeleteAnd they are Wonderful!
I LOVE how you have used fabric to cover yours AND how you have made each one different through the fabric you've used and in the way you have accessorized them- Spot On! :D
elizabeth
Thank you very much Elizabeth ♥ Yes we must have the same thoughts.. :D :D But my mannequins are not covers, they are hollow on the inside... I forgot to mention ... ;) I love yours very much, I am very busy now, but I would love to try the look you have :D
Delete:D
Delete♡
e
Another fantastic project from you, such talent. I love all the detail you have added. I have an old dress form real size, just love the look of them. Hope your summer is full of fun, and lots of mini time. Jenn
ReplyDeleteHi and Thank You Very Much Jennifer for your comment and for your compliment- Both are Greatly Appreciated! :D
ReplyDeleteI find old mannequins to be very appealing almost like sculptures. I have one only in my house and I think of it as a modern day version of Venus de Milo :D
Enjoy your summer AND Congratulations once again, on the feature article in the Miniature Showcase magazine- Well Done :D
elizabeth
Wow! elizabeth, they have been incredible, i love them❤️
ReplyDeleteMini hugs!
Thank You Very Much Monica! :D
DeleteI am Very Glad that you liked the way that these dress forms have turned out, because I do too ;D
elizabeth
I do admire the time and trouble you take with makeovers. (I don't know if I would!) The forms looks great and I love the addition of studs where the arms would be.
ReplyDeleteI think Irene that I take more time and trouble with these makeovers, because I am beginning without a plan. During the entire process, I am asking myself if they are finished yet? and if I don't think so then I continue on sometimes even undoing what I had already done. Nevertheless, there ARE shortcuts to this process, because when I did my next three after already posting about these 5, I did in fact find a way to shorten the entire procedure down and still get similar results, yet at the time of this blog, I felt I had to include all the steps it took to arrive at what you see here.
DeleteBoth the original and the modified methods went pretty fast- it just looks more involved from the photos. ;D
But Thanks Very Much for your comment Irene; which I've Very Much Appreciated:D
elizabeth
Hi Elizabeth hope you are having a lovely summer! I cannot get over the transformation of these pieces! Absolutely jaw dropping!! They really do look like vintage and well loved forms. The arm/shoulder button additions just take these to another level! Really inspiring :)
ReplyDeleteThank You Very Much Kristine! :D
ReplyDeleteIt felt good to make over these 5 dress forms so as to capitalize on their obvious imperfections. As you already know, I like OLD; now however, they look 'old' but in a GOOD way ;D
elizabeth
Oh my goodness, I love them so much!! I'm so glad you had a break or these wouldn't have new lives. Awesome and thank you so much for sharing your skills yet again, you are brilliant! Mini Hugs, Jean
ReplyDeleteHello Jean! :D
DeleteI am soooo glad that you have enjoyed this dress form tutorial- Thank You! :D
It felt good to me to be able to put these old gals to good use again and give them a new purpose in life. :D
elizabeth
Hi and Thank You Very Much Jennifer for your comment and for your compliment
ReplyDeleteแตกใน xxx
Thank You Roth for your comment, and I hope that you have enjoyed this dress form tutorial as much as I have enjoyed publishing it :D
ReplyDeleteelizabeth
Hi Elizabeth,
ReplyDeleteWow, your dress forms came out really well........you should be quite proud of yourself. Everything you do always looks so real
and authentic. I just love miniature things too, they are just so
dran cute.
Hope this finds you doing very well, and
I am leaving my comment from when you came by for Thankful Thursday.
\
Hi Elizabeth,
Always so nice to have you come by......
I think America is much more unified that our main stream media wants any of us to believe.
As most Americans try to remain steady, loving, sensible and peaceable, the other side that
is off the charts, hateful and obnoxious and sometimes even violent just have the Louder voice and get much more news media coverage to prove to normal folks that we are way outnumbered.
I think the reverse might be the truth... or we would not have President Trump..........
Thank you for coming by and for taking the time to comment and also thanks so much for your sweet and encouraging comments and your well wishes for me and
my family.....you're a sweetie.
Blessings Abundant to your and yours,
Nellie
Thank You for your Lovely comment Nellie, and Thank You for saying what you've said regarding what and how "most Americans" are vs those that are "the Loudest" and I also agree with you about President Trump ♡ and in my opinion, I believe that you FINALLY have a President for all the people, and not just for some :)
Deleteelizabeth
That would be darn cute....lol
ReplyDelete