 |
| When I was a little girl, my mother taught me a "nonsense song" which she had learned when she was young; it went like this: OH! - "Mares eat oats and does eat oats and little lambs eat ivy a kid'll eat ivy too, wouldn't you?" but this is what most people heard when they listened to it played on the radio - OH! "Mairsy doats and doesy doats and a little lamsy-divy a kidlle-deedivy too- wooden shoe?" as a child it took me a while to figure out what this song meant, and no doubt you're probably wondering what in the world I mean by including these silly lyrics as the intro to this post? The answer is pretty simple- I needed a working title with IVY in it, which is how I came to recall this silly song. Funny how certain tunes can stick and stay in your head no matter how old you get. ANYHOOSIE as you've probably figured out by now this particular post is all about IVY! ❧❦❧ so lets get started I don't know if anyone admires Sole's Ivy tutorial on Pequenas Cosas blog: as much as I do. It is one of the most REALISTIC on the net. I always wanted to give it a go, and since I needed some IVY for the Villa Leone window planter, I turned to her Hiedra tutorial |
http://minis-sole.blogspot.ca/2014/08/hiedra.html?m=1
I followed Sole's instructions very closely and although I'm satisfied with my results hers look Really Real!
even so
here's what I did
I used wide masking tape and laid it sticky side up.

 |
| I laid thin pieces of wire on top of it to form the stems. |

 |
| I laid a second piece of masking tape over the top and outlined the stems with a ball tool to seal the 2 layers. |

 |
| Then I drew on the leaf shapes with a pencil and cut them out with scissors. |
 |
| Afterwards, I painted the stem brown and the leaves green. I made 4 stems of varying lengths and left enough of a stem on the ends of each one so that I could hang them over the edge of the planter and arrange them to suit. Well FOUR STEMS was not quite enough because my ivy looked too skimpy for the visual bulk of the planter so I ended up using some leftover leaf scatter I had in my stash to fill in some of the gaps which is what you see below- the extra scatter really beefed them up! |
 |
| Below is how the ivy looks installed. I'm happy with the finished planter and would give Sole's tutorial 2 thumbs WAY UP! * however-make sure to make more than you think you'll need* |
 |
| and thus ends Ivy tutorial #1 ❧❦❧ next up- |
 |
| Ivy tutorial #2 which came about as a result of wanting to fill up these two china pots which I'd cobbled together from some beads. For the ivy I used a product which Fatima and I purchased on line. BIRCH SEED SCATTER if you have birch trees in your neighborhood- keep the cones then make your own! http://www.zaboobadidoo.com/making-convincing-ivy/ The 2 blogs above and below are both good references on how to use it for ivy http://www.reapermini.com/Thecraft/24 here's what I did  |
 |

 |
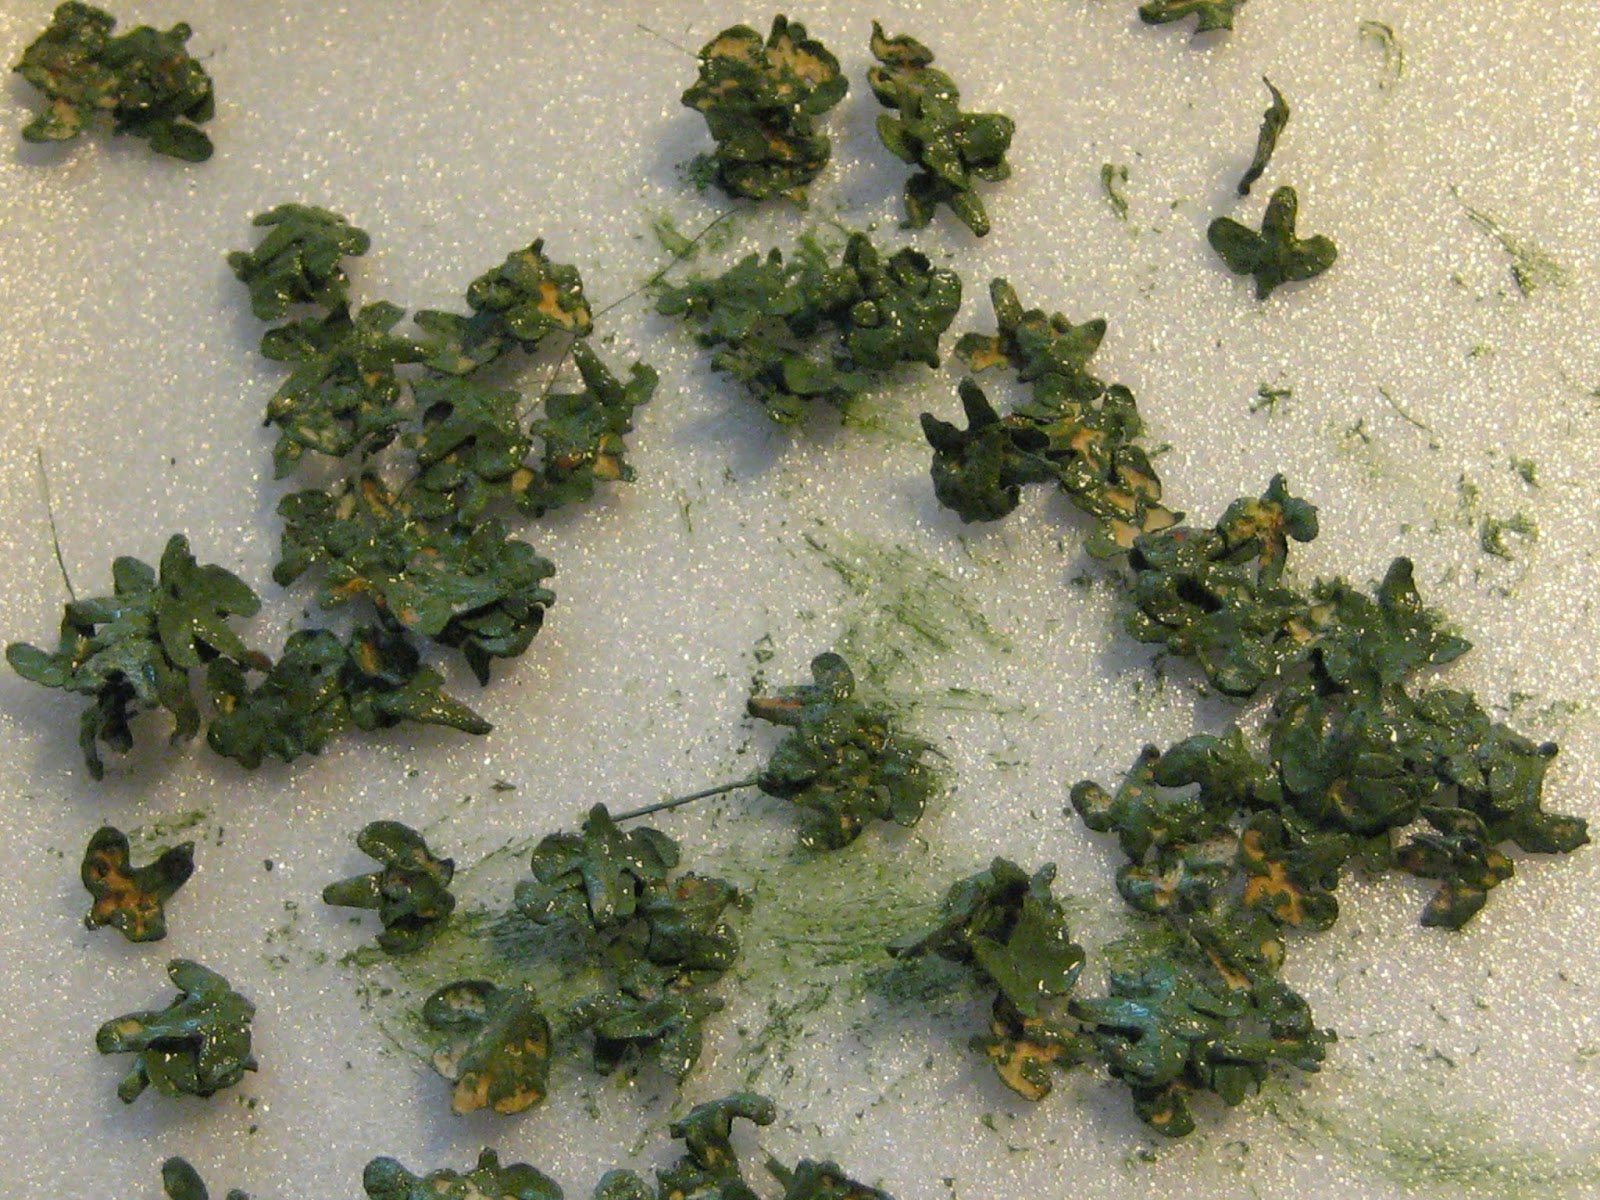
| I mixed two greens onto the birch spacers, and mixed them in with a paint brush, dragging it over the spacers so that they were evenly covered. |

 |
| It takes a while for all of the individual leaves to get painted and even when you think that they're done, many leaves will be still missing some paint, however you can always touch up the bald spots later. When they were ready, I transferred them onto a non-stick surface and separated any clumps with my fingers. This is messy and also takes a while because the leaves are very tiny. |
 |
| I made several batches of ivy leaves in different shades of green; not wishing to run out of them too soon. |
 |
I re-touched the leaves with more paint as required and adjusted the stems to form a shape and draped it to my specifications.
 |

 |
| and Ta Da! ❧❦❧ Ivy tutorial #3 is a variation of the same as above ( in case you don't happen to have any dead roots waiting around in your stash-) I'm using loops of thin wire which are tied off about 1/4 inch from the end |


 |
| cut through the loops and splay outward so you can paint them. |

 |
| When painted brown, leave them to dry. I propped mine up with a clothes peg |

 |
| I shoved a little air dry clay ( Play-doh) into the pot and then added the painted stems, shaping them as needed. |
 |
| This photo reminds me of the legs of an emerging spider- ugg! |
 |
| I used 527 glue because it stays fluid long enough for you to dip the ends of the ivy leaves into it then stick them to the frame. |


 |
| When I'd applied enough of the leaves, I re-adjusted the stems and then touched-up the stems with more brown stain, and the leaves with more green acrylic paint mixed with a green glaze. |
 |
| And placed the vases on the mantle in Villa Leone's Morning Room. |
 |
| and this is what they look like in place! And although we have come to "The End" I can't let you go until I give you the link to the tune of that nonsense song so that you can have it stuck in your mind from now on too-
https://www.youtube.com/watch?v=EU2CKQQr90E
OH! mairsy doats and doesy doats and little lamsy-divy A kidlley-divy too, wooden-shoe? OH a kidlle-divy too, wooden-shoe." ❧❦❧ miss you mom ✝ elizabeth |
.jpg)


My mom used to sing that to me to! Love the ivy. See you soon. Cheers, Linda
ReplyDeleteHi Linda! Hearing the song and singing it reminds me of a specific time and place with my mom. It is one of those tunes that make you smile in-spite of yourself :))
DeleteGlad you've enjoyed the IVY and I look forward to seeing you soon too!
elizabeth
These look so real... :-)
ReplyDeleteThanks Marion! Hope you will check out the tutorials on each of the other links because they look even MORE REAL! :))
Deleteelizabeth
Ha! I love it! That is one of our go-to road songs along with a few goodies from Roger Miller!
ReplyDeleteThanks for the tutorials, links and another peek at that fabulous fireplace display! The bead pots are awesome!
Oh man Jodi, I can't imagine singing this song for too long in the car because just a few times around with the a Littlelamsy-divy would drive me crazy, much like the campfire songs "On Top of Old Smoky" and "99 bottles of Bear on the Wall".... but they do indeed, bring back GOOD MEMORIES of GOOD TIMES. (sigh)
DeleteYou're welcome regarding the tutorials- please check out the originals.
I'm Very Happy with the way the Ivy looks on the mantle which as you can see, has taken a different turn along the way thanks in part to those 2 bead pots; and I'm Very Glad you like them! :D
elizabeth
Good Morning Elizabeth,
ReplyDeleteAll is well this morning. What a great tutorial. You make it all look so easy! I know it is not!
Up early as we expect another full day to include SIMP. Bruce will be there with camera so hope to be able to send you pics soon.
Family arrive tomorrow so lots of shuffling onboard to create space for an extra four.
Thinking of you.
Hugs and love
Janine
Hi Janine! Glad that you enjoyed the tutorial my friend, Thank You!
DeleteAll is well here on the western front too, and THANKFULLY it's a little cooler this morning than it was last night.
Hope that SIMP was as exciting an adventure for you, as expected and I can't wait to see the photos! ^.^
Say Hello to your kids for me, and I hope the boat's cooler with the new fans in place... whew!
♡
elizabeth
p.s. Miss you guys A Lot!
Hats off to you my friend, your ivy looks fantastic. :-) Though after that amazing garden you made around your house. I am surprised your not writing the book on making plants and flowers. I have made a few kits and they really take it out of me, I find it totally exhausting.
ReplyDeleteThank You Catherine! Each of these Ivy making methods were easy but time consuming but since I am always looking for short-cut, of the 3 the 2nd one was the easiest. I love making flower kits yet they can be rather pricey if you want to fill up a garden but I DO agree, they are not for everybody.
Deleteand No Book in sight from me, but I love the thought of being an Author! hahaha :D
Realistically though, I would find the entire process emotionally exhausting since I am truly horrible with any kind Paper Work, which is due in large part to being diagnosed as a Practicing Professional Procrastinator,
and sadly there is NO CURE. :(
elizabeth :))
Dear Elisabeth Thank you for the tutorial. I have af big Birch tree in my garden so I could make millions of ivy if I wanted to. Your ivy looks so much better than the kits you can buy for Money.
ReplyDeleteBy the way - do you know a tutotial for ferns as I cannot find any. I cannot find any kits too. I would like one or two in my bathroom.
YIPEEEE Farmor!!! You are so lucky to have Birch trees in your garden :D
DeleteThe link to Reapermini.com explains how to harvest and process the Birch seed pods, so make sure to check it out. :D
I have purchased Ivy kits and they turned out pretty good but these methods are COST EFFECTIVE and the results are personally Much More Satisfying! :)
I haven't made a search for how to make ferns but a LONG TIME AGO, I made them using green Florist's tape with thin wire sandwiched in between the layers similar to the demonstration in Ivy tutorial #1. Yet there are many varieties of ferns so it would depend on what type of fern you were trying to reproduce.
But if I do happen to find something on line, I will leave a link in a comment on your blog, because you just never know... :)
elizabeth
Hi Elizabeth! I love the story about your childhood song, although it's not familiar to me ;O!
ReplyDeleteYour ivy tuto's are great, the result is stunning and so lifelike. The bead pots look gorgeous and I love seeing another peek at your fabulous fireplace display!
Thanks for sharing the links and especially that song with us!
As always I love to read your blogposts, cause there is always something to learn :)! Have a great weekend, dear friend.
Hug, Ilona
Greeting dear Ilona and Thank You for your Very Kind words especially regarding the song because you've made me think of my sweet mother again, and that is always a GOOD thing! :)
DeleteAlso getting a compliment about my plants from The FLOWER LADY herself, is Always something to feel EXTRA GOOD about! ♡:D
elizabeth
Thank you for sharing your ideas! Beautiful!
ReplyDeleteHi Ingi and Thank You for enjoying these Ivy tutorials! Please make sure to check out the originals on the links because each person can use the same materials in different ways and there is Always something new to be learned from everyone! :))
Deleteelizabeth
I'd forgotten all about that little ditty, now I can't get it out of my head! Excellent tutorial Elizabeth, you have such patience. Now I know how to deal with the shop bought ivy I have (especially putting it in pots - I hadn't thought of that). I did smile at Farmor's post re ferns - I was just thinking the same about parlour palms!
ReplyDeleteHaahahahah! I know just what you mean, Irene! I find it ASTOUNDING how much trivia mostly in the form of commercial jingles and movie songs which I still remember, AND how it seems to spring up out of nowhere more often than not. :D
DeleteGlad you liked the tutorials Irene, and that you like the idea of it in the vases. It didn't occur to me either until I remembered that ivy can root in water just as it can in dirt, yet patience is perhaps the least of my virtues which is why I bought the birch leafs scatter, so I didn't have to make each of the required leaves, one by one.
And WOOHOOO- I DID see a Parlor Palm- Check out Monique's FABULOUSLY SMALL blog; in her: Tutorials tips and trick 2 :D
elizabeth
Not one, but three different tutorials! These are fabulous Elizabeth! Thank you for sharing. It makes me want to try some plants especially with the summer weather out. They look beautiful in the pots and your photos are really helpful. Have a great week!
ReplyDeleteI just wanted to drop you a note here so you were sure to see it... the fridge in my post is actually by Elf Miniatures in the UK! I have yet to try metal working, so I've always left it to Elizabeth there. If you haven't already check out her site! You'll fall in love!!
DeleteHello Kristine and Thank You for being inspired by these tutorials! :D
DeleteI have been spending some time outside in my Real Garden and you are quite right about wanting to make plants when you get The Bug!;)
and I'm glad that you like the look of the ivy in the pots because I do too! :D
elizabeth
Wow, I remember Hawkeye singing that on MASH. And these tutorials! I'm just amazed... and thinking if I can figure out a way to protect them that I might try my hand at plants again.
ReplyDeleteHawkeye was a HOOT and I can hear his voice even now! :D
DeleteI am Delighted that you have enjoyed these tutorials Sheila. They were VERY EASY once the prep work was done, and the ivy in the pots went quickly!
Cutting things out( as in #1) is generally not my forte, but if I can do it- then ANYBODY can.
Hope you'll give'em a try :D
elizabeth
The ivy looks wonderful Elizabeth. It's interesting to see the variation you get with each tutorial. Very natural looking :0)
ReplyDeleteThanks Pepper! I like Variety too and I am always on the prowl to see the different ways one thing can be re-interpreted.
DeleteSole's tutorial was AMAZING and when I think of how many of those lvy leaves she cut out for each vine, I am Dumbstruck by her talent and her patience since making just 4 darn near wore me out, but I do love their final trailing effect in the planter, and happy that you like the different results too! :D
elizabeth
¡Precioso Elizabeth! Has hecho un buen uso de los tutoriales.
ReplyDeleteThank You Isabel and I am Glad that you like my results of these 3 tutorials!
DeleteWhile writing this blog I hit a wrong key and lost all the text including the links to the various blogs. Trying to find the 3rd war game tutorial was exasperating however my perseverance finally paid off. It gave some additional information about how to process the Birch cones which I thought was important and shows how by using the same material you can come up with a different method of application, and it is always nice to have extra options isn't it? ;P
elizabeth
Stop. The. Presses. You have blown my mind. I would have never thought about the masking tape or the birch trees. I have a ton in my area. I will keep my eyes open for the cones. I love the pots you made up. So incredibly realistic.
ReplyDeleteI NEVER would have thought of using the masking tape either Kat, but I am soooo glad that Sole' did!
Deleteand It changed my life forever ;P
I am THRILLED that you have Birch Trees in your area because this stuff is sooooo easy to work with and even though they appear fragile, these little spacers are TUFF AS NAILS! Even when damp. They do take a lot of paint though and even afterwards when you are gluing them on the stems you will see places where the paint didn't get to, but I found it super easy to touch up both leaf and stems, once they were stuck in place :)
elizabeth
Excellent ivy results! :D
ReplyDeleteHello Brae and Thank You for enjoying the various results!
ReplyDeleteI never knew making Ivy could be so much fun and other than the cutting and the painting all 3 of the tutorials were a piece of cake! :))
elizabeth
These are fabulous! Thank you so much!
ReplyDeleteThank You and you are Most Welcome Karen, and please make sure to check out the links to the originals, because you won't be disappointed :D
Deleteelizabeth
You've made some great looking ivy! I love watching the process. I worked on a petting farm and the pigs rutted up tons of roots! My mini eye was delighted and I took lots of it home :) Re that song, I know of it too, but I must admit I never new the last line was wooden shoe!
ReplyDeleteThank You Very Much for your comment Linda, but I had to laugh in reference to the last line of the song which was actually "Wouldn't You?"
DeleteApparently many thought it was "wooden shoe" and I'm not surprised.
I have to add this; Several years ago I was browsing in a bookstore and came across a book about popular songs which people always sang the wrong lyrics to. Bob Dylan songs were in there a lot and I remember flipping through the various song titles and laughing at some of the substitutions people have made to fill in the lyrics when they didn't know the real ones. Of course this was years before Google.
The song I could NEVER decipher no matter how hard I listened, were the lyrics to A LONG COOL WOMAN IN A BLACK DRESS- It is "garbled garbled, garbled- DownTown- working for the F.B.I." the rest I make up as I play my air guitar-Get It On! :D
elizabeth
Tout d'abord merci Elizabeth pour les tutoriels ! Jolies plantes !
ReplyDeletePour le premier, j'ai utilisé le ruban de masquage pour faire les plantes du mas provençal et de la librairie.
Bonne continuation et encore merci !
Bises. Joce
Hello Joce! Thank You and I'll certainly be re-visiting your Provencal house as well as your book store to see your versions of plants made with the masking tape. Not only do I like its cost effectiveness but also the realistic texture it naturally brings to the plants.
ReplyDeleteSo Thank You for the invitation! ♡ :D
elizabeth
This ivy is so utterly realistic Elizabeth, thank you for sharing your technique. Celia
ReplyDeleteI Thank You Very Much and I am Very Glad that you like my Ivy, Celia.
DeleteI was grateful to find these 3 links to the ivy tutorials which not only gave me direction but sped me on my way. :))
elizabeth
Wonderful tutorials! I have wanted to make my own ivy for a while but although I have seen tutorial number 1 before, I didn´t understand it very well and it seemed a huge job :) Now, thanks to you I have a better idea of what to do, I should give it a try. The other tutorials seem much simpler but I have no idea if I can get that bearch thing :) ha! I´ll keep my eyes open. Anyway, your results which either method are fantastic, they look real and beautiful. Thank you for sharing!
ReplyDeleteThank You Alexandra for your Very Encouraging words! :) ♡
DeleteI know what you mean about hesitating to try a tutorial without a clear understanding of the procedure, which was why I decided to post my efforts regarding #1. I am not very patient and make 4 was an effort, but it certainly gave me an Even Greater appreciation for Sole's climbing ivy and the multitude of vines she made to achieve her Fabulous results.
The other 2 tutes were very easy and other than the painting, took very little time to complete. You Can order the BIRCH tree- LEAF SCATTER on line from war game/ railroad craft companies; if you can't find any in the wild- Happy Hunting !!! :)
elizabeth
back before we moved to Ohio, Richs Mom sang that song while she was working around the house (they loved listening to the oldies station) so I knew all the words. it was back when Dad was alive. thanks for the trip down memory lane and I'll probbly try all your tutorials when Im watching tv i watch, Claws,TRHOBH,p,a,nj and Good Behavior when it comes back on. I think I've turned into a Ratched Becky with the good hair if I didnt work days I'd be watching daytime soaps OMG I do live in Peyton Place. oh well at least we have Ivy to keep busy.
ReplyDeleteI enjoyed reading your comment Marisa; and isn't it strange how we can forget someone's name if we haven't seen them for a short while, but the words to a song we sang as a child can readily flood back to mind AND put us immediately into a HAPPY PLACE again?
DeleteI'm glad that this song has brought your Dad to mind and made him alive in your memory again, as well as taken you back to visions of your mother as a young woman singing around the house.
My mother was a singer around the house too, which is how I picked up a lot of old songs. We used to watch old movie musicals together on the couch, long after my other brothers and sisters were in bed and sound asleep. Mom used to nod off towards the end and I'd have to wake her up.
and now MY daughter does the same thing to me! ;P
elizabeth
That was one of the songs that was useful to get a sulky child out of the sulks! I'd sing it it, dad joins in, other child joins in and second child couldn't resist! Your three lots of diddly-divey-do look wonderful. Such patience. M
ReplyDeleteYou're Right Marilyn, it IS a happy song and what a DELIGHTFUL story of how your family liked to sing it together as "A diddly-divey- do" sounds Splendid,
Deleteand I Thank You for sharing your version of the lyrics and for enjoying the ivy too-
wooden shoe? ;)
elizabeth
Wonderful tutorials! It is always so interesting to see, what kind of ideas you have and what kind of result you will get. The results are always so realistic. Thank you so much for sharing the tutorials and ideas with us.
ReplyDeleteThe nonsense song was really nonsense to me. I did not understand the lyrics but it sounded very funny.
Hello Sirkka Thank You for enjoying these tutorials and for liking the results- they were all fun to do and all Really easy!
DeleteThe nonsense song IS all about livestock eating different plants, specifically Horses eating oats, Deer eating oats, Lambs and Goat kids eating ivy.
When I was little I always wondered why would any kid
( assuming a human child) would want to eat ivy? I wouldn't!
But it sounded funny to me too! :D
elizabeth
Todas las plantas te han quedado preciosas !!!!
ReplyDeleteThank You Very Much Elosia! I hope that you will also visit the original links and give the ivy tutorials a try out too! :D
ReplyDeleteelizabeth
Hi, Elizabeth - Thank you for that very timely tutorial; even though I'm not quite ready (not nearly ready!) to start any landscaping on my villa, it is high time that I start thinking about how to go about it. I only hope that I can muster some of your patience; it looks as though I'm going to need a lot of it. (Both patience and ivy!) You've done beautiful work on the ivy techniques, and I love your "bead" pots; how perfect for your morning room. Thanks too for the "walk down memory lane." My father sang "Mairzy Doats" to me when I was a child, and I sang it to my daughters and to my grand children. My daughter had a toy stuffed lamb when she was small, and she named it "Lamzy Divey." How nice to be reminded of all those sweet times!
ReplyDeleteMarjorie
Thank You Very Much Marjorie for your comment about the ivy tutorials AND Thank you for sharing your story of "Mairzy Doats" with me! :D
ReplyDeleteIt really makes me smile when I hear how this one little song has connected us who knew it growing up, to a happy memory with our parents and with our children and/or grandchildren.
Your daughter's stuffed lamb toy "Lamzy-Divey" sounds Adorable!
ah the memories ♡
elizabeth
Fantastic tutorial Elisabeth!.. I'll be trying those second two for sure. Thanks so much for posting. :)
ReplyDeleteHello Sam and Thank You Very Much! I am so glad that you have enjoyed the ivy tutorials AND that you plan on trying out 2 of them too, which Pleases me even More! :D
Deleteelizabeth
Your ideas are original and the results are perfect.
ReplyDeleteThank You Kindly FAby for liking the results of the ivy tutorials, but these idea were all taken from other sources as per the links- I only adjusted them slightly to suit my requirements. ;P
Deleteelizabeth
I've used the wire and masking tape method loads of times before but never with ivy...hmmmmmm, looks like I've got something else to add to my list!
ReplyDeleteHi Christine! :D I never used masking tape for making plants prior to making these, but back in the day, I've used layered florist's tape for ferns and they turned out pretty good.
DeleteIt is funny though, that it often takes seeing something familiar used in an unfamiliar way, to kick start your creative juices and send you off into another direction. Which is one of the Great benefits of blogging and sharing ideas on the internet- wouldn't you agree? :D
elizabeth
They're perfect for palm trees I've found! The wire comes in so handy for adding a level of flexibility you wouldn't ordinarily get if you made them without!
DeleteOh definitely! I'm a big fan of sharing knowledge, and while I may keep the odd technique under my hat if I was going to make things to sell, I spent so many of my formative years reading books on how to make miniatures and trying to work out how one thing could be transformed into another, so being able to do that with a wider audience via my blog is just the next logical step!
I certainly do agree! and Irene will be pleased to hear this RE: Palm Trees! :))
DeleteI know how much enjoyment and learning is derived from making things yourself. There are items I can't and don't want to make and so I am grateful that there are those whose work I can purchase on line, but when it comes to sharing information of "how-to_?", I consider it "paying it forward" by passing on to others what has so generously been passed on to me.
You are incredible - and so is your ivy. Using three different methods of creating ivy blows my mind away... especially because your first attempt was already a burner. Thanks for sharing this with us - and the song too. I must admit your post's ending caused a tear around here... .
ReplyDeleteHugs
Birgit
Awwww Shucks Birgit- you say the NICEST things! :D
DeleteI had fun making the ivy because it turned out much like I'd hoped it would, and in fact, the 3rd tutorial was a spur of the moment one, since I knew that many people don't have dead roots at hand so the thin wire proved an even better alternative AND it is a lot easier to form than those teeny tiny roots.
I am so Glad that you enjoyed this post and it touched my heart that you liked the ending-
my mom might be gone but she is Never forgotten ♡
elizabeth
Wow! I love your techniques, amaizing!!
ReplyDeleteMini hugs❤️
Thank You Very Much Monica! I hope that you will give each of these tutorials a try because the techniques are so simple, that even I could do it! :D
Deleteelizabeth
My Dear Elizabeth, "Wooden Shoe..."!!! My foot!!! Ha! Do you have any idea how many times I woke up last night with that song running through my head????! My children had a tape of "Silly Songs" that they listened to that had that jingle on it, so I knew the real words.... but I do know what you mean, it is utterly infectious!
ReplyDeleteAs for your Ivy Tutorials.... they are Brilliant! I remember seeing that masking tape version somewhere once... and I never ever saw those Birch Seeds... they are awesome! Your ivies all look so real.... don't forget to water them! LOL! As usual, I am humbled by your courage to try so many techniques and see what works best for you... I am so timid... perhaps it is time I tried to make some ivy too.... just to stretch my "chops" and learn to experiment!! You are an inspiration to me!!! :)
What??? so a " wooden shoe" wouldn't do??? heeheehee
ReplyDeleteIt is so Gratifying to hear how many people have fond recollections of how this silly song has factored into their lives to make them smile, and I'm Pleased as Punch that you've have a history with it too! :))
And as for the Birch spacers, I wish I'd thought of it but I didn't. I first saw it used in link #2 and had a heck of a time trying to find it for sale. I told Fats about it and she found it on line and ordered some for both of us however she now has a source for home grown birch seeds cones, so she'll have a steady supply for the ivy she plans to make for her Christmas themed Garfield dollhouse"VITORIA".
I'm not really very courageous Betsy, I just like to fool around and sometimes things work out, but if they don't- then they don't, Nevertheless it feels good as you say, to stretch your Chops a bit,
and if those Chops turn into Lambsy Chops - Even BETTER!!!! :D
Glad you're back into your mini-making again, Betsy because YOU my dear, are an inspiration to us all ! ♡
elizabeth
p.s. I can certainly see some ivy growing around the glass house of The Folly..... just sayin ;)
Once again amazing work! Your ivy is fantastic and I like very much how you mixed it with other flowers, it is also perfect on its own on the mantelpiece. Thank you for the tutorial! The song is fun.
ReplyDeleteGeneviève
Hello Genevieve! ♡
DeleteI feel like I now♡ know you personally after seeing a photo of you and Norma and Janine at SIMP. Hope you had a fun time there, but such a shame that it was the last show.:(
I am glad that you've enjoyed these 3 ivy tutorials too- Thank You! :D When I inserted the ivy stems in with the other plants in the planter, I decided to fixed the flowers up too. This occurred during a long dreary early spring when most of the gardens around here were a dull, wet, soggy mess. The bright flowers and the ivy in did a lot towards lifting my spirits at that time, was just what the doctor ordered. :))
Making the ivy in for the pots on the mantle was my way of bringing the outdoors- in! ;P
elizabeth
Love them all and the plants in the bead vases particularly so. I tried the first ivy tutorial and it was an abject failure (but I never added leaves nor painted it). Also did a version of the second ivy tutorial on my 1:24 cottage and was really happy with the results. I have an endless supply of the little birch thingos - in my carpet, on the couch, in my car, in my shoes.... you get the idea. Anyways, might collect some more for my 1:12 houses! You are always inspiring Elizabeth! Xx
ReplyDeleteHello Shannon! I guess yours is a case of too much of a good thing! hahahha, ;D
Deletebut I do know what you mean!
I have cedars and pines surrounding my property which
continuously drop dead needle debris which is picked up on the paws of my dog and carried into the house where she grooms herself on the living room carpet after first dropping needles through the kitchen and dining room; an on-going irritation to say the least.
I hardly bother putting the vacuum cleaner away anymore :/
Glad that you like the ivy tutorials and I have to say that I tried the tape tutorial for the first time and found that I really needed to use a ball tool to press the tape as close to the wire as possible otherwise it left too much of a seam on either side of the stems, so if you decide to give it another go-round, keep that in mind -
as well as to make sure to paint and put leaves on them, you silly girl! :D
elizabeth
Maybe I should have used a ball stylus. I don't think I chucked them out. Perhaps I could have another shot at fixing them? To be honest, it sounds like too much work for me! Haha! Maybe I'll just make a wire armature stem and put leaves on that instead.
DeleteVaccuum cleaner - no, ours is almost always out. I tramp thread and debris down the stairs from my craft room to the lounge room plus we used to have a doggy (as you may recall). We recently looked after my mum's dog for a week and there is a huge pile of dog hair in the laundry - he didn't really even go in there! How is that possible??
I seem to hang onto my "fails" too Shannon but since I have so many I do a "thinning out" periodically otherwise I am swamped by them, however sometimes they can be "re-done" if for no other reason than to see IF I can! :)
ReplyDeletee
I had to laugh, I've been watching Twin Peaks for the first time, and one of the characters burst into song at one point and I recognised it instantly, but only because of this blog post! XD
ReplyDeleteWhich makes my blog "highly edumucational" ;)
DeleteHello Elizabeth,
ReplyDeleteWhat fun! Thank you for sharing 3 tutorials. I have my heart set on Ivy climbing a few walls of the manor some day. Techniques 2 and 3 really look realistic. Well done my friend.
Big hug
Giac
Fatima wants to have Ivy climbing up the walls of her doll's house too Giac but she hasn't gotten to that stage as yet.
ReplyDeleteI saw a French tutorial where the woman used cheesecloth for the skeleton for the ivy and it looked GREAT, so there are a number of different options when the time comes for you to move your attention to the exterior of The Manor :)
Big Hugs Back!
elizabeth
Thank you thank you....I have been waiting for you to show me this. I'm going to try and make some. Would love to make a lot of ivy, but have time restrictions.
ReplyDeleteThis post is Spectacular!
Congrats on the award! Well deserved!
Fancy meeting YOU here Fatima! WELCOME HOME! :D♥
DeleteI can't imaging placing all of these leaves one at a time to grow up against the side of a 1/12 scale house, but for a house plant this method goes together real quick.
I'm GLAD that you like it and THANK YOU Fats, for ordering the leaves in the first place. :D
elizabeth
I discover only your splendid ivy, thank you Elizabeth for these clear explanations
ReplyDeletebig hugs
Hello Claude! It makes me Very Happy to receive a compliment from You regarding my ivy! ♡ As you KNOW I LOVE and am Inspired by your Marvelous mini floral creations, so I Thank You! :D
Deleteelizabeth
Gosh, will you find me clear down here at the then of a very generous list of commenters. I so appreciate that you visit my dollhouse. I love the ivy project. I might even give it a hand. I am always looking for ways to create my own plants, but I am not very good at it. Yours looks lovely.
ReplyDeleteThank You VERY MUCH Ann for taking the time to leave a comment and for your lovely compliment regarding the ivy plants.
DeleteI so sorry that I didn't see your comment any sooner than today, but I hope that in the meantime you have been able to try out this tutorial and have had success with it. It is actually Very Easy which truthfully, the only kind of plant making which I can do. Enjoy!!! ;D
elizabeth
Techniques 2 and 3 really look realistic. Well done my friend.
ReplyDeleteแตกใน xxx
Thank You Very Much Roth for your compliment on the ivy tutorials 2 and 3. They were both Very Quick and easy projects with long lasting satisfaction! :D
Deleteelizabeth