 |
| WELCOME BACK Benvenuto indietro! |
 |
| Just to satisfy any curiosity regarding what I decided regarding the wood nymph with 3 arms; as you can see I changed it however, in the picture of the 2 dancing maidens- the raised right arm, doesn't actually belong to either of them. but it works! ♡♡♡ Now on to the tutorial I am making a stone archway leading from the entry of the Villa, into the kitchen using plastic garden fencing purchased from the dollar store. |
 |
The hard plastic fencing comes in snap together sections made up of 4 arches with center spears.
It's available in either white or black.
I chose white because I wasn't certain about what color I was going to finish it in.
|
 |
| This is what the fencing cost in Canada. I cut 2 of the arched sections free from the fence panel |
 |
| I scored the joins with an utility knife and then snapped them apart using an old pair of wire snips |
 |
| The rough edges were cleaned off with a utility blade |
 |
| I measured the frame for its height, and cut it down to the right size. |

 |

 |
 |
| Matte board was cut to fit around the arch and glued onto the frame using E6000 glue. fyi (The second wall template on the kitchen side, has not yet been glued around the arch, because I still can't decide on a wallpaper.)  Gaps around the frame, were filled with drywall patch |
 |
| To finish the arch, I repaired any rips and blocked up the open gaps in the frame using masking tape and/or foam core board. |
 |
 |
| I painted the interiors of both arches with black acrylic paint and let it dry. |
 | ||
| then I wedged pieces of scrap foam board inside of one of the frames and made sure that the second arch would fit snugly over top, making adjustments for a tight fit, where needed.
|


 |
| I scraped off any excess glue and painted the entire frame in a white acrylic paint. |
 |
| Then using a spatula I layered on drywall patch, filling in any gaps around the frame as well. This was then sprayed with hairspray to seal it and gave it another coat of acrylic paint. |
 | ||
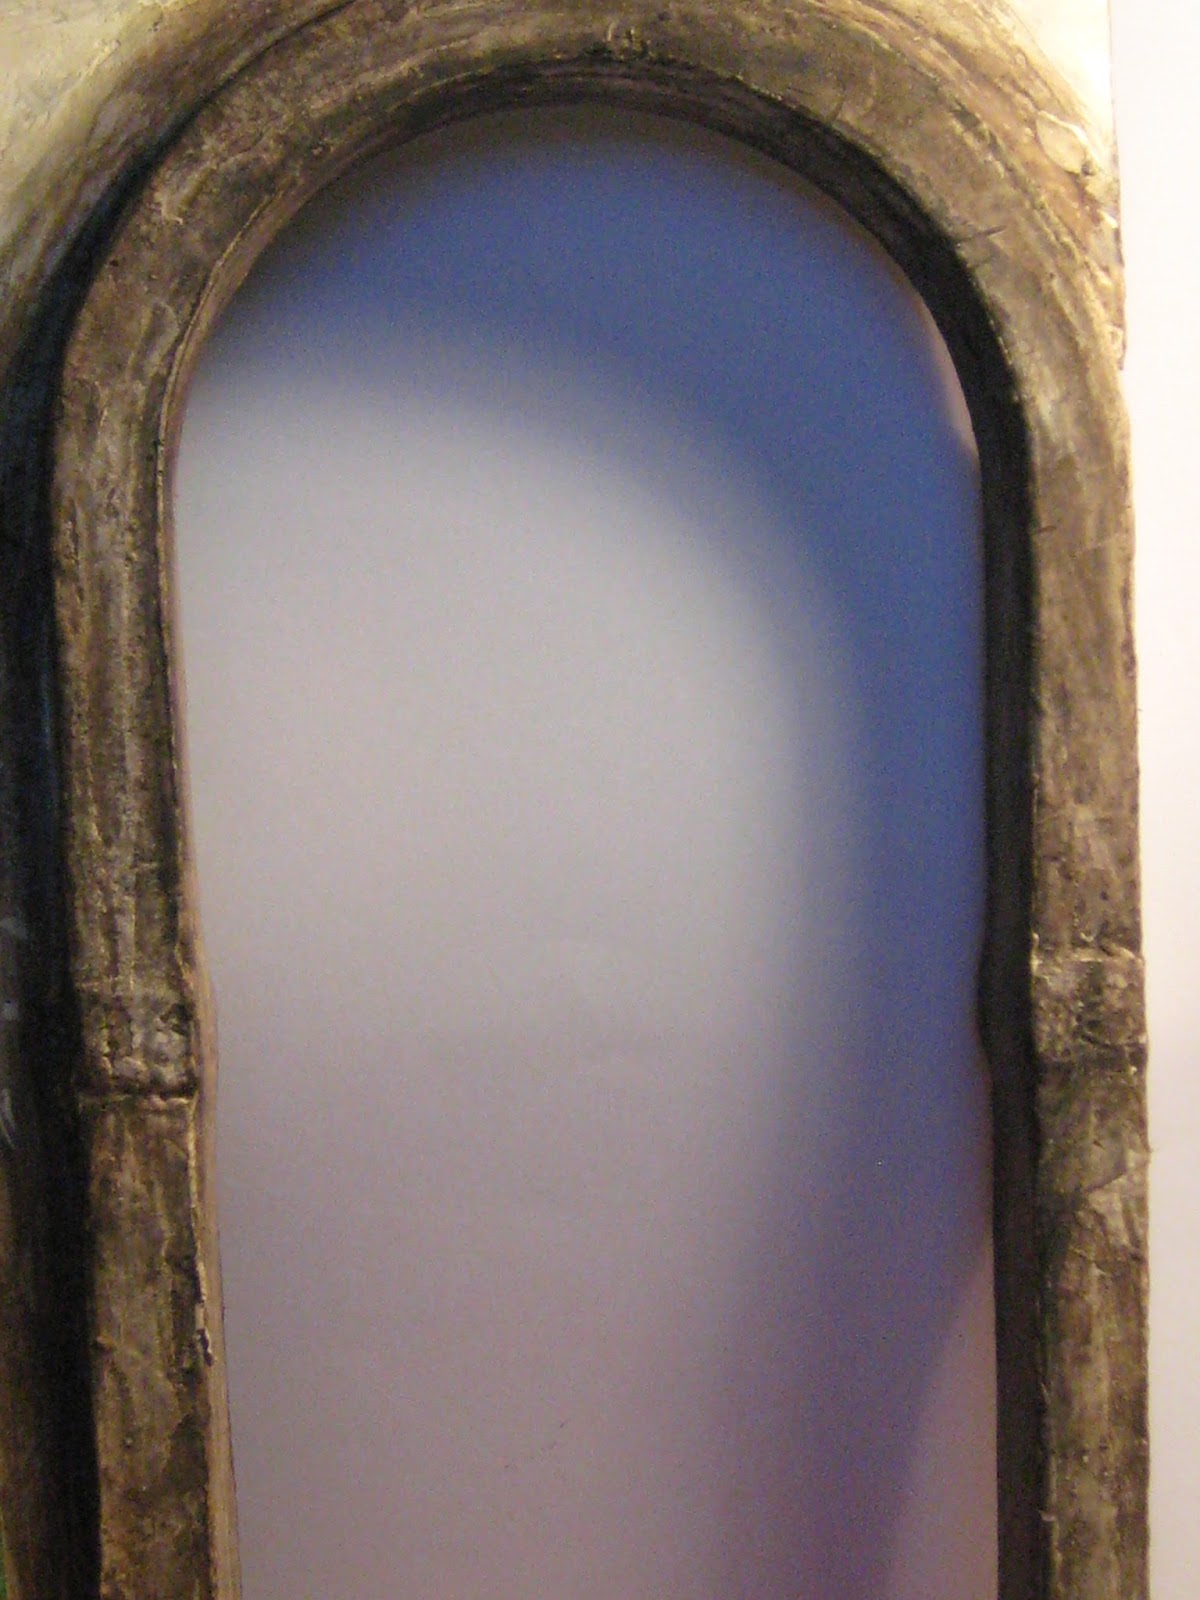
| I applied a coat of drywall patch to the front surfaces to disguise the "tooled metal" texture, hoping to make it look more like old stone. I normally use hairspray to seal the raw plaster BUT I decide that there had to be a better way to get a stone effect without taking so many steps, so I experimented a bit and came up with a recipe which worked out much better for me; a type of LIQUID STONE here's my small batch recipe: all amounts are in approximate measurements but are easily adjusted up or down 1 tablespoon GESSO 1& 1/2 tablespoons DRY WALL PATCH 2 teaspoons LIQUID ACRYLIC SHEER COAT MEDIUM [gives a transparent finish when mixed with acrylic paint, but in this case it serves as a sealer + binder ] 1 teaspoon OF WATER. the products were mixed until smooth and the consistency of a Heavy Cream. They were then troweled onto the face of the arch with a flexible spatula. the photos below show what it looked like after the liquid stone recipe was applied
|

 |
| The resulting finish is smooth with a light gloss now for the color |
 |
| Using an assortment of grated chalk pastels, water, brushes and sponges, I painted over the arch with a very thin, watery mix of all the above colors adding the color with a brush and subtracting it with a sponge. I continued with this process until I was satisfied with the final color of my stone. The white liquid stone base resists the water, while the powdery nature of the chalk pastels, dries splotchy, enabling me to build up the colors with the white still showing through under the various grays. The more water mixed in with the chalks-the more translucent the finish; with more chalk than water- the more color density. so this is what it looks like now |


 |
| Not Bad if I do say so myself :D Hope you've enjoyed this "trash to treasure" tutorial |

See you again soon!
caio caio
elizabeth
.jpg)


The end product looks great! I like how you aged it with the pastels. Keep up the good work.
ReplyDeleteThank You Very Much Troy and I'm Really glad you like it!
DeleteUsing the pastels for the color made an enormous difference to the surface and were a lot easier to use than the acrylic paints which I'd been using before.
Enjoy your weekend :))
elizabeth
AWESOME! I just want to go and do some stonework! Oh dear! will have to wait until my current project is done! Fabulous!
ReplyDeleteThank you for sharing
fats
Hi Fats!
ReplyDeleteThank You and I'm Happy that you like the end results! It took me a while to figure out how to make the plastic look like stone, but steady perseverance and experimentation, finally paid off.
and this time, I made sure that I wrote the recipe down! :D
elizabeth
Looking at the final result I would never have guessed this started out as plastic fencing. Well Done!
ReplyDeleteThanks Sheila! My objective was to make it look more than the sum of its parts, so your compliment is Greatly Appreciated! :D
Deleteelizabeth
Not bad?! It's great!! :D Such a modest start as a plastic garden fence.
ReplyDeleteThank You So Much Brae! :D I had been thinking about converting this plastic fencing for a number of years, but without a project to try it out on until now, so I'm Very Happy that it actually worked!
ReplyDeleteAnd Delighted that you like it too :D
elizabeth
Fantastic! It looks so good! And your tutorial is excellent. Can't wait to see it!
ReplyDeleteWill be in touch soon! cheers, Linda
Thank You for enjoying the tutorial ( I'm thinking of your Folly Linda), and thank you for your email too! :D
DeleteI am going to have to get busy getting my villa in order for when you come over, because otherwise it's in a state of perpetual chaos-
it only looks decent for the pictures! :(
I'm eagerly anticipating your visit! ♡:D
elizabeth
Se ve fantástico,gran idea y muy buen trabajo y tutorial!!!!
ReplyDeleteBesos.
Thank You Very Much Pilar for your Wonderful compliments, and I am Very Happy that you like the idea. It took me a while to make it happen, but better late than never. ;)
Deleteelizabeth
Hello Elizabeth,
ReplyDeletethank you for this fantastic tutorial. Great what you make of cheap things.
Greetings and a big hug
Melanie
Hi and Greetings Melanie! Yes, one of the most satisfying things when making miniatures, is transforming "cheap things" to make them look better than what they were originally.
DeleteIt is even more satisfying when the transformation turns out better than expected! :D
Thank you Very Much for your comment! ♡
elizabeth
Fantastic use of the plastic arcs. Thank you for sharing this tutorial.
ReplyDeleteI love the stunning results.
Drora
Hi Drora! Thank You Very Much and I am Delighted that you have enjoyed this tutorial! :D
DeleteTo tell you the truth Drora, I surprised myself at how well it all turned out; so it makes me happy that you like the end results of the plastic arches too! :))
elizabeth
what a grat idea! And it looks absolutely fab..
ReplyDeleteThank You Very Much Marion! :D I was quite excited when both the Idea and then the Technique were able to come together as well as they have. :D
Deleteelizabeth
Siempre que visito tu blog me voy con nuevas ideas y conocimientos. Admiro la forma en que trabajas y te agradezco que la compartas.
ReplyDeleteEse arco se ve genial. 😙😙
Hi Victoria! :D
DeleteI Thank You for your Lovely words and for your compliments!
I enjoy experimenting and finding new ways to do things and when I can share information which I think can be useful, then I do, because I'm always learning from others too! ♡
elizabeth
Oh that's a genius idea for the arches! Very handy if you wanted to do multiple doorways with them too as they'd be a uniform size. (For some reason I could see them being used as a topiary hedge, if covered in the appropriate foliage!)
ReplyDeleteThe 'liquid stone' looks phenomenal when painted too - I love how the underlying texture is brought out by the pastels - they're such an underrated resource for miniature painting!
Hi Christine! :D You must have been reading my mind!!!
DeleteAs soon as I brought the fence, I've been thinking about their use in a garden scene!
The liquid stone turned out to be so much easier than what I had been doing before and as a base it made the applied color look more authentic with less effort.
And I think that by adding sand or grit or substituting Artist's Gel Medium, or more or less dry wall patch, you can get countless variety of textured finishes.
Something to think about for a future garden. ;)
elizabeth
Hi Elisabeth what a coincidense. I am making an arch in my diningroom and your tutorial came very much in handy.
ReplyDeleteHow MARVELOUS!!! Such good timing that this tutorial is published when your are making an arch for your dining room! ♡ :D
DeleteIf you have any further questions about any of the process Farmor, please don't hesitate to ask-
and please let me know how it all turns out! :D
elizabeth
Wow Wow Wow Great work! Thank you for the tutorial, the result is wonderful. You are very generous sharing all your knowledge and you make it look easy!! By the way, great result on the 3 arms nymph :)
ReplyDeleteThank You Alexandra for your Sweet compliments and for your Great comment regarding the 3-armmed nymph! ♡:D
DeleteAnd re: "making the tutorial look easy"- in truth the assembly of it was Very Easy- it was the painted finish of it that took the most time and proved to be the most challenging.
Chalk painting is relatively new to me, however now I'm HOOKED on chalks and want to learn more and find other ways in which I can use them. :)
elizabeth
Great work!!! The result is fantastic. I'm also glad that you managed to work out the problem with the nymphs wallpaper.
ReplyDeleteGeneviève
Hi Genevieve! Thank YOu So Much for your compliments regarding this tutorial as well as for your comment regarding the nymph situation.
DeleteIt was a bit tricky finding a section of the print where the various limbs weren't too tangled-up. This new panel of the mural has worked out better than I'd hoped since now I get 2 nymphs, for the price of One! ;)
elizabeth
What a fantastic idea and the result looks fabulous, Elizabeth, thank you so much for sharing your tutorial :)!
ReplyDeleteBig hug, Ilona
Greetings Ilona and Thank You Very Much for your Very Generous compliment! :D
DeleteIt felt good to be able to have this tutorial turn out better than I had thought it could, not to mention that I was also able to learn something new during the entire construction process. :D
elizabeth
The result is fantastic! Aging the arc with the pastels was a brilliant idea. It really looks like an old worn stone arc
ReplyDeleteMany Thanks Sirkka for your Lovely compliment! Initially I had been using acrylics with mediocre results, but as soon as I switched to the chalk pastels and water, everything fell nicely into place and the arch took on the appearance of old weathered stone. :D
Deleteelizabeth
elizabeth
awesome ! Thank you Elizabeth for this excellent tutorial, it looks like a stone arch!
ReplyDeleteThank You Claude for your comment and for your compliment! :D
DeleteI know that you are an Artist on so many levels and so your words are especially cherished! ♡
elizabeth
I've heard about turning water into wine but a plastic garden trim into an ancient miniature stone arch seems a bit far fetched..... miracles do happen! Fantastic (a) to spot the potential and (b) to make it happen. Brava
ReplyDeleteThank You Very Much Marilyn! :D
DeleteI have been thinking of trying out this idea for several years but never had a reason to actually do it. Yet had I tried it sooner, I wouldn't have thought of using the chalks, so everything in its proper time.
I am truly Delighted that it meets with your approval EM, because I know that you are far more exacting when it comes to those little details, than I am. :D
elizabeth
🌻 Just fantastic dear Elizabeth !
ReplyDeleteI love the way you painted the arch. Pastel chalk is such a great tool. You used it in a PERFECT way.
Chapeau Mme !!!
Hugsssssssss 🌻
Pipi
Greetings Pipi and Thank You for your Kind and Generous words!:D
DeleteI am only just discovering the joys of using chalk pastels in larger projects such as this, which has become a new Adventure for me, so Thank You Very Much Pipi, for approving the results! :D
elizabeth
elizabeth
The result is perfect. Thanks for the turorial.
ReplyDeleteThank You Very Much Faby for your comment and for your compliment! And I'm very happy that you have enjoyed viewing this tutorial! :D
Deleteelizabeth
Merci pour le tuto Elizabeth, l'effet pierre est stupéfiant!
ReplyDeleteThank You Very Much Jean-Claude! I Really appreciate your comment since I know that you have a lot of experience painting realistic stone i.e. on your French Chateau! :D
DeleteWith more practice, I hope to be able to further refine this process so that I can do it faster and with more confidence. :)
elizabeth
bonjour Elizabeth ,
ReplyDeleteje regarde toujours avec beaucoup de plaisir vos messages . je ne mets pas toujours un commentaire . c'est ennuyeux de toujours dire la même chose ... que j 'admire votre travail .. que je suis toujours aussi étonnée par vos trouvailles ..
mais votre travail est étonnant cette fois ci pour moi .
au début , je n 'étais pas surprise par votre travail car je connais bien vos habitudes et votre façon de travailler . on reconnait parfaitement votre style dans toutes vos maisons .
j'ai commencé à regarder vos photos . j' avais des doutes avec votre arche en plastique . je n 'aimais pas trop le résultat au début . je trouvais le résultat un peu grossier . et puis vous avez fait la couleur avec des pastels .
Whaouuu !! bravo !
je suis étonnée par le résultat . la matière , la couleur .. tout est parfait . on oublie les photos du début . je ne douterai plus jamais de vous . haha ! vous m 'avez bien eu . le résultat est incroyable . on ne peut plus penser que c'est un morceau de plastique . tous les détails nous fait penser à de la pierre . merci pour partager toutes vos recettes avec nous .
je vous embrasse
catherine
It is So Good to read your comment Catherine and I have to say Thank You for your honest appraisal of the plastic arch before it's painting, AND I that I agree with you 100%!
DeleteThis tutorial is actually my second attempt at trying to make the arch look like stone. What I'd done initially looked like a very poor excuse, and it was only after I had re-examined the photos prior to resurfacing the face of the arch with the liquid stone mix, that I knew that I could make it better. I deleted my first tutorial and re-worked the arch to get it to what you see now.
Although the construction was easy, the painting was more laborious however, knowing that I could make a reality the results I could see in my head, made the extra time and effort worthwhile.
Thank You for your vote of confidence Catherine, AND I must say that I am glad to know that I have "a recognizable style"- I think that's perfectly Marvelous!!! ♡ :D
elizabeth
Having the ability to “see” objects repurposed as something else is a miniaturist’s superpower, but the magic happens in the finishing. This arch is brilliant!
ReplyDeleteAwww Thank You Very Much Nancy; I am Very Happy that you like it!:D
DeleteI would agree that seeing outside the box is a miniaturists stock in trade, however I prefer your terminology of it as "superpower" so much better! :D
elizabeth
Una idea genial, el resultado ha sido fantástico.Gracias por compartirlo.Feliz semana:-)
ReplyDeleteThank You Very Much Rosa! :D It makes me Happy that you have enjoyed the results of this tutorial :D
DeleteThe idea had been in my mind for a few years so it felt good to be able to get it out and finally realized. :D
elizabeth
Está pero que muy bien!!!Me ha gustado ver el tutorial
ReplyDeleteHi Isabel! :D
DeleteI'm Very Glad that you have liked and enjoyed this tutorial, I Thank You Very Much and I hope that it will come in handy for you sometime in the future. :D
elizabeth
According to me you have any right to declare the result as "fantastic", "impressive" or "awesome"... The color effect achieved with your chalk mix is simply amazing - and so is your idea to use this garden fence. Thanks for sharing this tutorial - oh, and not to forget: I'm glad you got out of the arm dilemma... ;O)
ReplyDeleteHugs
Birgit
Thank You Birgit for ALL of your "oh so complimentary" words- I Greatly Appreciate EACH one of them! :D
DeleteBeing able to see the arch out of the plastic garden fence was fairly easy because I was already pondering an addition of an arched doorway for the the villa not to mention had been thinking of this idea for several years, which proves that "timing is everything" ;P
and THANK YOU for your suggestion regarding the '3rd arm dilemma", your practical solution to the problem, proved to be Just The Ticket! :))
elizabeth
That looks exactly like stone! Well done and thanks for sharing your techniques, everything is looking great and very fun to watch---
ReplyDelete
DeleteIf you had seen my first attempts at painting this arch with acrylics, I know that you wouldn't have liked it at all Linda. :(
Re-painting it with chalks was a new challenge which required a number of tries before I felt that I'd got the plastic to where it I felt it looked like stone.
But I must admit it feels Really Good to get a "thumbs up" from a Fine Arts Artist, so Thank You VERY Much Linda! :D
elizabeth
Buongiorno Donna Elizabeth,
ReplyDeleteNo bad...nod bad you say...It's absolutely fantastic! What a genius idea to use the garden fencing. you have such an eye for miniature possibility. The shape is perfect and with your magic touch, the finish is wonderful. It looks so real, so well done. It is full of age and character and really is perfect for the project. wow! I am just in awe. Pure, unadulterated genius!
Un grande abbraccio,
Don Giacomo
Buongiorno DonGiacomo! :D
DeleteThank YOU Very Much "Sir G", for your Words of High Praise, which I Greatly Appreciate! I have to say that I kinda surprised myself with how well it all turned out, since not all of my experiments are successful- but it is good that this one was. ;P
Un grande abbraccio indietro!
Donna elisabetta
Dear Elizabeth, I will never cease to Marvel at your creative Genius!!! I would Never have thought one could make molded plastic from the Dollar Store turn to stone! But you have succeeded admirably! The recipe is simple.... you say.... and indeed it looks uncomplicated... but I am sure that most of us would never think to combine all those ingredients to make "stone"!!! And then the painting with the chalk powder washes.... you do it so beautifully! The results are absolutely convincing!!! Who would ever question that you found a perfect stone arch for your ancient Venetian Villa?!! And the solution to the dancing Nymphs is perfect.... and now we can see a glimpse of the rest of the downstairs..... Ooooh I want to visit this little Jewel of a Palazzo!!! :):):)
ReplyDeleteMy Dearest Betsy! First let me say I have been thinking of you and your poor injured wrist, which makes reading your comment even MORE special knowing the physical challenges typing presents- so a BIG Thank You! ♡ :D
DeleteSince I have had this idea in mind for awhile, it was simply a question of how to do it Best. It took me a few tries to get it to look right but the chalk painting sealed the deal! :))
I am VERY glad that you like the solution to the dancing nymphs- but Im back to wrestling with the kitchen.
I have changed the walls at least 5 times already and after publishing the photos I'd thought they were done- but then I changed my mind, so although it's a relief that the stone archway leading into the kitchen is completed; the wall transition is still causing me considerable grief.- ah me
Ventian Palazzo's are not quite as easy as I thought! :/
elizabeth
Hello, Elizabeth - Another brilliant stone piece! I'm so impressed that you found those plastic arches, but that you turned them into lovely aged stone is simply another example of your stone-working genius! That stone arch is beautiful; it makes a perfect doorway for your villa. I appreciate your tutorial and the Liquid Stone recipe. I can't wait to try it on something. (Something plastic, perhaps?) I've just completed a project that would have benefitted from that recipe - but I don't want to start all over again! Your solution for the nymphs and their many arms turned out just right - nice work! I'm loving every new thing that you complete for Villa Leone.
ReplyDeleteMarjorie
Thank You for your Marvelous comment Marjorie! :D
DeleteThe liquid stone recipe is flexible, as well as versatile. I originally tested it out on a piece of scrap card to make sure that it worked before I applied it to the already plastered arch, but since then, I have tried it out on a piece of old porcelain which I base coated with Revlon Matte nail varnish, and it worked on that too!
I found thin coats worked best since they dried faster, which could be speeded up with a hair dryer.
I've only just begun to explore the different ways to use it.
I do't know about you Marjorie, but I feel that for every 2 steps forward, I take 3 back- which is why I'm always eager to see and enjoy the progress on YOUR Amazing Villa, and from what you've said, I think that I'll be visiting Tuscany again real soon?! :D
elizabeth
Great work Elizabeth! That fence makes a perfect arch - note to self: go find plastic fence! And as always, the finish you achieved is astounding. I will need to refer back to this for some of my cottage exteriors. I am always gob-smacked with your work.
ReplyDeleteThank You Shannon for such Great Compliments! ♡ I too, hope that you can find the plastic fencing. It always saddens me when I publish a tutorial with stuff that it readily available where I live, yet not where many of my readers live. Even so, often The Hunt can prove to be just as interesting as the find! :D
Deleteelizabeth
This is so, so clever. I'm convinced you could repurpose just about anything you find. I love how it looks. Thank you for sharing your tips on getting the perfect stone effect. This will help me big time in my build :0)
ReplyDeleteHi Pepper! :D
DeleteI Thank You Very Much for your Lovely Compliments! I was stoked by how authentic the stone arch turned out too and I'm more than happy to share my tips with you , ESPECIALLY since I know that you have a LOT of stonework to look forward to. I LOVE your Gothic manor and hope that this method will translate well with what your doing. :D
elizabeth
The stoney finish on the arch goes so well with your mural print - the photos are really atmospheric. I pop back frequently to your postings for ideas and inspiration - keep them coming!
ReplyDeleteHello Irene! :D
ReplyDeleteThank You for your Compliment AND for popping by again!:D
I enjoy taking photos as much as I enjoy putting the spaces together in fact if I'm honest, probably even a little more, because I dislike construction, but I love to experiment with the finishes and with lighting.
And I'm Well- Pleased that you are enjoying both! :D
elizabeth
I am so glad that you dropped by the Dollhouse blog. I feel rather lonely out there, so it is very nice to get visitors. I am in awe of the work that you do. The arch is amazing and you are an artist.
ReplyDeleteAnd I'm so glad that YOU dropped by Studio E- Thank You Ann! :D
DeleteI believe that both of us enjoy the process of making silk purses from sow's ears, by using ingenuity as well as the various bits and pieces which we find around us.
I am Glad that you have enjoyed this tutorial; and I've certainly enjoyed your comment! :D
elizabeth
Dear Elizabeth, Here we are moored under the stone walls of the fortified town of Bergius, our first stop in France.
ReplyDeleteWe really enjoyed the people and places of Belgium but we have already been away for a month so felt we must keep moving.
Pepper said that she thought you could repurpose anything! Yes, Pepper it is true. It is amazing what potential Elizabeth's eyes notice in the most mundane of items. However her special talent is in encouraging and sharing her work with others not so adept.
Keep on mini-ing and enjoying the process Elizabeth, it is a great tutorial.
Janine
Hi Janine! :D
DeleteI have enjoyed reading of your adventures down river and have received the photos of you and Mr. B on your boat but I was unable to enlarge them, so you appeared as a "virtual miniature" standing on the deck, however the photos sent previously were fine.
I am Very Happy that you've enjoyed the photos of my journey using the plastic fencing, Janine. I think that you and Pepper are attributing to me super-powers which I don't possess, however in this hobby - Illusion is 9/10th of Everything ;))
Looking forward to your next travel installment and thinking of you, Fats and Linda and Norma together at the upcoming SIMP, knowing that you'll be sharing Some Major Mini-fun together!
4 Very Lucky ducks! :D
elizabeth
I am looking forward to having mini time but we will miss you! J.
Delete:D
DeleteWow, it looks great. My son wants a castle dollhouse and for some reason, I thought the DHE was not that expensive, but it was, and so now I may try to make him one. I may try this method for the stones at the top. although I do think that you are an ARTIST and I fear my mixing various colors together will just look like a lot of mud. All the best, Penelope
ReplyDeleteHi Penelope! A castle sounds Very Intriguing! Depending on the age of your son and the scale that you make it in, I would suggest looking up Gamer's channels on youtube, such as "Storm the Castle" etc. They do a lot of fantasy builds which may also prove helpful.
ReplyDeleteMeanwhile, I'm Very Happy that you've enjoyed this tutorial, Thank You Very Much, and if you have any further questions regarding it, please don't hesitate to ask! :D
elizabeth
una maravilla ver la transformación con el paso a paso.
ReplyDeleteUn abrazo
Maite
Thank You Very Much Maite! It makes me Very Happy that you've enjoyed the step by step tutorial and the results of the plastic stone arch! :D
Deleteelizabeth
That looks amazing Elizabeth! You make it look so beautiful!
ReplyDeleteThank You Pei Li! It took me a while before I felt I had the look I was after but now that it's done I am Quite Pleased with the way it looks too! :D
Deleteelizabeth
ok, now im going to the dollar store looking for this, thanks for the great tutorial :)
ReplyDeleteHugs
Marisa
Your Most Welcome Marisa and I am Happy to learn that you'll be investing in some "new fencing" this summer! :D
Deleteelizabeth
Привет Элизабет!
ReplyDeleteЯ люблю ваши фотографии. Вы умеете показать свою работу. Я каждый раз восхищаюсь реальностью сцен. Да и не только этим. Вы очень здорово обыграли четвертую руку. :) :) :) Вы большой мастер текстуры. Я всегда поражаюсь вашей тщательностью и усердием. Вы такая умница! Арка действительно каменная. Она каменная, старая и узнала людских тайн.
Мне очень жаль, что не могу воспользоваться вашим учебником. Такие материалы отсутствуют в моей стране. Я радуюсь, что могу воспользоваться вашими идеями. Это очень ценно. Спасибо большое, Элизабет!
ReplyDeleteHello Tatiana!
Thank You for taking the time to write me your comment and Especially for saying such NICE things about my texturing techniques! ♡
Since I consider you a Master at this craft, I consider your observations to be High Praise Indeed! :D
It saddens me that some of what we have so much of here in the West, is unavailable in other parts of the world, yet we all must use what we DO Have or Can Find and this is what keeps this hobby so interesting, wouldn't you agree? :)
Your own talents for converting the insignificant into tiny works of Art are Bar None, so it gives me Great Pleasure that you have seen the potential in some of the ideas which I've presented and THAT my dear Tatiana- Always makes me Very Happy! :D
elizabeth
Дорогая Элизабет! Я редко посещаю блоги сейчас. Я много времени уделяю реальному саду. Наш сад находится далеко от цивилизации. Там нет интернета. :) :) :) Спасибо за добрые слова в мой адрес. Я люблю ваш блог и читаю его с большим удовольствием.
Delete♡:D
DeleteThe new maiden paper really does work! I am so glad you found a solution you can be proud of!
ReplyDeleteYour creative use of random materials always inspires me to think outside the box and really have fun with the ideas - trial, error or success it's what makes this hobby so rewarding!
I love the way you can see an ordinary embellishment and turn it into a stunning architectural element. The finish you achieved is truly outstanding, and I am so excited to give your tutorial a try!
Eagerly awaiting the next chapter of Villa Leone!
Thanks Very Much and a Huge WECOME HOME again, Jodi! :D
ReplyDeleteI too was relieved to be able to satisfactorily solve the problem of the 3-armed nymph on the wall. Because it is the most visible it would have bothered me every time I looked at it, even if it were covered up.
I am DELIGHTED that you have plans to give this tutorial a tryout Jodi. I have been using the liquid stone on a variety of different objects and continue to experiment. One of the best things I like about it is the way you can alter it to emphasize a particular characteristic of the mix by adding or subtracting the amounts of any of the 4 ingredients.
I hope to have photos featuring some of the different usages I've applied it to, and an overview of the various results.
Meanwhile, work on the Villa continues-
Thank You again for taking the time to comment Jodi. It is Always a Great Pleasure to read them! ♡ :D
elizabeth
Wow! What an amazing transformation! I love the chalk pastel effect and what an ingenious idea! Bravo! *claps*
ReplyDeleteThank You Very Much Sam! ♡
ReplyDeleteI have discovered a new love for using chalk pastels. I have used them on mini foods before but an application on larger projects is a new direction entirely. I shall continue to experiment with it and report any new discoveries. :D
elizabeth
Hi Elizabeth | Studio E Miniatures Team,
ReplyDeleteMy name is Anuj Agarwal. I'm Founder of Feedspot.
I would like to personally congratulate you as your blog Elizabeth | Studio E Miniatures has been selected by our panelist as one of the Top 100 Miniature Blogs on the web.
http://blog.feedspot.com/miniature_blogs/
I personally give you a high-five and want to thank you for your contribution to this world. This is the most comprehensive list of Top 100 Miniature Blogs on the internet and I’m honored to have you as part of this!
Also, you have the honor of displaying the badge on your blog.
Best,
Anuj
Она каменная, старая и узнала людских тайн.
ReplyDeleteแตกใน xxx
I am Delighted that you have enjoyed the making of the stone archway Roth, because it gave me a lot of personal gratification to have been able to achieve what I saw inside my head and then make it work for inside this Villa. :))
Deleteelizabeth