 |
| This posting is about 2 things; a) how I made the tile floors for VILLA LEONE and b) how my staircase turned out. I hope to encourage others by telling you not only what I did wrong but how "mistakes" can often lead you in an entirely new direction which is BETTER than what you'd originally planned. I'll begin this with the TILE FLOORS FYI |
 |
| As I'd mentioned a couple of posts ago, I had been hanging onto this wrapping paper for over a decade. It was showing its age but I thought that a good hot ironing would restore it enough to make it usable. WRONG! After repeated tries, it was still looking nasty and so I had to resort to plan B, which was sheets of tile paper which I had purchased at the craft store. |
 |
| I cut the heavy card to fit the entry hall, and the floor for the dining room and spray- glued the paper to it, smoothed it flat, then sealed it with Mod Podge, which promptly caused it to wrinkle. GRRRRRR! I had to roll a brayer over the tacky floor paper to remove the bubbles and ensure that the tiles dried flat. note to self NEXT TIME USE MOD PODGE AS PAPER ADHESIVE, and NOT Spray glue, because the MOD PODGE sticks better! lesson learned |
 |
| Anyway, this is what the floor looked like when it was completely dry. I was going to leave it like this, but the more I looked at it the less satisfied I was with it, because it lacked texture and dimension. |
 |
| To give the tiles dimension I scored along the lines with a ball stylus and a straight-edged ruler. |
 |
| I aged the floor with a thin wash of brown gel stain and sealed the color with hairspray. |
 |
| To give the tiles texture, I brushed over the entire surface with a slurry mix of drywall compound and water, then wiped it off with a soft cloth. |

 |
| When the floor was dry, I sprayed it with hair spray let that dry and then used a light application of liquid floor polish to give it a soft shine. |

 |
| This close up of the tiles shows you the surface texture. I was pretty happy with how the floors turned out. And although they were not what I had originally intended, I liked Plan B BETTER than Plan A *** NEXT UP- THE STAIRCASE It is no secret that I HATE making stairs because it involves MATH and I have never been good at MATH. I made this staircase because I had to, not because I wanted to. I stressed out about it for several months. I did a little bit, got stuck, left them and tried again later. This process repeated itself several times over the course of many weeks and this is what they finally ended up as... |
 |
| I had to bulk up the staircase more than what they are in the Willowcrest kit. The space for them over the front door is tight. Later, the door trim is going to have to be cut to allow for that stair return. ugggg MORE MATH :( But I'm getting ahead of myself again, so let me back up. Fatima gave me some plaster embellishments that she had in her stash which she thought I might be able to use. |
 | ||||||
| There were 2 sheets of these. After I had built the staircase, I cut these embellishments apart and glued them to the surface of the stairs. You can see in the photo below the carvings next to the treads and under the stair return, but originally I had GONE CRAZY and glued the paster bits all over the entire flat surface of the support, which I'd painted, sealed and painted again. By the time I'd finished it looked cheap and tacky. So- I pulled off most of the embellishments to try and tone it down and of course it lifted off some of the layers of drywall plaster and made the surface irregular and- INTERESTING! WHO KNEW? I LOVED IT! :D
I had accidentally made
OLD STONE
 
|


 |
| Afterwards I slipped the staircase back into its location to gage the effect and... I LIKED IT! but when I hooked up the chandelier I'd made I changed my mind |
 |
| The incandescent light made the brown stone look PINK! (back to the drawing board ) |
 |
| I took them out and gave the unit a thin wash of water mixed with drywall patch, and a tiny drop of white acrylic paint. I brushed the mix onto the surfaces and wiped it right off again spray sealed it, tried it in situ and repeated this process again and again until the staircase looked right whether the lights were on or off. Then I built the dividing wall. |
 |
 |
| I had already run out of the wall paper I had used for the hallways, so after much trying to match it and failing, I took a lesson from the pages of my friend Janine's real life house. Janine has a HUGE WALL PAINTING of the Girl with the Pearl Earring on her bathroom wall, it is Stunning and the visual impact is Immediate! I used the same principal by using a trompe l'oeil print for the end panel of the staircase. THIS TIME I used MOD PODGE to adhere the print to the wall board. When it was dry, I sealed it with MOD PODGE and when that was dry I gave it a wash with the same slurry of drywall compound mixed with water to hopefully give the print the look of fresco, which I sealed with more hair spray. |

 |
| It doesn't match the green walls but it does compliment the staircase. Above is with the light from the hall chandelier warming up the print and below is with the light off. |

Especially in miniatures.
 |
| So this is where I'll have to leave you. I've yet to decide what to do about a handrail. Janine says I don't need one, my daughter Sam agrees, but I'm not convinced. Because of the irregular steps, a normal handrail with balustrades won't work, which is why I am considering running one attached to the wall running in front of the window. This problem will have to be resolved one way or the other before I glue the staircase into place. ahhh me more math on the horizon... :( I think I need a coffee ciao ciao!:D |
elizabeth
Next post- LIGHTING and DINING ROOM update
.jpg)


Well if you think that those stairs had any flaws in them, then I'm Minnie Mouse! They look amazing. And they floor turned out great. The hairspray finish....great idea. I'm excited to see the progress!!!
ReplyDeleteHey there Minnie! :D
ReplyDeleteThank you for your cute compliment Kat, but if you look closely at the stair risers you will see that they are not all of the same height. Part of this is the fault of the kit but also my fault for not noticing it until it was too late to amend.
There are other flaws too numerous to mention but it is what it is...
and YES hair spray is a great fixative and CHEAP at the dollar store too! :D
elizabeth
You are incredible and fearless! Your combinations of finishes are genius and only you can think of them and be brave enough to try them. I think I agree with the handrail on the wall. A thin black iron one. And the floor tiles turned out perfectly. You can blame the difference in sizes of stair risers on the old Venetian stonemasons who came back to work after a few too many Chiantis!
ReplyDeleteCheers, Linda
Thank you Linda! :D I was thinking EXACTLY the same thing - a thin iron handrail along the wall.
DeleteI am Delighted that you like the way the floors turned out AND with your explanation for the irregular stairs - to blame it on the Chiantis- Love It! :D
elizabeth
I really enjoy your blog! Your creative processes are so fun and inspiring. The stylus on the floor tiles looks perfect, great idea :) Awesome how you stumbles upon old stone. And the print looks great on the wall. I love watching you turn a problem into an even better idea---
ReplyDeleteThank You Very Much for enjoying my blog Linda! That in itself makes me feel Happy! :D
DeleteAnd also that you like the way the tile floor and stone stairs and the print turned out. YAY!!!! This project has me UP and DOWN in equal measures, because for every one solution I find- 2 more Problems crop up. Even so, when it finally does work - IT WORKS! :D
elizabeth
I am loving the floors and the staircase! Your Villa Leone is coming along beautifully and I love it! :) Great job!!
ReplyDeleteThank You Pei Li! :D I am feeling relieved that the most challenging part of the staircase is behind me now, so that I can concentrate more on the dining room of this Villa. Thank you Very Much for your compliment which I appreciate Very Much! :D
ReplyDeleteelizabeth
What a treat to see that you'd posted tonight! You always find a way to bring me right into the theme of your project! If I were zapped into the foyer I would know right away that I was in Venice! The floors are so lovely and look just like you laid each tile, and even with the different sized riser height your stairs are so charming! There is so much detail to see everywhere that you'd never notice the flaw unless it was pointed out! It's so exciting to see your projects develop, and I can't wait until the next post!
ReplyDeleteThank You Very Much Jodi! :D One of my consolations is that once the walls are all up, the staircase will be mostly hidden except from certain angles. Even so, I need them to look functional because they are still part of the house and as you've said, they should indicate where you are as soon as you cross the threshold, which is why it makes me Very Happy that this entrance hall immediately says "Venice" to you! :D
ReplyDeleteelizabeth
Amazing! You did so wonderful changes, everything is just gorgeous!
ReplyDeleteHi Ingi! Thank You Very Much for your lovely compliment, and I am So Glad that you have enjoyed this posting!
DeleteBy the way, I have just joined your blog and have been Marveling at your ingenious solutions for your Greenleaf Lily and I am looking forward to seeing more and one day trying your Laundry rack tutorial- Loved that! :D
elizabeth
Bonjour Elizabeth, c'est un plaisir de lire la façon dont vous surpassez les difficultés. Le sol est parfait, la patine des murs très réaliste ainsi que la hauteur des marches inégale qui donne du charme à la construction mais ce qui n’impressionne le plus chez vous c'est la beauté et la recherche des détails; le trompe-l’œil, la soupière en argent, la très belle table, les lunettes solaires et la sac qui font si "dolce vita",...
ReplyDelete
DeleteTHank You Jean-Claude for such a Beautiful compliment!
I Love accessories and feel like they are really the final word when it comes to telling a story about the occupant. Always my goal is to make sure that the spaces reflect a "good life" in progress, and so your specific observations are Much Appreciated! :D
elizabeth
Stunning!
ReplyDeleteThank You Megan for your Compliment! :D
DeleteI am hoping that by the time I am truly finished with the hallway and stairs that I will be even More satisfied with it than I am now, because each new thing I do in one area, radically changes everything else around it.
elizabeth
Hi Elizabeth! Well, what can I add to all comments above? Alot is already said, but I have to tell you that I love the way you always find your solutions for problems. It's a bit the same way that I also solve things ;). I think the stairs you created look awesome, they fit beautifully in your Villa Leone. The trompe-l'oeil is a great find, it fit wonderful. But using hairspray......does it go together with glue and won't it damage the materials you use...?? I have totally no experience in using hairspray, so.....
ReplyDeleteLastly, I love the combination of colors, they look absolutely suitable for this house/Villa.
Wishing you a great weekend and I hope finding lots of solutions for new problems in your miniature work. Because that way we can read and learn again from your fantastic blog :D!
Warm hugs, Ilona
Hi Ilona! I always enjoy reading your comments and I Thank You Very Much for this one. :D
DeleteI used the hairspray as a light weight fixative but I also use a matte clear acrylic sealer interchangeably. The hairspray is lighter and smells better whilst the acrylic spray is heavier and has the fumes to prove it!;) But both worked.
By the way, many people use hairspray to set the folds in their drapes after they pin them into position so that's another good reason to have it in your toolbox.
I was happy to find the trompe l'oeil print and sealing the surface first with the MOD PODGE meant that when I used the wet slurry it didn't damage the paper underneath at all- Whew!
elizabeth :D
I am always amazed how you managed to make things look better and better because you never give up and find solutions. Thank you for explaining everything. The result is fantastic.
ReplyDeleteGeneviève
Hello Genevieve!:D
DeleteAs much as I enjoy finding the solutions, I dislike having the problems which are usually presented compounded; thus the solutions come only in small increments. Even so, in this case they were worth waiting for, so Thank You Very Much for not only enjoying the photo-
but also for enjoying the story behind it all! :D
elizabeth
A splendid job and result! Thank you Elzabeth for all these useful explanations
ReplyDeleteI admire everything, the staircase and its pinkish tint to the light, the remarkable fresco
The whole is stunning, a big bravo
hugs
Many Thanks to you Claude for your lovely comment which a Really Appreciate! :D
DeleteIt was a series of happy accidents that turned out Better than I had planned and it makes me feel Very Happy that so many are enjoying the end results! :D
elizabeth
Superbes,le sol et l'escalier !!!
ReplyDeleteElizabeth tu es ingénieuse, tu arrives à résoudre les problèmes que tu rencontres. Cette maison me séduit de plus en plus❤
Bonne continuation !
Thank You Very Much Joce! :D
DeleteI fluctuate between LOVE and HATE when it comes to my relationship with this house, so your using the word "SEDUCED" now has me wondering if this house is simply trying to Tease me along too-
every step of the way! ;P
elizabeth
Hi Elizabeth! It always amazes me, how creative solutions and much patience you have with your miniature house. The scene is stunning :)
ReplyDeleteThank You Very Much Sirkka! :D I need both the "patience and creative solutions" because of the amount of unusual alterations done to this mass produced kit.
DeleteI have to constantly remind myself to Be Patient when I am feeling overwhelmed by the unexpected.
The solutions WILL come - eventually :D
elizabeth
I think it's amazing! You have such a talent! The right colours, textures, placement, accessories (that silver bowl!!).
ReplyDeleteI love your stairs and the trompe l'oeil.
The way you turned paper in realistic tiles is really smart. Thank you for sharing your secrets with us!
Hugs,
Véronique
Hi Veronique! I am Delighted that you like the "final" results Thank You! "D
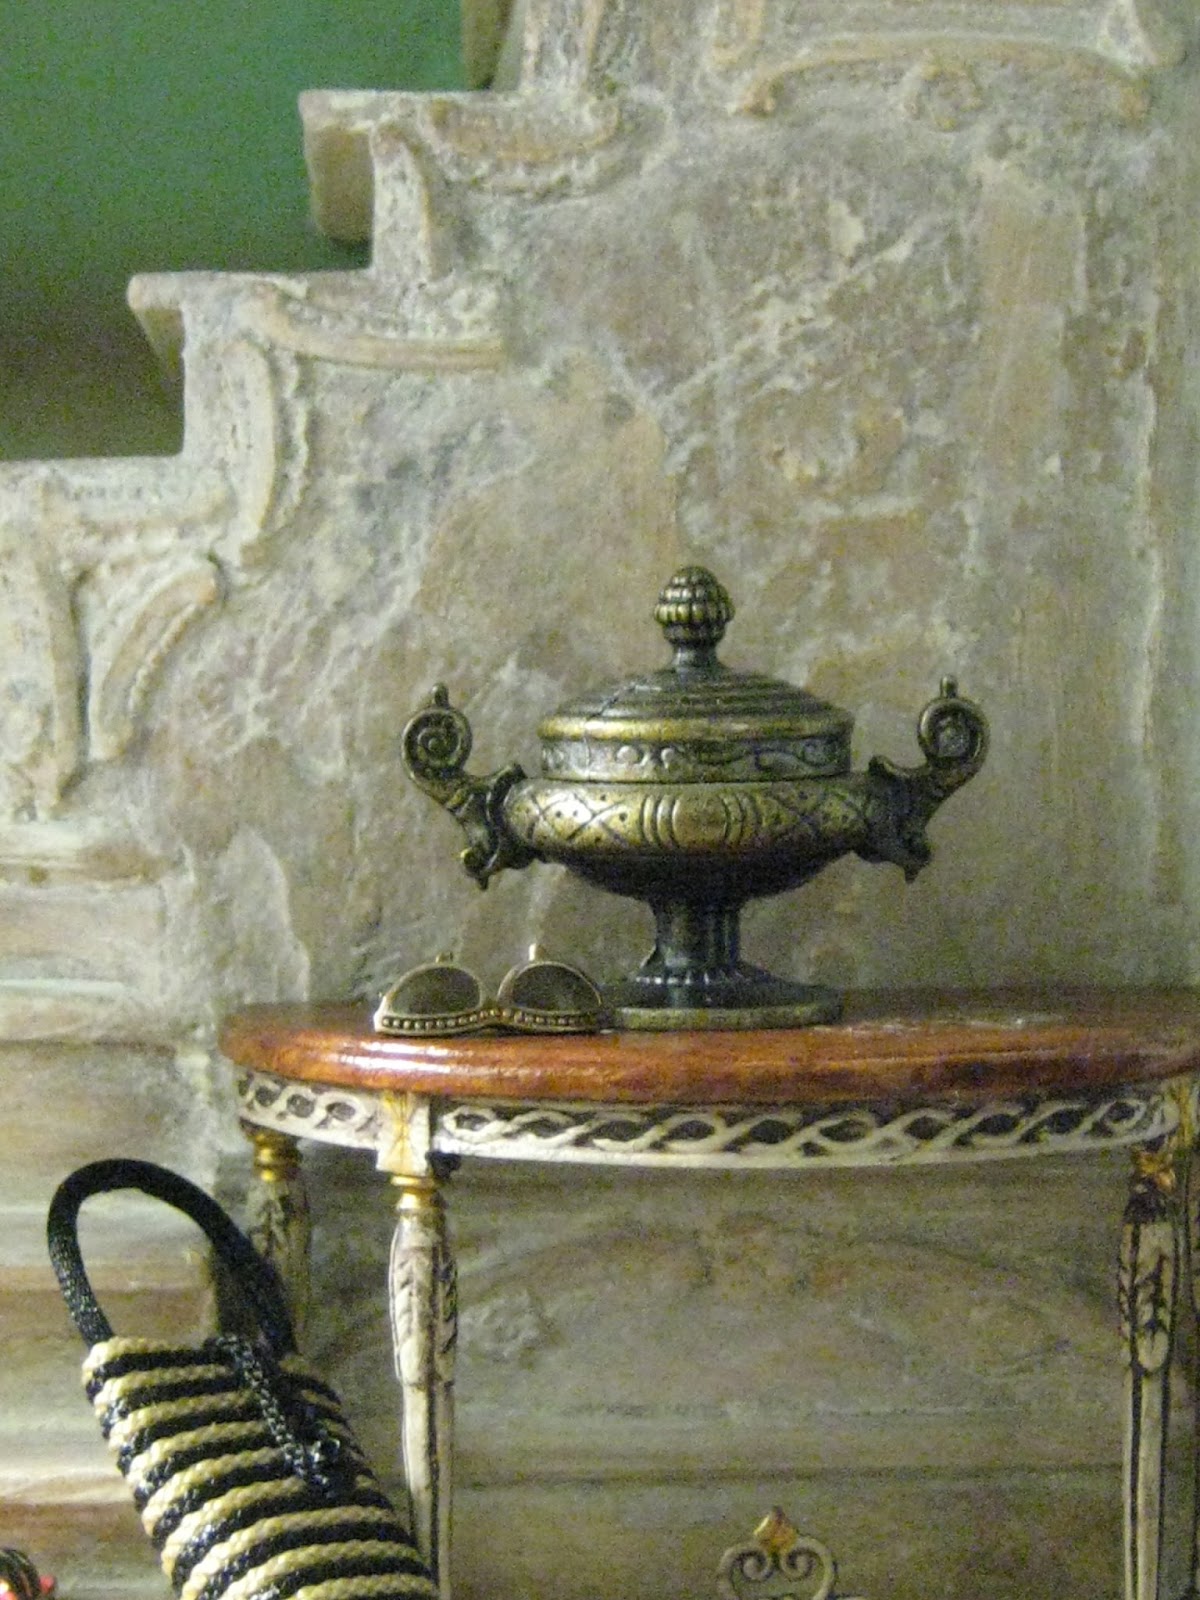
ReplyDeleteThe "silver bowl" is actually a brass finial which I found screwed onto the top of a battered old clock case found at the thrift store.
Easy Peasy! :D
elizabeth
I love all the effects and textures, Elizabeth, a fabulous job! Mini hugs!❤️
ReplyDeleteThank You Very Much Monica!
Deleteand I am a BIG fan of textures too! :D
elizabeth
Se lo difíci que es una escalera de 3 tramos y veo que te han quedado perfectas. El envejecido en piedra genial y me encanta como queda el freco. Impresionate!!!!
ReplyDeleteThank You for your comment Isabel!
DeleteThe geometry of the staircase was already predetermined by the kit. What threw me off was trying to widen them and work out the angles of the returns. My measurements were off, so having the stone surface become the feature rather than the steps themselves was a GREAT relief to me, and I am Very Happy you like it and the fresco too! :D
elizabeth
Hi Elizabeth, I love how you "accidentally" make stuff. It is also very refreshing to see how you go about your creative processes. It is very inspiring and humbling.
ReplyDeleteLooks great as always.
Hugs,
Sam
Hi Sam!!! :D
DeleteThank You for your cute comment Sam; it gave me a bit of a chuckle when I read it because I think that most of what I publish on this blog is related to my "accidents", both the Good and the Bad- and then the Good again! ;P
elizabeth
Looking great Elizabeth! Really really love the staircase stone effect. I love how organic this house is, how it is just evolving as you go. And I admire your braveness too, trying so many different options, placement of fittings and finishes. It's so inspiring.
ReplyDeleteThank You Very Much Shannon! :D
DeleteI LOVE that idea of this house being "organic", because I would agree with you about that!
It would seem that every plan I think is going to work, needs major modifications along the way and becomes something unexpectedly different - right before my eyes.
You would think that I would be used to it by now,
but Surprise Surprise - I'm not. What I have learned is to go with the flow when it happens - because it usually rights itself in the end. :D
elizabeth
Hi, Elizabeth - I've been waiting for an update on Villa Leone, and this post was definitely worth the wait! You've made great progress. The tile floor is beautiful, and what a great idea to define the tiles with the stylus. After texturing and aging, the tiles look amazingly real. Bravo! I can hardly begin to tell you how much I love that staircase with its lovely old stone. The embellishments add that perfect finishing touch. I know how difficult it is to build those treads and risers and twists and turns and supports! Then to create perfection (in my eyes at least) and to have the lighting change it all! My heart sank! But you made a grand recovery using all those interesting mixes of materials. The "fresco" is wonderful. I love that so many of what you consider mistakes actually lead to something better than the original plan. Good luck with all that math!
ReplyDeleteMarjorie
Hi Marjorie! :D
DeleteProblems with my recently "repaired" computer meant new problems for me trying to relearn it, and if it hadn't been for my daughter's coming to my rescue, this posting would have been delayed even further, because I am helpless without her assistance.
Having said all of that, there wasn't much to show or tell regarding Villa Leone until a sudden flurry of JUST DO IT hit me few weeks ago and here are the results. I am Very Pleased that you like the progress thus far which makes me Glad- Thank You! :D
And although I know that I will never be good at making stairs, I do LOVE making stone and so I feel that I am accidentally learning a lot with this house.
By the way, I was just visiting your blog and seeing the progress which you have made on Your Italian Villa. My Villa's in the city and yours is in the country yet both of us struggling with some of the same issues and solving them in entirely different ways which continues to fascinate me- Don't ya just LOVE this Hobby?!?
elizabeth:D
Hi Elizabeth, So happy you have posted and shared your adventures of Leone with blogland. I know you have more photos!!!!! Hope you will show them soon. I was very impressed with the progress of the stairs and how the accidental stone stairwell came together. Your finishes are so amazing and you are fearless in the way you add the layers of texture.
ReplyDeleteThe silver bowl filial is great - only you would recognize it as perfect for miniatures.
Chaio Janine
Hi Janine!!!:D
DeleteYes I DO have more photos but I felt I needed to break them up into more digestible segments. ;P
Thank You Very Much my friend, for your always honest critiques, it was good to get you and your hubby's feedback on the stairs. :D
I always find it INTERESTING though, when people use the word "Fearless" when it comes to my work because I don't think that way about myself.
I only take chances when my back is up against the wall because something which I thought would work- didn't, and I am too lazy to start all over again. Yet trying to save myself that extra effort, I would classify more as "Desperation" although I would readily agree that "Fearless" sounds MUCH better! ;P
elizabeth
p.s. That finial was worth its weight in gold, AND I was also able to talk the store down on price because the clock was broken! So I'm pleased as punch that I was able to find a place to actually use it. :D
Wow!!! Ahhh, I just LOVE this signs of a bit decay, it is adding life to this magical little world. And dreams... of old fairytales.
ReplyDeleteI am even so crazy about it, I just revealed the stones benath our wall in the hallway.
Structure...
Once again a wonderful post, Elisabetz, thank you so much for inspiring :)) Happy November-Greetings from Méa
Greetings Mea and Thank You Very Much!:D
DeleteI'm too am a BIG fan of age and decay and trying to find that middle ground of "just enough" can often be challenging for me, which is one of the reasons I have to re-do stuff over and over again, but I enjoyed reading your description as "old fairytales" I hadn't thought of it that way before.
I always find it interesting when I'm reading comments about how and what each person sees in each photo and how it makes them feel. I know that I was feeling excited when I visited your page and saw how you revealed the stone under the plaster in your Real Life kitchen and how etherial it looks- WOW, now that took some nerve to do!!! :D
elizabeth
Just admire how you keep going and going. The results are beautiful!! Greetings
ReplyDeleteGreetings Kleine Vingers and Thank you for your comment which I Greatly Appreciate! :D
DeleteI am into the project too deep to quit Now and so all I CAN do, is to keep going and going!
Slow and Steady wins the race.... :D
elizabeth
Да! Удивительное сочетание прошлых веков и легкий штрих современной жизни. Старинный особняк с многолетней историей, а внутри есть жизнь. Яркая, ослепительная жемчужина освещает стены огромной старой устрицей. Сама жизнь с легким шепотом скользит по старинным стенам и лестнице.
ReplyDeleteВы большой талант, леди Элизабет! Спасибо за чудесные чувства!
Татьяна
My dear Tatiana!
DeleteWhenever I read your comments it is as if I am reading Poetic Prose; truly you have a Marvelous way with words.
An example is this lovely sentence "Life itself with a slight whisper slides on the ancient walls and stairs."
I can't stop smiling-
Thank You! :D
elizabeth
Ваше творчество является поэзией! Но мне также очень приятно читать ваш комментарий. Спасибо!
DeleteТатьяна
:))
DeleteI too always have admired how you persevere until you persuade materials and designs to go your way. The stairs looks great! I love the floor and how you used the stylus to mark it. Another very successful project!!! ;-)
ReplyDeleteHello Catherine! :D
DeleteI think that you have given me a new phrase to use regarding my work- "Persuading materials and designs to go my way"!
Thank You Catherine- I LOVE IT!!! :D
elizabeth
LOVE the texture and colour on the stairs. What a lucky accident that was!
ReplyDeleteThe oversized mural is a great idea and looks fantastic by the stairs. Nice to have such friends to inspire you! As for the handrail, I would consider putting one on the wall, maybe only on the wall with the window. One of my favorite houses in Amsterdam has a staircase cutting across the window, so don't let a little window stop you from putting up a handrail ;-)
Hi Josje! :D
ReplyDeleteThank you Very Much for mentioning the color and the texture of the stairs, because although the texture was a fluke (and therefore easy), the color wasn't and I really struggled with it trying to get it to look right.
And you are so RIGHT about Janine. She and I have been real friends since the 90's although we've known each other for even longer than that, and she and her husband her "Trusty man" are both precious to me AS WELL AS inspiring! :D
I am GLAD though, that you agree with me regarding the handrail along the window wall. I have recently seen this done in real life which was how I realized that it could be done but it is always Encouraging to have an unusual idea, supported! :D
elizabeth
Hi Elizabeth!
ReplyDeleteI put myself right there next to the stairs. I think it came out great. It is so funny how your mistakes were leading you to an even better outcome!
As far as your stairs being uneven didn't know because it is an old building there would be "settling?" lol Are you going to put in a fireplace because it is feeling a bit drafty in this old building! Oh, wait...I am not really there...
I meant to say "didn't YOU know the building is old and settling?" LOL
ReplyDeleteThank YouVery Much Grandmommy! :D
ReplyDeleteYou are quite right about Venetian buildings which are NOTORIOUS for settling AND leaning, so that could be a good explanation for the irregularity of the stairs, however I liked Linda's explanation of the stonemasons having a few too many Chiantis, we can all relate to that can't we ;P
But it is funny that you should be asking about a fireplace because YES! I am in the process of building one as we speak, because I agree that damp, drafty old buildings NEED SOME HEAT!
The next question is: What should it look like?
that's a thing that makes me go hmmmm????
elizabeth
Not only do I love watching your projects take shape, but also the ingenious ways you solve problems along the way. I absolutely love the effect you got on the wall. The distressed plaster looks fantastic. Thank you for sharing your trials and tribulations with us all - it's inspiring =0)
ReplyDeleteThank You Pepper for your Lovely Comment! :D
DeleteOne of the positive things about blogging is that you get to leave out all of the BAD stuff to focus on the GOOD! Between each photo was a lapse of days; even weeks of negative results. Condensing it down to a readable post kinda glosses over the trials and tribulations and all the many Mistakes that ended up in the Trash.
The mural for example, is actually a 2nd one over the first. I used the wrong method of gluing which ruined my first attempt, which meant that I had to start all over again.
The second time it worked -Praise GOD- and then I was able to proceed with the distressed plaster from there. Trying to make it look less like a print and more like a painting was my final objective and I am quite Delighted that you believe I've succeeded. :D
elizabeth
Usually I would join your club of math haters anonymous... but in this special case even math is easy. Let me help you out - it goes like this: Elizabeth x Unforeseen Happenings² + creativity + (work x time) = Stunning Results!!! It is incredible how some mishap helped to give your stairs just the right aged look. And it's impressive what difference a little embossing made on these tiles - a lot of work but really worth it. Not to mention how I admire all your different coats of all sorts of texture giving it just the right look in the end... you are one tough lady! And I must say your show-and-tell-qualities are outstanding, it's always fun, interesting and educative to follow your progress. Speaking about progress... I hope we will see more of Villa Leone very soon!
ReplyDeleteHugs
Birgit
DeleteThank YOu Birgit for your Math Equation Comment, which gave me quite a good chuckle as I read it! :D
How I wish that YOU had been my high school math teacher back in the day, because your method of explaining a compound problem, is Much More FUN and to my liking! :D
Embossing the tiles was a lot easier than having to cut them all apart and then re-laying them crooked, which was bound to happen given my previous track record i.e. the kitchen floor of Green Dolphin Street.
Adding the layers of texturing was not only fun but really easy.
The difficult part for me other than the math, is knowing when to
S T O P !
But as for progress in other parts of Villa Leone- YES! you will be seeing more of it VERY SOON;
and that's a promise ;P
elizabeth
Love how it looks! Especially that gorgeous wall mural.
ReplyDeleteI don't think you need a railing for the first couple of steps but after the turn and upwards towards the second floor a handrail would be a good idea. We want everyone to stay safe right?
I've never used Modge Podge... I'm going to keep this in mind.
Thank You Sheila and I YES!, I agree that a handrail IS necessary for the safety of the occupants! I had actually been contemplating running down across the mural wall as well, until I read Josje's comment. I am Very Glad to know that you second that motion of the window wall and up, because that is DO-able! :D
ReplyDeleteelizabeth
p.s. Mod Podge acts as a glue as well as a sealer. The thing that you have to do is make sure that you remove all of the air bubbles when you are using it as a glue. I used a sample melamine tile which I got free from the Home Depot as a scraper, or you can use a brayer. You must let it completely dry before you use it as a sealer; trust me- I learned that lesson the Hard Way.
Dear Elizabeth, I LOVE the "stone" stairs!!! You never fail to amaze me with your creative use of materials that "accidentally" make the Perfect finish!!! LOL! But I must admit that I think there has to be a handrail.... all stairs need them unless it is an old and drafty Castle Tower stair! LOL! It would always bug you not to have one.... that is why you are not convinced to skip this step... and I am afraid that it will have to be on the outer side or it will not be convincing! (All of this is my Humble opinion... and you can disregard it entirely!):) I see a wrought iron banister.... ornate and baroque.... made from some sort of filigree or mesh ..... and a simple twisted brass handrail.... (from card stock paper... many layered and "treated" with your magical glues and potions....!) And the one consolation is that the rail will be "shorter" if you make it run up the outside of the stairs! As for the floor... I am sorry the old paper gave you such a difficult time! But in the end you have created a beautiful and appropriate marble tile floor! But really, the piece de resistance is that mural on the wall!!! You know how much I love decorated walls.... even in places they are hardly visible.... but you will catch glimpses of it and you will know it is there! It makes such a fantastic "statement" of faded grandeur.... Wow! As usual, I am bowled over by your work, and I can't wait for more!!! :)
ReplyDeleteHi Betsy!:D
ReplyDeleteThank You for your very Insightful Comment, and you are absolutely Right! - Not having a handrail would BUG ME! :(
And just as you have outlined, my original DESIRE was to have a whorly-sworly wrought iron banister.
I would have LOVED that, but my staircase is -ODD; the risers unequal. I don't know if I could find the room to install the banisters nor a way to keep the oddness less noticeable, which is why I am considering the handrail along the window wall.
I shall certainly take your recommendation to TRY to see what I looks best before I actually do it because as things stand, nothing is WRITTEN IN STONE! (hahaha)
I am Very Happy that you like the wall mural Betsy, and although it is tucked out of sight when viewed from the back, it can still be seen from the front door and from the hall window so the effect is not wasted.
And YES I HAVE, been Greatly Influenced by you in seeing the Beauty of not only your decorated walls, but also your decorated ceilings.
So stay tuned Betsy for even MORE of the "DAYDREAMER FACTOR" soon to be seen inside the drafty corridors of Villa Leone! ;D
elizabeth
I am impressed with your floor technique. I will have to give that a try! The Entry hall is looking great. Keep up the good work.
ReplyDeleteThank You Troy! :D
DeleteThe floor tiles were easier and faster than laying them individually but make sure that the paper is glued down with MOD PODGE first.
I've tried a number of different adhesives to adhere the scrapbook paper to matt board and the Mod Podge has worked out to be the BEST because it stays STUCK! :D
elizabeth
You are simply fearless! I am so terrified of making mistakes I plan to within an inch of my life - your mistakes aren't really that, they are simply your creative processes at work. I can't say anything other than the end result is just perfection. As for a stair rail - it could take a really very thin plain old cast iron one Some of the very plain ones here are nice: http://www.homestylecentral.com/wrought-iron-stair-railing-ideas/
ReplyDeleteThank You Marilyn not only for your Lovely comment but also for providing such an informative link! :D
ReplyDeleteThe attached photos show a lot of options which I am going to seriously consider, but it's Extremely helpful to see the vast variety of different styles of iron railings, effectively applied in so many different ways.
Many Many Thanks Em! :D
elizabeth
Hi Elizabeth! It was hard work, and the result is great! Indeed, this is an old stone and it is clear that these stairs enjoyed many generations! Congratulations on a good result and I wish you a lot of inspiration!
ReplyDeleteI have a small question. Hairspray is not sticky?
Thank You Yuliya, for your lovely comment and for your question regarding the hairspray! The hairspray is a light lacquer that is only sticky whilst it is wet, as soon as it dries it will gives a light seal to the surface just as it would if it were sprayed on your hair. There is almost no shine to it so the surface remains flat and non reflective. If more shine is desired then an acrylic spray sealant can also be used, and indeed I used both interchangeably on the stairs but hairspray only when it came to the mural. :D
ReplyDeleteelizabeth
Thank you, Elizabeth! Your answer is very clear. I'm always afraid wastes hairspray, now necessarily try.
DeleteNo one could ever tell that any miniatures give you trouble. Your work is so impeccable. You always end up with the most remarkable designs. I love the finish on the stairs!
ReplyDeletehugs♥,
Caroline
Hi Caroline! :D It feels good to have you say so, but I am sending back the same compliment to you! :D
DeleteAnd Thank You for enjoying my un-finished "finished" stairs as there is still much more work to do on them yet! ♥
elizabeth
Hi Elizabeth
ReplyDeleteI love the new look of the stairs and the tile :) thank you for sharing how you worked your magic on them. Im back to blogger now since the Ski Country convention is over (I work in retail and the owner bought a bottle distribution company so since Im the admin/sales associate/girl friday I get to plan events and send out news letters I feel like Terry Garr sometimes but enough about me)
I cant wait to see how this little project turns out, you do what I want to do but I dont know how..does that make sense? happy thanksgiving
hugs
Marisa :)
back to working on the joes, I have one more thing to make and then Im done
Hi Marisa! I am always Delighted to hear from you! Glad to learn that you have a job that sounds interesting but that you also seem to really enjoy! :D
ReplyDeleteThanks Very Much for your comment, and I wish you a Happy Thanksgiving Too! :D
GO JOE!
elizabeth
Absolutely loving the stairs (chianti induced error and all), especially the accidental old stone. Thanks for the all tips on achieving the texture on the floor and the trompe l'oeil.
ReplyDeleteHi Norma! :D
ReplyDeleteI think that Linda hit the nail on the head with that Chianti Observation, and I have taken it to heart and adopted it!! :D
and you are Most Welcome to the tips on the stairs and the trompe l'oeil. Just remember to let the Mod Podge dry thoroughly between applications otherwise you will be busy smoothing out the wrinkles over and over again too - JUST LIKE ME! :((
elizabeth ;P
Well...I really need to take a break from real work! Missed this blog posting until you mentioned it tonight! What a treat! The work you have done took me back to the home I was born in and lived for the first 11 years of my life. The stone work, so real! Where oh where did you find that amazing light fixture? Couldn't be better! What marvelous mind you have which gives you the vision to create how you do! Truly wonderful! Can't wait to see it. Belissimo!
ReplyDeleteCiao!
Hi Fats!
ReplyDeleteWhat you have said is music to my ears!
It's been a challenge and a guessing game as I've been constructing this house as to whether or not I'm communicating the right feel or not, so How Marvelous that you are personally able to equate this mini Villa to a similar to one you lived in as a child,- HOORAY!!!! :D
I see now that I am going to need to pick your brain for more details regarding some of the other rooms, so you'd better get ready for that, Fats. ;P
But as to the light fixture, I made it and hope to have another post outline the procedure in an up coming blog, but Thank You, I'm VERY HAPPY that you like it too!
elizabeth
p.s. WELCOME HOME again- missed you!!!:D
Hello donna Elizabeth,
ReplyDeleteHow wonderful is that floor. I am glad your plan A did not work out because plan B turned out so amazingly well! The scoring between the tiles and the drywall compound "wash" really did wonders to an already nice floor, but the end result is fantastic. Che bello!
As for the old stone effect, it looks perfect. It has so much character and charm and look perfect for the setting. The trompe l'oeil print is the perfect touch for the divider wall. What a wonderful villa this will be. You have the style down 100%
Big hug
Giac
Buongiorno Signor Giac!
ReplyDeleteThat floor was kinda fun and it turned out pretty good for paper so Thank You for your approval! :D
I have found that using a slurry for adding age, toning down color and to a bit of light texture has become indispensable for this particular project, and I use it often.
I lucked out on the old stone for the staircase. That goof made me so Happy that I can even overlook the odd angles and irregular treads and still remain "content", and that goes for the mural too.
You know what Giac? I have made MORE false starts and Big mistakes with this house than any of the others, but despite that fact, it is actually growing on me day by day and I think that perhaps I AM going to like it in the end.
A Big Hug Back :D
elizabeth