The following post is a quick update on what I have been making for my Venetian doll's house -
VILLA LEONE
PLANTS:
I underplanted the orange geraniums with ivy leaves from
I also made some additional plants for the patio. The herb plant
(basil?)below started life as a micro hosta plant kit intended for model railroad landscaping.

LAMPS:


 Christine uses this method to "solder" her plastic horse models together when changing their poses. It can be sanded and stained and is as hard as rock! LOVE IT!!!

IRON:

STONE:
elizabeth
VILLA LEONE
 |
It's July already and I have hardly spent any time in my Real Life garden. I have a BIG garden which regularly requires LOTS of my time and attention, however during the last 3 weeks of June, instead of being outside grooming it and pulling weeds, I was happily indoors making paper plants for Villa Leone.
Most of the plants were made with kits which I already had on hand.
In the photo above I made the orange geraniums for the wall planters, using the Fabulous kits from
TEMPLEWOOD MINIATURES
Most of the plants were made with kits which I already had on hand.
In the photo above I made the orange geraniums for the wall planters, using the Fabulous kits from
TEMPLEWOOD MINIATURES
http://fineflowersinminiature.com/epages/1f2f454e-ce84-48cc-9680-531b5aea95ac.sf/en_GB/?ObjectPath=/Shops/1f2f454e-ce84-48cc-9680-531b5aea95ac/Categories/1d0d2cade49078f9d43bbdfab67abbc0/11
I underplanted the orange geraniums with ivy leaves from
A LITTLE MORE IN MINIATURE
http://www.alittlemoreinminis.com/lastCutSheets.asp
The flower kits I bought were white but I painted them in different shades and tints of orange,( after they'd been assembled), using watercolors, inks and felt- tipped pens. The printed leaves are already beautifully shaped and authentically colored, with a good supply of materials in each kit.
 |
 |
 |
| A closer look at the plants. I included 3 of my own fading blooms into the mix using the Marigold Flower Soft material. I LOVED assembling these flower kits and I especially like the look of the leaves, as well as the ease of removing both blossoms and foliage from the laser cut master sheet. |
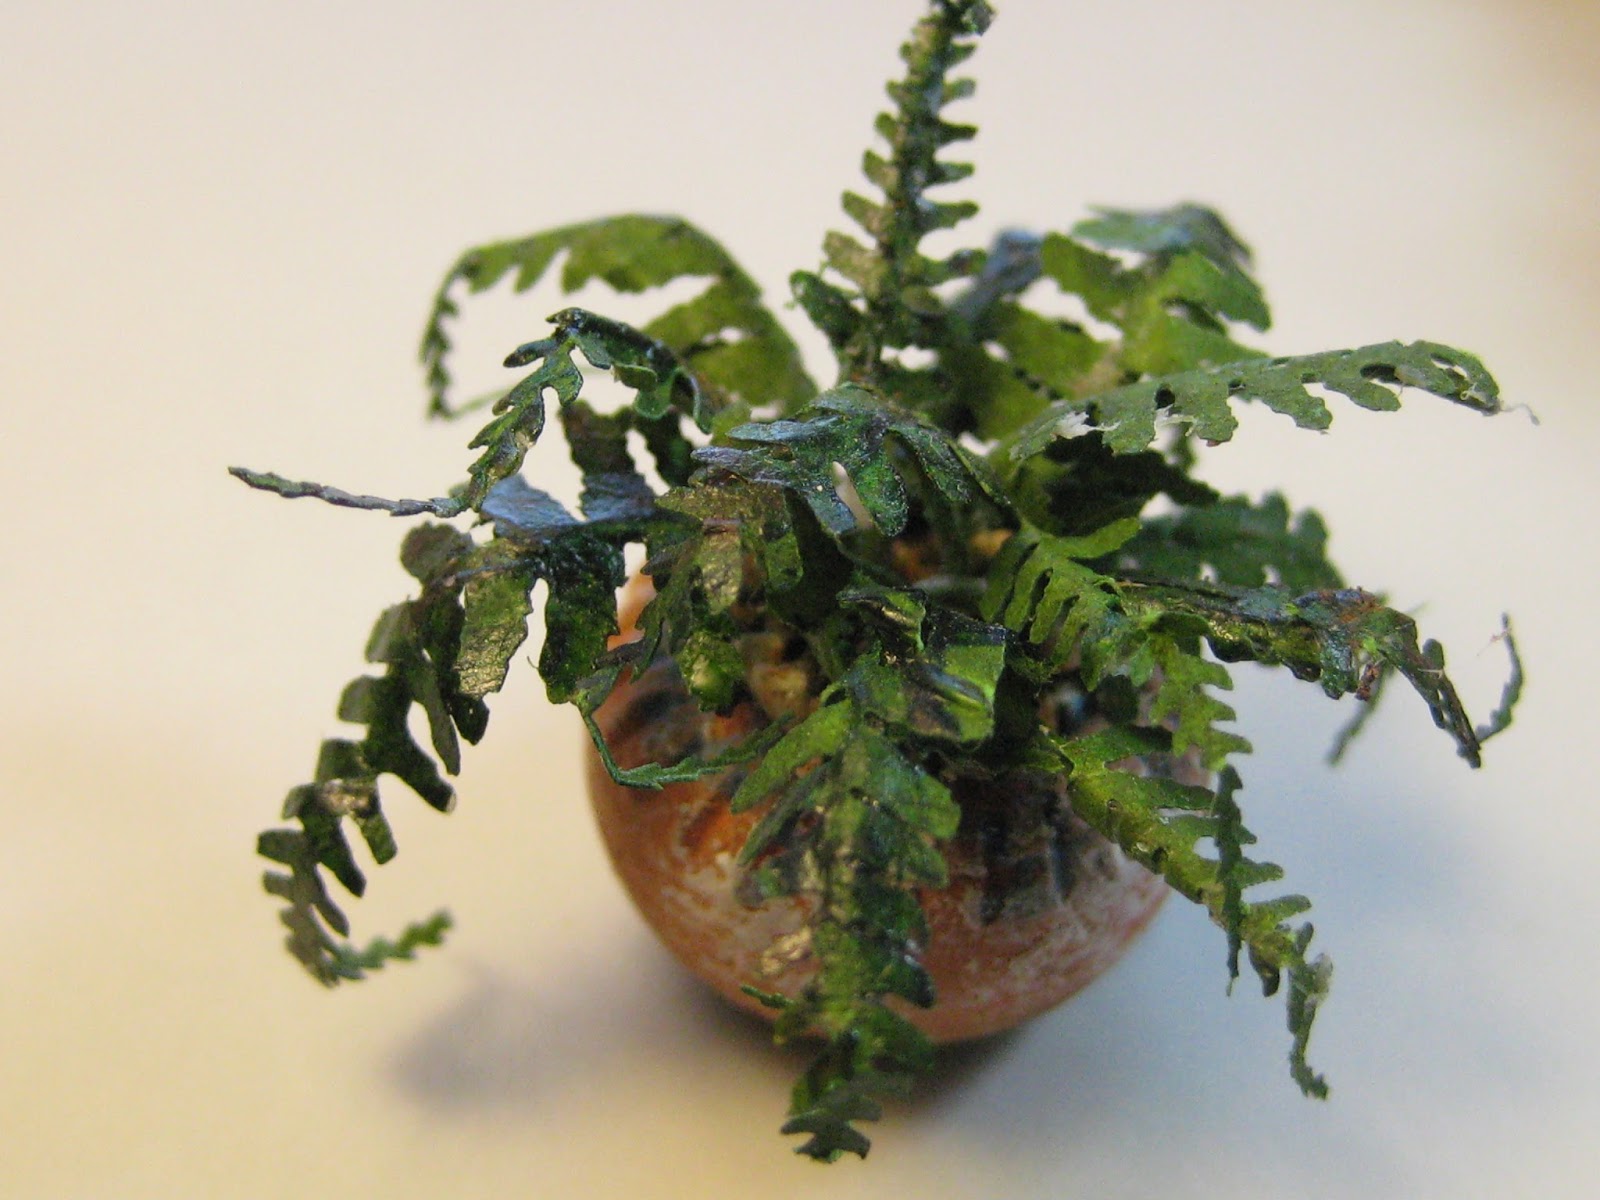 |
| The fern kit came from MELISSA'S MINIWERELD http://www.melissasminiwereld.nl/bloemen-en-planten-1-12.html I enjoyed constructing this delicate fern even though I mangled it somewhat through constantly changing my mind about which container it would finally occupy. |
 |
| In memory of my mother, I decided to try to make a nasturtium plant using circle paper punches for the leaves and crepe paper for the blossoms. Although I think that it looks close enough to a nasturtium, I am going to give it second try in an attempt to get a a more detailed blossom, and hopefully the next one will look better. The blue trailing plant was originally supposed to be a lobelia but the blossoms are too big. So now I'm calling it "a mystery plant" |
 |
| For the "mother-in-law's tongue/snake plant", I followed the video tutorial on JOANNE'S MINIS https://www.youtube.com/watch?v=ePzgTMgpes4 I used the twist ties just as Joanne instructed, but rather than cut out each leaf before painting, I found it easier to base paint the entire block of plastic ties first and then separate them, shape them and detail them. I'm quite pleased with the results! |
 |
| Having already made a whole bunch of roses last January, (none of which were the right color), I decided to make even MORE this time using orange oragami paper. My idea was to try my hand at making a rose tree to sit on the front balcony. I was able to use up all of the "homeless" rose leaf stems I had stockpiled, and managed to fill up the top of the tree in a believable way. If only the foliage on my Real Life roses looked this healthy! |
 |
| After I made the orange rose tree, I decided to make another shorter one and try and use up as many of the pink roses I'd made earlier this year. The photo below shows the base beginnings of the shorter rose tree. |
 |
The base is formed from dried lichen from railroad landscaping material hot glued onto a stem. For the support above I used a dried stick, but I used a paper covered wire for the orange topiary pictured below. |
 |
| A Group Shot. |
 |
| The wall planter and the tall rose tree positioned on the front balcony. |
(basil?)below started life as a micro hosta plant kit intended for model railroad landscaping.

 |
| The bottle of Chianti is a necklace bead, which was already covered with twine. I inserted a clear push-pin into the top, and painted it with green glass paint. I glued another bead to the top of the push-pin and painted it with brick red acrylic paint and sealed it with Revlon Matte nail varnish which dulled it down enough to look waxy. I glued on a flat spacer to the bottom of the bottle so that it would stand upright, then painted it to tie into the "straw". Now all that's missing is my glass Salute! :D |
LAMPS:
 |
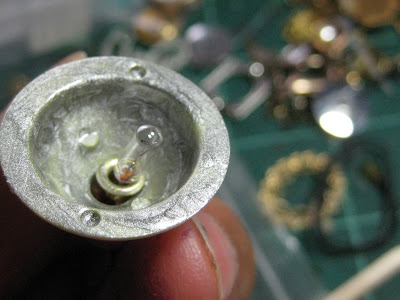
| I needed at least 3 matching exterior lamps for the outside of VILLA LEONE 2 for the front and 1 for the side, and as usual, everything that I LIKED on line, was way out of my budget. I had tried earlier in June to make some lamps but I didn't like the results and so I brooded and continued to scour the internet hoping to find something suitable which I could afford: I didn't- so I had to come up with a solution of how to make the 3 exterior lights myself. I started with the necklace bead that you see in the photo above. The necklace was purchased at the thrift store several years ago and I remember how excited I was because not only were the beads of various sizes but they also easily separated into 2 halves! |
 |
| I began searching through my bead boxes for additional materials to build up the shade to form the light fixture. Below are some of the components I used for it. |
 |
 |
| I glued the shade to a plastic bit from the hardware store, and then to a 3rd bead at the top of the shade. I used Quick Grip glue to attach each bead to the next. The toothpick was placed through the holes to keep them aligned and to keep the glue from clogging up the opening. |
 |
| I glued in a brass eyelet into the center of the shade. |

 |
| When the glue had set, I threaded a light bulb through the shade. In the photo below, later, I decided to paint the interior of the shade with silver nail polish and then I reinserted the light bulb. |

 |
| To make the frame I used a heavy gauge wire which I shaped over a dowel. Once that was done I inserted one end into the hole at the top of the shade and secured with a drop of Super Glue. |
 |
 |
| I wrapped the wires around the metal frame and squished a crimp bead under the wires and secured it with liquid Super Glue. |
 |
| To increase the size of the light bulb, I used the smaller portion of a gel capsule and after cutting a couple of half circles out of the top edge so that the heat could escape, I adhered it to the shade right over the light bulb. |

 |
| The base of the light fixture is composed of 2 bead caps glued together. Because of the imbalance of the light I needed to make sure that the wire frame would remain secure. I saw this GREAT TECHNIQUE on Christine Sutcliffe's blog: LAST ALLIANCE STUDIOS http://lastalliancestudios.blogspot.ca/2016/06/yet-more-mini-customs.html Christine makes custom model horses and their tack and she passed along her method of using liquid SUPER GLUE combined with BAKING SODA as a SUPER STRONG BONDING METHOD. I decided to give it a try. |

 |
| I insetted the wire frame into the base of the light fixture. I added a drop liquid( not gel) Super Glue and then while it was still wet, I sprinkled on some Baking Soda and then added one more drop of the liquid super glue and blew off the excess power. IT WORKED A TREAT! A solid bond that would take the weight without sagging. |

 |
| I painted over the entire unit with a bronze nail polish and left it to dry overnight. Later, I overpainted the lights with a variety of acrylic paints, and when they were dry, I tested them out to make sure that they still worked. |

 |
| I positioned them on the wall of the upper balcony and drilled a hole for the wires to pass through. I added another eyelet into the feed hole in the wall. The bases are currently held to the wall with blue tack. I needed to establish their location so that I can plan for the wiring once I start working on the inside of the house. As I was telling Janine on the phone today, I don't think that these fixtures are finished yet since they look to me to be a bit raw. Perhaps, if I leave them alone and focus on something else, the solution as how to finish them will eventually present itself. Meanwhile, I was able to construct the 3 exterior lamps that I needed for a fraction of the cost, by using up the materials I already had on hand! and I'm quite HAPPY ABOUT THAT! :D |
IRON:
 |
| I ordered these chipboard gates from ALPHA STAMPS http://www.alphastamps.com/Collage_Supplies-Die-Cut_Chipboard/c4_131/index.html?page=1 the kit contained 2 sets of gates both large and small. Eventually the large ones will be the gates for the garden entrance but the smaller pair were for the security bars on the main floor windows. |
 |
| I began by painting them black and then overpainted them with a textured acrylic paint. The gate on the left has the textured paint. When they were both done, I gave them a sealer coat of matte MOD PODGE and then a thin wash of a brown. They are the perfect width for the windows, however I eventually intend to have them attached to stand out from the frame. So these too, are still unfinished. |

 |
| This gives you an idea of the effect. I also added a carved motif to this section of the house, which matches the one above the front balcony. |
 |
| And finally the amendments to the front door, which I felt was not visually hefty enough to counterbalance the weight of the balcony. To fix this, I added strips of egg carton to frame out the door and glued on some addition wood trims to act as carved detail to the stone. |
 |
| There is now an additional 1/2 inch on either side of the original door frame which graduates down to the exterior wall. This was an easy fix with the most challenging aspect being in trying to match the new paint to the old. The end results are as seen below. |
 |
| Well, that's all for now. I hope that you enjoyed seeing the work in progress on Villa Leone, which has been frustrating yet fun. Unfortunately my Real life garden has been sacrificed for time spent on my miniature plants. *sigh* I kinda feel bad about that but it HAS been raining so I do have an excuse. Hopefully, I'll begin work on the inside of the villa next week, although I am still in the mood to make more plants for the balcony. Janine suggested a vining geranium which sounds like a good idea to me. I do believe that a plant spilling over the balcony between the balustrades would look quite appealing. hmmm... I wonder what the weather forecast is for the second week of July? More Rain!?! sweeeeeet :D |
 |
.jpg)


Dear Elizabeth, Everything looks terrific. I know you will keep working on those lights till they satisfy you completely! What a lot of new techniques you have found - there are so many generously-minded people in blog world that willingly share information.
ReplyDeleteThe window grills are lovely and yes, I can imagine them extended out from the windows.
You matched the "stone" surround very well around the front door. Flowers turned out well too. I do love your roses.
All is well here. The golden plums are ripening and I ate a couple today. The espalier apples and pears are Increasing in size. B away fly fishing with #2 son.
Thinking of you.
Janine
Hi Janine! Thank You my friend, for being my sounding board over the phone, it helped to vent and talk out my mini woes to you! :D
DeleteI am Very Glad that you like the look of things thus far. You are right in that those light fixtures are still of concern to me but I'm not going to rush it, as I have those vining geraniums which you've suggested crowding my mind. ;P
The rose trees turned out better than I'd anticipated and were made so that they would be visible over the balcony railing, I'm glad that you like the look of them, cause I do too!
But I am Amazed that your golden plums are already ripe enough to eat!!!?
While walking my dog the other day, I passed a plum tree with the fruit still hard and green and at least another 2 weeks before edible. You certainly have the Magic Touch when it comes to Real Life gardening Jainine, as well as one of the Prettiest cottage gardens that I have ever seen!
talk again soon
elizabeth
Я читаю ваше сообщение и любуюсь вашими фотографиями с большим удовольствием. Я всегда узнаю что-то новое и интересное. Ваши лампы удивительны! Вы большой мастер превращать пластмассу в старинный металл. Спасибо вам большое что поделились информацией. Сода плюс клей. Вау! Это надо обязательно использовать. Вы сделали так много прекрасных цветов. Цветы всегда оживляют и украшают дом. Вы замечательный художник, Элизабет! Каждый новый мазок вносит жизнь и яркость в ваше творение!
ReplyDeleteТатьяна
Hi Tatiana! I quite enjoyed making the light fixtures and I DO Love transforming one thing into another- much like an alchemist! ;P
DeleteI still have more work to do on the lamps, although I'm not yet sure yet what that will entail; I'll just have to wait and see.
The LIQUID SUPER GLUE + BAKING SODA was a REVELATION to me too! I had never heard of it before and Christine was kind enough to tell me and even though I've now done it a few time already, I continue to be Amazed at how strong a bond it produces! You are right in saying that it should be MANDATORY when using super glue to also use the baking soda, but it HAS TO BE THE LIQUID, because the gel doesn't work.
I am Delighted that you like the flowers and again, your observation in that they help to "brighten and decorate" the house, is spot on! I find flowers add life to a solid structure and even though the house is orange, it was feeling dull and lifeless to me until I added the flowers.
to it. Making paper flowers made me feel happy and gave me great pleasure as I was constructing each of the plants.
Thank You Very Much for enjoying them too, Tatiana. :D
elizabeth
Your flowers and plants are truly beautiful, thank you for the links.
ReplyDeleteI love the planter under the window,with the flowers it's a perfect addition to the window.
The iron grates are wonderful too. The outside of the house is fantastic, amazing work! Ciao
Geneviève
Hi Genevieve! I am very happy to pass on the links for the various kits that I used. The Temlplewood flower kits are a Terrific Value because of the number of plants you are able to make, not to mention their Fabulous foliage. The ivy leaves are also a 10 out of !0 because of the multitude of leaves and the graduating sizes that each leaf sheet has. The ivy paper has a really lovely texture too.
DeleteI actually started making the flowers for the window planter first and so I am rather fond of it, mainly because of the multitude of flowers that I was able to plant which serves to brighten up that side of the house. Flowers can transform their surroundings like nothing else can.
I think that I was blessed because the small iron grates turned out to be the perfect size for the dimensions of the windows ( and how often does that happen?) ;P
Thank You for enjoying this house, Genevieve! I often have my doubts about it. Trying to locate information about Venetian interiors has been challenging, so working on the exterior has been a lot easier. I Greatly Appreciate all of your encouraging words, and 'Ciao' to you too! :D
elizabeth
Buongiorno Donna Elisabetta,
ReplyDeleteBravissimo! I am just enchanted by everything you do. The geraniums are just wonderful! You did a fantastic job of them as well as the great rose trees. They look so incredibly lifelike. That's Bravo#1. The Chianti bottleis brilliant. I am always amazed at the miniatures you see in every day oblecj. That's Bravo#2. The outdoor lights are just perfect. They look realistic and are perfect for the setting. Bravo #3. By the way, thank you for sharing the super glue baking soda trick. The gates are fantastic and your finishes are absolute perfection. In your pictures there is no sign that that is not a real full size house. #4. And finalmente, the stonework is, as always, amazing. That's 5 Bravos my friend.
Big hug
Don Giacomo
Ah Don Giacomo, always such a Pleasure to visit with you my friend! :D
Delete5 Bravos make me blush Giac, but I Thank You Very Much for each one!
I had a great deal of fun putting the flower kits together so TEMPLEWOOD should take that bow as well as A LITTLE MORE IN MINIATURE and their Superb ivy kits! You know that a dish is only as good as the ingredients the chef uses; am I right Chef Giac? ;P
But about the Baking Soda/Super Glue technique- thanks to Christine for so generously sharing that with me. It saved the day as far as the lamps went. And even though I still managed to get super glue on my fingers, I went from hating the stuff to LOVING it and that's saying a Lot! :D
A BIG Hug Back, Donny G
elizabetta :D
As I've come to expect, you've come up with ingenious and money-saving methods to adorn your Villa! I love all the flowers, with detail in the painting that is amazing. The lights! The Chianti bottle blows my mind. And I love the gluing tip you have shared with us. Bravo, my friend!
ReplyDeleteHi Claudia! Thank You! :D I LOVE saving money not nearly as much as I LOVE spending it, and so if I could have found a way to justify splurging on the light fixtures I would have. But when I factored in the exchange rate, the shipping costs and the time spent waiting for the parcel to arrive, it seemed worth the effort to at least trying to make the lights myself. If I failed THEN I probably would have willingly surrendered the credit card!
DeleteThe Chianti bottle was an old project which I had placed in another scene. I happened to spot it, retrieved it then updated the bottle. It will sit on the patio table when I get working on that side of the house again.
I have to admit that Christine's glueing tip was worth it's weight in Gold! The things that you can learn from others, keeps this hobby fresh and interesting to the nth degree. At least it does for me.
Thanks for your lovely comment Claudia, Very Much Appreciated! :D
elizabeth
Dear Elizabeth...as always a new post on your blog is a joy to read, scour, learn from and save. Since I'm making a series of plants right now for my Victorian miniature house reading about your gorgeous plants was a delight...how beautiful they have all turned out and the colours are exquisite against Villa Leone's exterior. Love, love, love the miniature Chianti bottle...it's so realistic! You are more than generous to share the methods and resources used to create the marvellous results with the lighting, stonework and ironwork...I am ever so grateful, admire your creativity and find that reading your blog is an inspiration that does not fade. I love to reread each post and make notes for things to try in the future. I am heading out to my real life garden now but since rain is in the forecast this afternoon and evening the miniature paper plants will be calling my name! Thank you Elizabeth for your wonderful blog...all the best...Cheers, Alayne
ReplyDeleteHi Alayne! It has been raining off and on here today too! :)) My poor RL garden is so confused, is it summer or not?!?!?
DeleteMeanwhile, I have been looking jealously at photos of my friend Janine's garden which she keeps neat as a pin and is like a French Style Garden of Eden.....
Thank You Very Much for your comments Alayne. I am always happy to share the success or failure with what I do and how I do it and if it helps or inspires others - that's a good thing! It is hard to go wrong though when the flower kits are Good to begin with. I still have a few more kits which I would like to construct, but I need to make the vining geranium first and that one will be Free Style since I used up the others. Your Victorian Garden sounds REALLY LOVELY- I wish you had a blog so that we could see it! ( hint hint)
Like you, I collect ideas to try which I file away for the future too; but there is simply never enough time.
Have fun making your paper plants this evening and Many Thanks again, for your Thoughtful and Encouraging Comment! :D
elizabeth
I wonder now... If I would be doing a rain dance... maybe our rain here in Northern Germany would head over the Atlantic to give me a chance to care for my neglected garden and start the battle against the weeds while you would have once more the best excuse to continue working on more wonderful plants?! Hmmm... ;O) The ones you've done so far are once more stunning, I admire your colouring techniques... and especially your eye for detail. Using flower soft to create faded geranium blossoms is a great idea... and the result simply stunning. Speaking of stunning brings me to your homemade lamps. Let's all cheer "hooray" because the stores could not offer you matching lamps forcing you to create your own ones. Despite of the good and satisfying feeling of having done this by yourself at a minimum of costs there's on top the fact that they look awesome. And before I forget it - all your photos are brilliant and show your work very well... but I really enjoyed the picture of the open door frame. It looks like a real construction area when an old house is being renovated.
ReplyDeleteHugs
Birgit
When I read your comment Birgit, I was not only pleased that you have enjoyed the photos in general but in particular that one with the view to the chaos inside the front door. I was of 2 minds about publishing that shot but it seemed to me that it spoke of a major renovation taking place inside an historic old building. Nothing inside the opening was staged, it has looked like exactly that for the past few months. I do believe that we are both on the Same Page in enjoying that behind the scene picture;
DeleteAnd I Thank You Very Much for saying so! :D
elizabeth
Comme toujours, j'aime passer beaucoup de temps à contempler chaque photo de votre blog, tout se déguste ;-) Et merci pour les liens que vous partagez, beaucoup de choses très intéressantes à découvrir, merci Elizabeth.
ReplyDeleteI Thank You for enjoying the photos Jean-Claude and also for your Lovely comment, which I Appreciate Very Much! :D
Deleteelizabeth
Como siempre un trabajo impresionante.
ReplyDeleteLas plantas y lámparas geniales y la entrada de la casa me encanta con ese sabor antiguo.
Hi Eloisa! Yes it does indeed have that "old flavor" Thank You for saying so! :D I was looking at this dollhouse yesterday and wondering why I needed to make it look so Old and Ancient? I must have inherited my love of old objects, from my mother. Back in the day, old stuff was all I grew up with so I think that there must be a subconscious link between my childhood and my dollhouse miniatures! ;P
DeleteI am Delighted that you like the plants, and the lamps too. They were definitely- FUN projects!
elizabeth
I get so excited when I see a new blog from you. All the plants are fabulous, so realistic - the lamp and chianti bottle are just inspired! Thanks for your generosity in sharing tips and links.
ReplyDeleteThis is High Praise coming from you Robin, Thank You Very Much!!! :D
DeleteIf you could see my Real Life Garden though..... ugg. I'm going to have to stop playing hooky soon and get back out there! Your photos on your last blog of your "over-grown" garden has nothing on mine. YIKES!
Even so, I enjoyed making the mini plants a whole lot and hope to make some more before I have to quit and go back outside. I am Very Pleased that you have enjoyed the flowers, the links and the tips! :))
elizabeth
I am in love with this house....
ReplyDeleteGreat idea to use flower soft for the fading blooms, I have to remember that one.
Off to check out the super glue and baking soda trick.
Thank You Susanna!!! Sometimes I love the house and at other times I don't! Do you ever feel that way about any of your projects?
DeleteAt the moment, I am feeling positive about this villa because adding the flowers have made this house look more alive which makes me happy. As for the using the flower soft- that turned out to give the impression of dried out blossoms which was exactly the look I was hoping for; so that's another good reason to celebrate! :D
Good luck with the Super Glue and Baking Soda but Watch Out for your fingers! :O
elizabeth :D
Oh Elizabeth c'est un travail superbe !
ReplyDeleteLes fleurs semblent réelles,les lampes... Je ne trouve pas les mots pour décrire vos créations, si parfaites.
Merci pour les astuces et les miens. Bises. Joce
Thank You Joce for all of your Enthusiastic Compliments! :D It Really makes me happy that you have enjoyed the plants and the light fixtures.
DeleteTo be honest, I am relieved that the lights turned out as they did since I was making it up as I went along, but when the first one worked then constructing the other 2 went smoothly and quickly! It Pleases me greatly that you consider them a Success! :D
elizabeth
Hi Elizabeth! I truely love all the work you've done at Villa Leone, the plants are absolutely great and so life-like. Those lamps fit fantastic at this house, great work! What to say about the grates, another original specific part of this sort of houses, well done. But the trick with the baking soda was a true eye-opener for me ;)! I never heard of it, so THANK you so much for sharing!!
ReplyDeleteI'll open a bottle of chianti and say cheers, waiting for more fantastic work at your Villa Leone :D!
Hugs, Ilona
PS Here it's rainy too, so I guess a lot of people are having rain instead of a sunny summer ;)
Greetings Ilona! :D You must know that I consider YOU to be the Queen of the Mini Plants, so I am Very Grateful for your compliments regarding my flowers! :D
DeleteI'm still not finished with the lamps as I think that I might have to do something more to them later on, but I am glad that you like the direction of this villa so far.
The Baking Soda and the Super Glue was a combination which I had never heard of prior to seeing it on Christine's blog, but it dries as hard as a resin and I have used it several times already for bonding plastic, chipboard and metal and it works like a charm!
Have fun experimenting Ilona and Thank You again, for your Lovely comments!
elizabeth
They are beautiful, I love them!
ReplyDeleteBig hugs! :0)
Thank You Very Much for your Compliments, Monica! They were Challenging and Fun to do and I am glad that you enjoy them! :D
Deleteelizabeth
¡Qué maravilla de plantas! Un trabajo fabuloso. Me entusiasman los geraneos. Las rejas también queda muy bien. Creo que el aspecto de las lámparas encajan estupendamente.
ReplyDeleteHi Isabel! Your compliments are Greatly Appreciated since I have been a Big Fan of your mini Courtyard Garden AND the light fixtures which you too made from scratch, AND the Fabulous plants which you've constructed for your project. I've enjoyed Everything that you have done with your courtyard Isabel, and so it pleases me Greatly that you are enjoying what I've done with my Villa, too! :D
Deleteelizabeth
Dear Elizabeth, I know I have said it before, and I know I will say it again.... You are AMAZING!!! The lights are Incredible and so realistic looking... way better than anything "manufactured" and sold on the web!!! And you made it all so easily from all those assorted pieces you always find... but best of all... you know how to mix all the finishes to create such amazing effects!!! I am always in AWE of your work! And the plants you made are Gorgeous!!! I must try my hand at more of the kits I already own.... and test some of your brilliant adaptations! As for the stone and "iron" you have added..... they are just Perfect for this property! I think I will need to get some of those "iron" gates for my own project! :) The stone surround for the door is also Wonderful and you never would know it was egg-carton material! It all looks so real and so Fantastic! I want to come stay in that Villa!!! LOL! I am sorry your garden has been neglected... but your Venetian Villa has "blossomed" instead! I can't wait to see more!
ReplyDeleteThank You Betsy but I think that YOU are Amazing! I think that I said much the same things to YOU regarding your brickwork and the tree sculptures both inside and out on your Hardwick Hall, the tile floor in the Conservatory, and the ceiling painting in The Folly, the water effects in the Park, and the stonework and painted saints in your Castle.....etc. I am Always "In Awe" when I visit you! :D
DeleteBut I am truly Delighted that you like the lights Betsy!
Personally, I am really HAPPY that the plants turned out so well. Trying to soften the hard surfaces of the balcony proved to be trickier than I thought because most of the greenery lies hidden behind the stone, an event I hadn't really considered before, hence the rose topiaries to rise above it all.
If you are looking for inexpensive "IRON" though, check out Alpha Stamps because they have some easily affordable solutions as well as gold filigree paper, which can be rather difficult to find. :D
I like the spacing of the iron grates as it allows enough light to pass through into the house, so DO go check it out!
Meanwhile, the rain has started up Again which provides the Perfect excuse to start working on the next batch of geraniums;
It's Blossom Time! :D
elizabeth
Wow! Each wonderful piece combines for a thrilling treat for the eyes! Such fantastic detail, and brilliant creativity with "found" objects! You make the most amazing things from such ordinary stuff!!!
ReplyDeleteHi Jodi! :D Thank You Very Much for your Lovely comment!
DeleteI needed to start thinking outside the box again, especially when it came to making the lamps because I have" Found Objects" stacked up to the ceiling and it was Definitely time to use some of them up! :D
elizabeth
Your flowers and plants are simply gorgeous and so realistic! Villa Leone and all your wonderful details -Fabulous. I love your innovative creations---
ReplyDeleteHi Linda, and Thank You Very Much! :D
DeleteI LOVED making the flowers and trying to make them look realistic was certainly my objective! Some plants are easier to do than others but having quality flower kits to use was a Good head start! :D
I Really Appreciate your compliment regarding the details, because I LOVE creating details! :D
elizabeth
The plants look lovely. And I like the door. Greetings
ReplyDeleteThank You Very Much Aurora! Making the plants for me was Gratifying and the amending the door has finally Satisfied me. The door is now completely Done! :D
Deleteelizabeth
I always enjoy your posts, I learn something new every time. All your new additions look fantastic, but I'm particularly enchanted by the geraniums. What a fabulous paint job, they are uncannily realistic.
ReplyDeleteHi Keli! I am Happy that you have enjoyed this post; Thank You for saying so, and I'm always Pleased if I can pass on information that others might benefit by so Thanks for that too! :D
DeleteAs for the geraniums, the petals and the leaves of the kits are quite detailed to begin with. I bought white so that I could custom color them but even if I had left them plain, they would be impressive. Personally, I am Thrilled with the final results, orange geraniums are not something I've seen a lot of here in Western Canada and so when I researched them on the internet, I found many varieties boasting Strong, Vibrant colors from which to choose.
I'm Glad that that you Like them too! :D
elizabeth
Oh dear Elizabeth,
ReplyDeleteso precious work again. I love the flowers and plants...wow, so very well done. They look very realistic. If I wouldn't know that they are minis, I would ask you for the garden center you'd bought.
Hugs from Pipi 💝
What a Lovely compliment to have received about my plants; Thank You Pipi! :D
ReplyDeleteFortunately, the "Garden Center" is only a click away, so I hope that you will visit the links I've posted. And by the way, these mini plants are a whole lot healthier than my Real Ones! ;P
elizabeth
Dear Elisabeth your plants look so realistic, that one might think they need to be watered. It's good for you that they are made of paper. Otherwise you would have to look after different gardens 😉
ReplyDeleteThank you very much for the new tutorial. Every time I read your posts I learn so much 😊
Thank You Ersilia! I had lots of fun putting the plant kits together. Thankfully they don't have to be watered but if they did, then I would only have to put them outside my studio window and let the rain do that job! ;P
ReplyDeleteYou are most welcomed for the tutorial, Ersilia. FYI- I was learning through that entire process too! :D
elizabeth
My Mom would love this house. She's all about the orange. It's looking absolutely incredible. Thanks for passing on that tip about the super glue. Must try!!
ReplyDeleteLove & hugs♥,
Caroline
Thank You for your compliments Caroline! :D Painting this villa this orange color was because I saw that some of photos of homes in Venice were wearing it, however I find that the color itself is both energetic and optimistic. :))
DeleteAnd I am Extremely Grateful to Christine for so generously sharing her Super Glue method with me so I could then share it with you, but the best thing of all is that IT WORKS! :D
elizabeth
I always get such a craving to make mini plants whenever I see your ones, they always look so perfectly 'imperfect' if that makes any sense! I love the colour variation and how not all the flowers and leaves are identical; some are fresher than others - just like the real thing!
ReplyDeleteGreat idea using the twist ties for the snake plant, that's genius, and so very convincing too! I'll need to go on the hunt through my packaging stash now! lol
I'm glad the glue/baking soda method came in handy, it certainly worked a treat on those amazing lights! I think they look amazing, although perhaps they need a little more colour or contrast to complete them as they're all one colour right now. You'd never know they began life as beads though, its amazing what you can do with a few bits and bobs!
Hi Christine! :D
DeleteWhen I make plants I deliberately set out to make them 'PERFECTLY IMPERFECT" so reading your comment was Music to my ears, Thank You! :D
The Templewood kits are Great to begin with which makes their assembly a whole lot easier.
As for the Snake Plant, Joanne's Minis was an Easy tutorial which I highly recommend. I googled up an image that I could copy as I was painting the details which also served to show how the leaves grow.
The Baking Soda and Super Glue Method was a God-Send and I can't THANK YOU ENOUGH for being so willing to share it! I have NEVER enjoyed using Super Glue primarily because of the uncertainty of the bond, and the mess I make with it, but now I am A TRUE BELIEVER, and all because of you! :D
And you are right about the lamps being of one color in the photos. I had already amended them but the new photos wouldn't publish correctly in my blog so I had to remove those photos entirely. I think that the lamps still need work but the outline has been established so the rest can come later. It does feel good however, to be able to have made them myself by using up some of the beads that I have been saving in my stash for years, because if not now - then When? :D
elizabeth
Dear Elizabeth....the plants are plantastic! I love them all. And you have done so many of them. I can't believe how much you have accomplished on the exterior. It is great! I love how you have painted the "paper" gates into the textured wrought iron for the windows. The lighting couldn't be more appropriate and I'm sure you will tweak it as only you can at the right time. Everything is GREAT! I am as always astonished at how you manage to find just the right thing! I've been tinkering with the idea of doing the wine bottles with green marbles as a quick workshop for MCBC and here you are...found a bead already wrapped! Amazing! I can't wait to see more.
ReplyDeleteHi Fats!:D I am Very Happy that you like the plants, because I really enjoyed making them! I am always surprised though, at how many stems one has to make in order for the plants to looks believable; the leaves being by far, the most time consuming.
DeleteThe iron gates turned out to be the exact size needed for the two windows which turned out to be a bonus for me since I wasn't sure until after they'd arrived, if they would work.
And as for the Chianti bottle... if I remember correctly, I made this bottle well over a year ago, but it is only now that I've found a Proper Home for it. But that's what happens with our miniatures, because you don't always have a place right away for the things you make or collect do you Fats? However it is nice to be able to find something that has been stashed away which has been waiting for just the right time to be Rediscovered and finally Used!
elizabeth
That rain forecast is a mixed blessing though isn't it - it'll give you more days you can stay inside and work on your villa but it's also going to make your real garden grow and grow! Your mini plants are fantastic, so realistic. The lamp is a masterpiece, your ingenuity knows no bounds - have made a mental note of that super superglue and baking soda combo, never know when it might come in handy. Love the chianti bottle by the way :)
ReplyDeleteSo True Norma, a "mixed blessing" indeed! :D The Real life garden waits for no man( or woman for that matter) and so I end up with a bigger bite than I'm able to chew once I DO finally get outside to tend to it! :/ Thus I console myself by playing with paper flowers; a great consolation prize by the way! ;P
DeleteThank You for enjoying them and also you are most welcomed to Christine's Super Glue/ Baking Soda combo. Once you've tried it though, there is no going back to using Super Glue alone- I've now been spoilt by this new technique forever!
elizabeth
what a beautiful house
ReplyDeletei love very much your plants
lamps and iron are so successful, what a good work
Hello Claude! :D Thank You for enjoying this house and the compliments you've paid to it! It may be OLD but it is still standing! hahhaha
DeleteAnd thank you for your comments regarding the plants, iron and the lamps- I regard them as successful too! :D
elizabeth
Hello, Elizabeth - I've been reading and re-reading and looking and looking again at your blog post; you've done so many amazing things that I can't take everything in at one time! All the plants that you made are simply beautiful and so life-like that it's hard to believe that not only are they not real, but that they're miniatures. Of course, I've already told you that you're the Master Stoneworker, and your new stone additions prove it once again. The egg-carton stone door frame is exactly right. I know that you think the exterior lamps seem unfinished - but I think that you shouldn't mess with perfection. I love those lamps and the fact that once again you've created something wonderful out of nothing. I truly do not know how you do that! And speaking of Something from Nothing, out of all your practically unbelievable creations, I must say that your Chianti bottle is the most superb creation of all. Your inventiveness just boggles my mind! Villa Leone gets better and better, and I can't wait to see more.
ReplyDeleteMarjorie
Hello Marjorie! Your words mean a Great Deal to me Marjorie and I Thank You for every one! :D
DeleteEach thing that I've done however, took many tries before I was finally satisfied so please don't think that I just do it and it is done! For every success their are countless behind the scene failures. Nevertheless, making the plants was a breeze once I got up the courage to put the kits together. Templewood is such a good line because they give you LOTS of plant materials in each kit and the paper is preprinted, it's thin, and it's very easy to assemble.
The stonework around the door proved to be easier than I had anticipated because it just needed long strips to beef up the door, but I'd looked at the door a long time before it occurred to me how to make it look more substantial.
I am Delighted that you like the lamps Marjorie. I can't tell you what a RELIEF it is to have finally figured those out! Miniature lighting can be so expensive and when the budget won't allow it, it's maddening!
However, the Chianti bottle was simply finding the right bead at the right time! It is funny though, I almost didn't bother showing it, and it has become the "Star" of this posting- goes to show that you just never know.... :D
elizabeth
Bonjour Elizabeth.Everything is so beautiful, the plants, and the way you worked iron is gorgeous. It is true enchantment.Claire
ReplyDeleteHello Claire! Thank You Very Much for liking the plants and for your comment regarding the iron! It gives me Great Pleasure that you are enjoying my work! :D
ReplyDeleteelizabeth
Everything looks amazing and perfect. The plants are so realistic. I love the Chianti flask of wine.
ReplyDeleteHi Faby! :D Thank You for your comment and for your compliments! The little bottle of Chianti is I believe, the Most Popular item in this blog post probably because nearly everyone remembers having these bottles stuffed with candles in the top back in college days or when they had their first flat or apartment. Chianti bottles and cinder block shelf units were all the rage back in the 70's!
Deleteelizabeth
How wonderful this all is - so inspiring! I have just begun my miniature journey with mum (80yrs) and I (45yrs) so I really appreciate all the time you put into your posts. Now I have bed time reading looking back thru your lovely blog. Nasturtiums are my favorite flower too!
ReplyDeleteThank You Poppy! :D
ReplyDeleteI enjoy both the crafting aspect of miniatures as well as blogging about them. I try to insert the highs and lows of my personal journey and hope that my experiences will be of some value to my readers, and I am Very Pleased to know that you are enjoying reading about them! :))
Being able to share your journey with your mother is Time Well Spent, and it is "funny" that a fascination with the "little things" is something that almost everyone is drawn to in some form or another, and one of the reasons that this hobby appeals to so many is that you are never too young or too old for it!
Nasturtiums remind me of my mother from when I was very young. She would just toss the seeds into the garden and let them do their own thing. They grew like crazy without any effort on her part. Not so with me. I have had to nurture my plants every step of the way!!!
Welcome to my blog Poppy and once again, THANK YOU! :D
elizabeth
Yet another most enjoyable post Elizabeth. I DO enjoy reading them (and then I read them again) because there's always something to learn from them. Love the flowers (I need a nudge to start mine) and the gates are a marvellous find. Thanks for that link, it was a great site to poke around in and one I'd not seen before. The lamps are marvellous and perfect in style for the Villa. I'm really enjoying this project of yours.
ReplyDeleteHi Irene! I am glad that you've found the link to ALPHA STAMPS useful! There are a lot of interesting items in their catalog as you've already seen. I think that scap-booking supplies have done a whole lot to help our miniature hobby blossom by virtue of the fact that so many of their materials are quite useful for our miniatures.
ReplyDeleteThanks Very Much for enjoying the lamps and the plants and I know that you will have loads of Fun making yours. I have to add this; that once I finally got started it was hard not to keep going! :D
elizabeth
I have been terribly busy at work and after that I went on holiday in Croatia. I visited several old towns over there. When I look at the pictures of your work in your latest posts, it's almost incredible to see how you have captured the feeling of being there. I felt like I was somehow back on holiday again :-)
ReplyDeleteThanks for sharing your lovely work. Besides that I always learn a lot from your posts.
Hi Tessa! It's great to see you again!:D
DeleteThanks for your Lovely comment regarding my villa. As I scour the internet for information regarding Venice and other parts of Italy, I've found that if I hadn't already committed myself to this area that my house could quite easily be re-located almost anywhere in that country, but it doesn't surprise me that Croatia would also be a possibility because that is also along the Adriatic coastline in close proximity to Venice. I do believe the the Venetians were quick to absorb much of the various cultures along their trade routes and bring them home with them and that would include building styles and ornamentation. :D
you see, I am learning a lot too! ;P
elizabeth
Elizabeth,
ReplyDeleteI love the plants and the lights (Im still scared to use electricity but watching you via the blog makes it not so scarey * I was one of those kids who put a paper clip in the electrical socket and got shocked...hence the fear of all things electric* ) I should be coming back to blogging soon I now have a job during the day. enough about me have you figured out what to do about the inside of the house? I'll be watching *but not in a stalker way*
Hugs
Marisa
Hi Marisa! Thank You and Welcome back to Blogland!!! It is WONDERFUL to see that you are out and about and visiting once again! :D
DeleteI can certainly understand you hesitation and fear of electrics especially if you have had such a Frighting experience as a child! Personally, I am not entirely comfortable around electricity either, but the 12 volt systems which are used to transfer the power into low and acceptable 12 volt current for use in a doll's house is very Safe and quite Easy to use. The headaches usually arise when an established connection somehow become loose, which is where you can quickly learn to really HATE it! AARRGGG!!! ><
Thankfully though there are now LOTS of streamlined LED SYSTEMS that can light your dollhouse or roombox (no muss no fuss) using only a tiny battery pack, which should alleviate any fears you may still be holding onto.
Meanwhile-
I am currently awaiting the arrival of the stove for my dollhouse kitchen which should hopefully get me motivated to figuring out what to do next about the inside of my Villa.
elizabeth
Dear Elizabeth, I'm so glad I see your new minis, I love them all!!
ReplyDeleteThis "old" house looks fantastic. I admire all plants!! warm hugs! Magda
Hi Magda! You are right, this IS an "old" house and it is proving to be quite a challenge for me- far more than I had anticipated to tell you the truth.
DeleteMaking the plants have made me feel more optimistic about it for the moment, although currently I am riding the roller coaster of now I'm happy with it/ now I'm not.
But Thank You Very Much for all of your encouraging words! :D
elizabeth
Your paintbrush is actually a magic wand - such transformations - wonderful talent and imagination - a joy to follow your work every time. Thank you so much for taking time to share it with others. Marilyn
ReplyDeleteHi Marilyn! I DO enjoy transforming things and everything connected with this project has had to undergo some sort of refurbishment in order for it to fit in with the theme. But trying to find information regarding the interiors of Venetian homes is more difficult than what I thought it would be therefore I am doing whatever I can on the exterior as I continue to collect data for the interior.
DeleteI am Very Glad that you like the results thus far though; Thank You! :D
elizabeth
Love, love, love the black lamps! They are so very "modern farmhouse meets industrial". :) The roses are so gorgeous! Love the intense orange; the pop of color looks fantastic against all the aged architecture.
ReplyDeleteThank You VERY Much for your many compliments regarding the lamps and the flowers Lindsey! :D
ReplyDeleteI feel grateful to God, that a solution for the second floor exterior light fixtures presented itself, because I am now able to use those "savings" towards the purchase of something else.
The vibrant colors of the flowers cheers me up every time I look at them so I know that they will be just as effective when "the lady of the house" finally gets an opportunity to enjoy them too! AND you're RIGHT- The contrast between the old building and the new plant life was EXactly the effect I was aiming for! :D
elizabeth
Hi Elizabeth,
ReplyDeleteOh my! You've been working on your dollhouse! I love seeing your progress and you've made so many things! Amazing! The colors of the plants really brings energy to your dollhouse now. Fantastic job!
Thank You Pei Li! :D I had a whole lot of enjoyment making these flowers and consider it practice for when I get around to constructing the garden for this villa. This was just a little foretaste, however I agree with you that the effect of the colors on the house (as well as on me) "brings energy to the dollhouse". :))
ReplyDeleteelizabeth
Oooh aaaah, awesome flowers, lamps, grilles and stone, I love everything you do and I just don't know where all the ideas come from, fantastic!
ReplyDeleteHi Margaret! Thank you for your compliments and for your vote of confidence.
ReplyDeleteI have found that this project is one of the MOST CHALLENGING because of a lack of available research materials, so my ideas are very slow in coming. As I search for the various pieces to this Venetian puzzle, I've had to find smaller projects to fill the gaps with, as I wait for more ideas to float to the surface. :))
elizabeth
Love everything you have been up to! Your flowers are beautiful. :)
ReplyDeleteThank You Auralea! Making the flowers not only gave me a whole lot of pleasure and satisfaction but they also helped to spruce up the exterior of this faded Villa!
DeleteGlad that you are liking the final results. :D
elizabeth